You are evaluating displays, and every spec sheet lists a “native resolution.” This term seems technical and is easy to gloss over. However, ignoring it can lead to poor image quality and diagnostic uncertainty.
Native resolution is the absolute number of physical pixels built into a display panel, like the 3840×2160 pixels in a 4K screen. It is the single [resolution](https://reshinmonitors.com/native-resolution-medical-displays-3/ “resolution”) where the monitor displays an image with perfect pixel mapping, ensuring maximum sharpness.
![]()
In my experience building and designing medical displays, I have seen how technical specifications can sometimes create confusion rather than clarity. The term “native resolution1” is one of the most critical, yet frequently misunderstood, of these specifications. It is not just another number on a data sheet; it is the foundational characteristic that dictates a display’s ability to render an image with absolute fidelity. An image can only be truly clear when it is displayed without any digital manipulation or guesswork. Understanding this concept is the first step toward appreciating why specialized medical monitors2 are essential for accurate diagnosis. In this article, I will explain what native resolution is, why it is so vital for medical imaging3, and what happens when you stray from it.
How is native resolution defined in the context of displays?
The term “resolution” is used so often that its true meaning can get lost. You might think it is a flexible setting, but for a physical display, it is a fixed, unchangeable attribute.
Native resolution is the display’s fixed physical pixel count, arranged in a grid of rows and columns (e.g., 1920×1080). It is the only resolution where one source pixel maps directly to one screen pixel, creating the sharpest possible image.
![]()
I think the easiest way to understand native resolution4 is to picture a mosaic made of a fixed number of tiles. You can project a small or large picture onto the mosaic, but you cannot change the number of tiles it has. A display panel is just like that mosaic. It is constructed with a precise, physical grid of pixels. For example, a 2-megapixel (2MP) display5 has roughly two million of these tiny light-emitting elements. The native resolution defines this physical structure, such as 1920 pixels horizontally by 1200 pixels vertically. This is different from the “supported resolutions” a monitor might list. A monitor’s internal electronics can accept signals of various resolutions, but it must always convert them to fit its fixed physical grid. Only when the incoming signal’s resolution exactly matches the native pixel grid can the display achieve a perfect, one-to-one mapping. Every other scenario requires a compromise. Our MD26GA – 2MP Diagnostic Monitor has a native resolution of 1920×1200, which is designed to match common outputs from imaging systems, ensuring that images are shown with perfect clarity and without any digital scaling.
Why is native resolution crucial for medical imaging accuracy?
You assume a high-resolution [medical image](https://reshinmonitors.com/how-to-verify-11-pixel-mapping-on-diagnostic-monitors/ “medical image”) will look sharp on any high-resolution screen. However, a mismatch between the image and the display’s native resolution can introduce subtle flaws that compromise your diagnosis.
Native resolution is crucial because it ensures a pixel-perfect representation of the original medical image. This one-to-one mapping preserves the finest details, like microcalcifications or faint nodules, which is essential for confident and accurate diagnosis.

Medical images from sources like CT, MRI, or mammography are not just pictures; they are precise matrices of data. Each pixel in the image file has a specific value that corresponds to a specific measurement, like tissue density. To make an accurate diagnosis, a clinician must be able to see this data exactly as it was captured. This is where native resolution6 becomes non-negotiable. When the display’s native resolution matches the resolution of the image matrix, it creates a perfect one-to-one correspondence. One data pixel from the CT scanner is rendered by exactly one physical pixel on the display. This direct mapping maintains the integrity of the image. There is no interpolation, no approximation, and no data loss. I cannot overstate how important this is for finding subtle pathologies. For example, in mammography, detecting tiny, clustered microcalcifications7 is key to early breast cancer diagnosis. If the display is not showing the image at its native resolution, these critical details can be blurred or distorted, potentially delaying a diagnosis. This is why our MD52G – 5MP Grayscale Mammography Monitor features a native resolution of 2048×2560, specifically to match the data-rich output of digital mammography systems.
| Modality | Common Image Matrix Size | Recommended Native Resolution |
|---|---|---|
| CT / MRI | 512 x 512 | 1MP / 2MP |
| CR / DR | 2048 x 2048 (approx.) | 3MP |
| Digital Mammography | 2048 x 2560 (approx.) | 5MP |
| Surgical Endoscopy / PACS | 3840 x 2160 | 8MP (4K) |
What happens when images are displayed at non-native resolutions?
Your new display “supports” many resolutions, but images sometimes look soft or “off.” This visual softness is not just a minor annoyance; it is a symptom of data being lost through a process called scaling.
When an image is displayed at a non-native resolution, the monitor’s processor must perform “scaling.” This process of either inventing or discarding pixels introduces artifacts like blurriness, jagged edges (aliasing), or moiré patterns, which degrade diagnostic image quality.
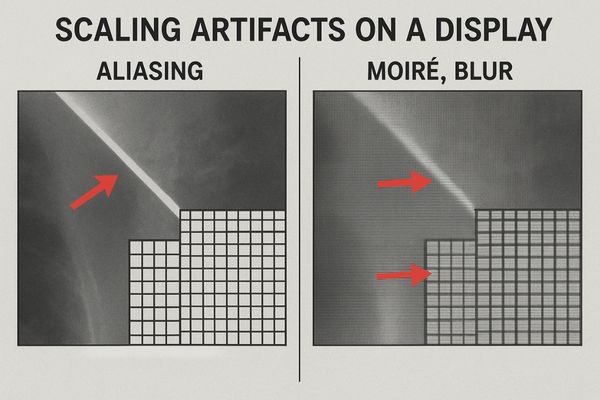
When the resolution of the image source does not match the native resolution8 of the display, the monitor’s internal electronics must intervene. This process, called scaling or interpolation9, is essentially the monitor making its best guess to fill its physical pixel grid. If you display a lower-resolution image on a higher-resolution screen (upscaling), the monitor has to invent new pixels to fill in the gaps. It averages the values of adjacent pixels, which almost always results in a softer, less sharp image. Conversely, if you display a higher-resolution image on a lower-resolution screen (downscaling), the monitor must discard pixel information because there is not enough physical space. It averages multiple source pixels into a single screen pixel, which can completely erase fine details. In either case, the image is no longer a pure representation of the source data. This process can introduce visible artifacts that are highly problematic in a medical context. In surgery, for instance, a surgeon relies on a crystal-clear view. Our MS275P – 27″ 4K Surgical Monitor10 has a native 4K resolution. When connected to a 4K endoscope, it provides a one-to-one pixel view, ensuring that the texture of tissue is rendered without any scaling-induced blur that could obscure a bleed or a subtle abnormality.
How does native resolution impact grayscale and DICOM compliance?
You have invested in a DICOM-calibrated monitor to ensure consistent images. Yet, if the display is not running at its native resolution, you may not be getting the compliance you paid for.
Since DICOM calibration maps specific grayscale values to each pixel at the native resolution, any scaling disrupts this precise relationship. This alteration of pixel values invalidates the calibration, potentially masking or creating false grayscale details and compromising diagnostic reliability.
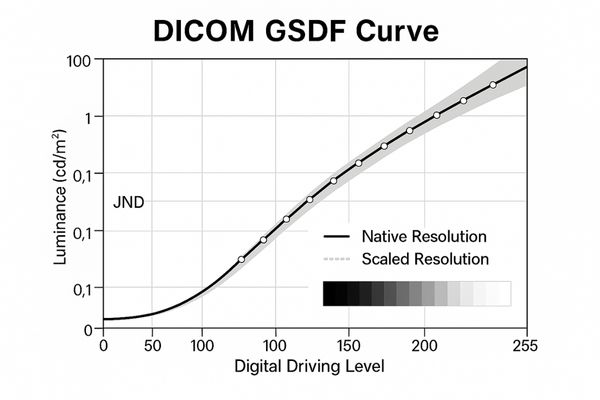
The DICOM Part 14 Grayscale Standard Display Function (GSDF)11 is a critical standard in medical imaging. It ensures that images look perceptually similar across different displays. My team and I implement this by carefully calibrating each monitor at the factory. This process creates a lookup table that maps every possible digital value in an image to a specific luminance level that a single pixel should produce. This calibration is performed and validated at the display’s native resolution. It assumes a perfect, one-to-one relationship between the source pixel data and the physical pixels on the screen. When you use a non-native resolution12, the scaling engine changes the pixel values before they are sent through the DICOM lookup table. For example, the scaler might average two different pixel values to create a new one. This new, artificial pixel value will then be mapped to a luminance level that was never intended by the original image data. The result is a broken DICOM curve. Subtle but diagnostically important grayscale differences can be lost. Therefore, maintaining the native resolution is a prerequisite for true DICOM compliance13. Our MD33G – 3MP Grayscale Diagnostic Monitor is calibrated at its native 2048×1536 resolution, and only at this setting can a user be confident they are seeing a truly DICOM-compliant image.
| Image Quality Factor | Displayed at Native Resolution | Displayed at Non-Native Resolution (Scaled) |
|---|---|---|
| Sharpness | Maximum sharpness, pixel-perfect detail. | Image appears soft or blurry. |
| Data Integrity | 1-to-1 mapping, no data loss. | Data is invented (upscaling) or discarded (downscaling). |
| Grayscale/DICOM | Calibration is accurate and reliable. | Calibration is compromised; grayscale is inaccurate. |
| Artifacts | No digital artifacts. | Potential for aliasing, moiré patterns, and noise. |
How does Reshin optimize native resolution across its medical displays?
Finding a display with a native resolution that perfectly matches your imaging equipment can be difficult. A mismatch forces you to accept the compromises of scaling, which undermines the quality of your diagnostic tools.
We design our medical displays by first analyzing the output of specific imaging modalities. We then select panels with matching native resolutions (e.g., 5MP for mammography, 8MP for endoscopy) to ensure a direct, uncompromised signal path from source to screen.
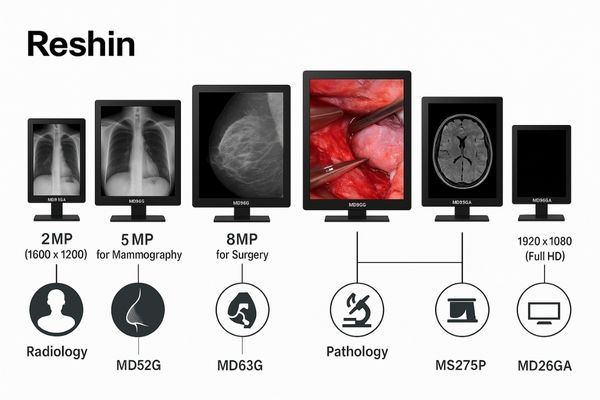
As a specialist manufacturer, I believe our most important job is to eliminate variables for the clinician. We achieve this by building our displays around the principle of native resolution purity14. Our design process does not begin with a generic display panel. It begins with the medical device it will be paired with. We analyze the exact image matrix sizes produced by leading CT scanners, mammography units, and endoscopic cameras. Then, we source and integrate display panels whose native pixel grids are a direct match for that output. For example, our 4K surgical monitors are not just general-purpose 4K screens; they are engineered for the specific signal characteristics of a 4K camera head. The internal electronics and image processing pathways in our monitors are optimized to pass the signal through with minimal alteration when running at native resolution. We call this a “glass pipeline” approach. The goal is for the display to be a perfectly clear window to the original image data. Our MS321PB – 32″ 4K Surgical Monitor, with its native 3840×2160 resolution, is a prime example. It is built to give surgeons an unscaled, crystal-clear view of the operative field, preserving every detail for critical procedures.
Conclusion
Native resolution is not just a technical detail; it is the basis of image clarity. Using a display at its native resolution guarantees a true, pixel-perfect image, which is fundamental for diagnostic confidence. For medical displays delivering pixel-perfect clarity at native resolution, contact Reshin at martin@reshinmonitors.com.
-
Understanding native resolution is crucial for anyone involved in medical imaging, as it directly impacts image clarity and diagnostic accuracy. ↩
-
Exploring the importance of specialized medical monitors can enhance your knowledge of their role in ensuring precise medical imaging and diagnosis. ↩
-
Delving into medical imaging technology will provide insights into its complexities and the significance of specifications like native resolution. ↩
-
Understanding native resolution is crucial for optimizing display quality and ensuring clarity in images. Explore this link to learn more. ↩
-
Discover the advantages of 2MP displays, including clarity and detail, which are essential for diagnostic monitors and imaging systems. ↩
-
Understanding native resolution is crucial for accurate medical diagnoses, especially in imaging technologies like CT and MRI. ↩
-
Learning about microcalcifications can enhance your knowledge of early breast cancer detection and the importance of precise imaging. ↩
-
Exploring native resolution helps you understand the importance of display quality and how it impacts image clarity. ↩
-
Understanding scaling or interpolation is crucial for grasping how image quality is affected on different displays. ↩
-
Discover the advantages of 4K Surgical Monitors for precise medical imaging, crucial for successful surgeries. ↩
-
Understanding GSDF is essential for ensuring accurate medical imaging and compliance with standards. Explore this link to deepen your knowledge. ↩
-
Native resolution is crucial for accurate image representation. Learn more about its significance in medical imaging by exploring this resource. ↩
-
DICOM compliance ensures that medical images are standardized and reliable. Discover more about its importance in healthcare imaging. ↩
-
Understanding native resolution purity is crucial for clinicians to ensure optimal image quality in medical displays, enhancing diagnostic accuracy. ↩