Using a generic monitor for CT and MRI review can obscure subtle soft-tissue gradients, compromising the diagnostic confidence of any 3MP medical display. This introduces inconsistency between reading sessions, posing a significant clinical risk for what should be a reliable CT monitor or MRI diagnostic screen.
Below, we focus on the pillars that actually determine CT/MRI confidence and which models deliver.
Entry Criteria: Diagnostic-grade 3MP displays for CT/MRI reading (not clinical review grade), ranked primarily on long-term stability, uniformity, and DICOM GSDF quality control.
Top 5 · 2025 Picks (3MP for CT/MRI)
| Rank | Brand | Model | One-line Rationale |
|---|---|---|---|
| 1 | Reshin | [MD33G](#) | Grayscale-centric for the most stable soft-tissue gradient review. |
| 2 | Reshin | [MD32C](#) | Color/mono capable, ideal for radiologists with mixed worklists. |
| 3 | EIZO | RadiForce RX370 | Versatile 3MP color display with proven calibration for PACS. |
| 4 | Barco | Nio Color 3MP (MDNC-3321) | Reliable CT/MRI standard featuring front-sensor automated QA. |
| 5 | Jusha | M350 | A dedicated 3MP grayscale display covering CT, MR, and DR use cases. |
- MD33G: A long-term stable choice for grayscale-priority reading seats.
- MD32C: Color/mono capable, perfectly suited for mixed-task worklists.
- RX370: A versatile 3MP color diagnostic monitor for general PACS use.
- MDNC-3321: Features automated quality assurance with a front sensor.
- M350: A dedicated 3MP grayscale display for CT, MR, and DR.

When selecting a 3MP radiology monitor1 for computed tomography (CT) and magnetic resonance imaging (MRI), the goal is not simply to find the highest peak brightness or contrast ratio. The most critical requirement is unwavering consistency. A radiologist must be able to trust that subtle density variations will be rendered identically across different workstations. This guide deconstructs what makes a 3MP display exceptional by focusing on image fidelity2, ergonomics, and seamless PACS integration.
What “Top 5” means for a 3MP radiology monitor in CT & MRI rooms
Defining "top" purely by peak brightness or contrast is a common pitfall. These specifications often fail to translate into better diagnostic outcomes in real-world clinical practice.
For CT and MRI reading, ‘Top 5’ status is earned through task-fit. It’s about the ideal balance of DICOM GSDF compliance, sustained luminance, and tight uniformity that ensures tissue gradients look identical across all rooms and shifts.
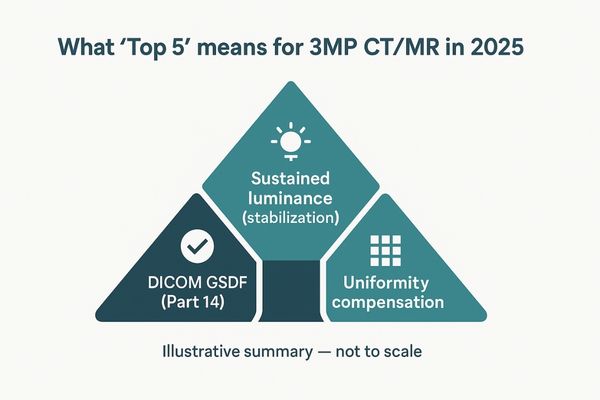
Our ranking methodology prioritizes consistent performance over peak specs. The best 3MP medical display for CT and MRI interpretation is one that a radiologist can trust implicitly over the long term. This trust is built on stability. The core evaluation criteria are therefore centered on performance that persists over time. This includes strict adherence to the DICOM GSDF (Grayscale Standard Display Function)3, active luminance stabilization4, and superior uniformity compensation. A model like the MD33G is designed with this philosophy in mind, focusing on the stability needed for grayscale-centric review. Any monitor that cannot deliver this trifecta of sustained, uniform, and compliant performance is not a true diagnostic tool.
Image fidelity first: DICOM Part 14, sustained luminance, and uniformity
A 3MP medical display that is brilliant on day one but drifts out of compliance is a clinical liability. Without stable performance, diagnostic confidence erodes with every reading session.
Image fidelity is a non-negotiable foundation. It is achieved through strict DICOM GSDF compliance for accurate perception, sustained luminance for long-term consistency, and uniformity compensation for location-agnostic diagnosis.
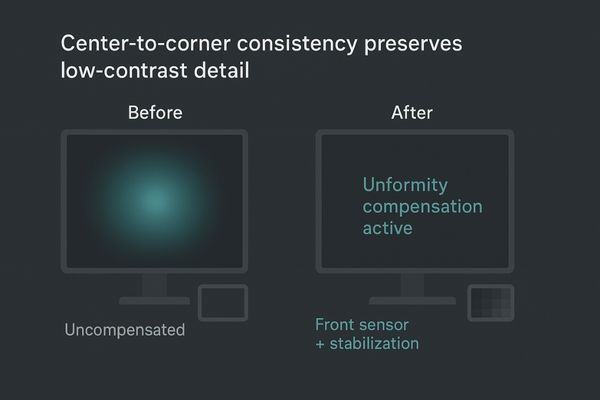
The primary job of a 3MP radiology monitor is to present a truthful representation of the image data. This starts with factory calibration to the DICOM Part 14 GSDF standard5. However, true fidelity is maintained over thousands of hours through active technologies. A luminance stabilization circuit6 with a built-in front sensor constantly adjusts the backlight, ensuring brightness remains stable. Equally important is uniformity compensation. The consistency of grayscale and brightness between the center and corners of the screen directly impacts the visibility of low-contrast lesions in different locations. This is a quiet deal-breaker for CT and MRI review where subtle gradients are everything. This focus on sustained, uniform performance guarantees that diagnostic decisions are based on patient data, not display artifacts.
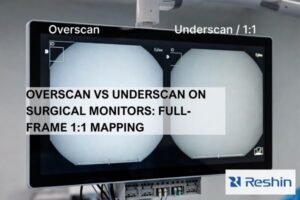
3MP sweet spot for CT/MRI: pixel density, bit-depth, and grayscale steps
Relying on resolution alone is a mistake. A high-resolution 3MP display with poor grayscale processing can still produce artifacts that obscure critical details in CT and MRI studies.
The 3MP format hits a sweet spot for CT/MRI. Its pixel density is well-matched to the source data, while a high-bit-depth pipeline ensures smooth grayscale steps, preserving low-contrast tissue detail.
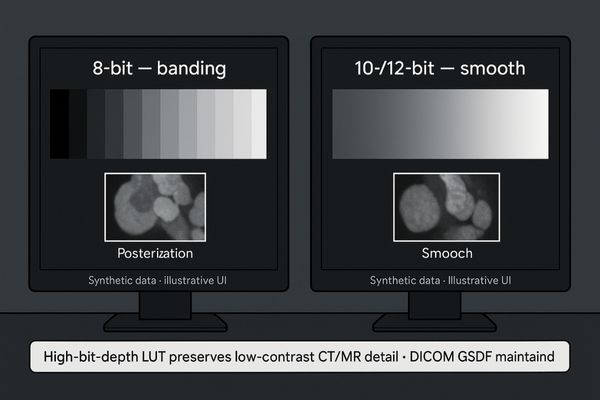
A 3-megapixel monitor (2048×1536) is perfectly suited for displaying the common 512×512 matrix of CT and MRI slices. In common dual- or quad-image layouts, a 3MP display maintains a near 1:1 pixel mapping, preserving image sharpness. However, its true advantage comes from the processing behind those pixels. A high-quality diagnostic monitor like the MD32C utilizes a 10-bit or 12-bit internal look-up table (LUT)7. This allows it to render over 1,024 shades of gray8, far exceeding the 256 of a standard 8-bit panel and avoiding "banding" artifacts. Low-contrast confidence is driven by bit depth; resolution alone cannot rescue a "steppy" LUT.
| Source Matrix | View Layout | Fit on 3MP (2048×1536) |
|---|---|---|
| 512×512 | 2×2 (Quad) | Fits perfectly (1024×1024 space) |
| 512×512 | 1×2 (Dual) | Fits perfectly side-by-side |
| 768×768 | 1×2 (Dual) | Fits perfectly side-by-side (1536×768 space) |
Conclusion: In common 2×2 or 1×2 layouts, a 3MP monitor maintains near 1:1 pixel mapping and smooth grayscale, making it the "sweet spot" for CT/MRI efficiency and quality.
Reading-room ergonomics that actually matter for CT/MRI
When choosing a CT monitor, chasing the largest possible screen size is often counterproductive. An ill-fitting monitor can cause significant physical strain, reducing radiologist productivity and increasing burnout risk.
Ergonomics is about task-fit, not inches. Key factors include glare control, easy OSD access, sensible default luminance, and a size that supports efficient dual-head portrait or mixed layouts.
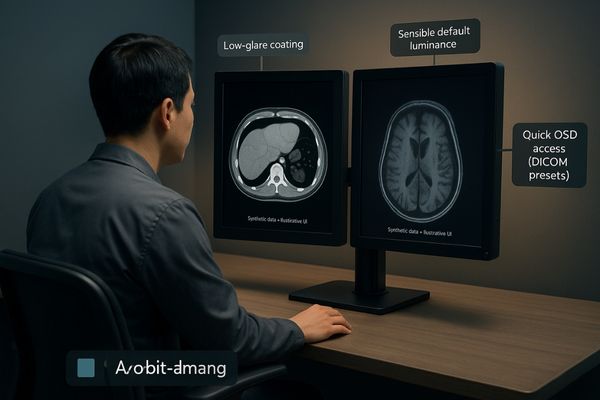
In a high-volume reading room, ergonomics directly impacts diagnostic endurance. Many radiologists prefer a dual-head 21.3-inch 3MP setup9 in portrait mode for efficient comparison of prior and current studies. An anti-glare screen coating10 is essential for minimizing reflections from ambient light. A sensible default luminance policy—setting the out-of-the-box brightness to a comfortable level for a dim reading room—prevents eye shock. Finally, quick and intuitive access to on-screen display (OSD) controls for tasks like switching DICOM presets or activating detail enhancement modes is crucial. These practical features reduce fatigue far more effectively than simply increasing screen size.
PACS integration basics: ports, calibration logs, and fleet QA cadence
An MRI diagnostic screen that is difficult to connect or manage creates a bottleneck. Seamless integration into the existing PACS infrastructure is essential for uptime and operational efficiency.
Effective integration hinges on versatile connectivity, visible QA logs to build user trust, and an automated QA cadence to simplify fleet management. Fewer adapters = fewer support tickets.
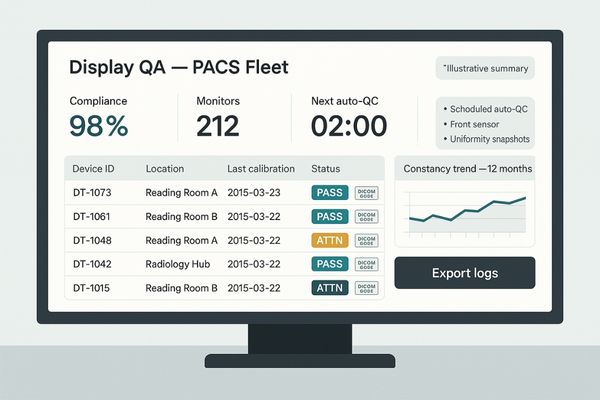
A diagnostic monitor is a critical endpoint in the PACS network. To ensure smooth integration, a monitor must have a comprehensive selection of input ports. DisplayPort (DP)11 should be the primary, but having DVI and VGA as fallbacks is an insurance policy in hospitals with mixed-vendor workstations. Beyond physical connection, software integration is key. The monitor must be compatible with a central QA platform that can schedule automated calibrations12. This automated QA cadence, typically run quarterly, ensures ongoing compliance without manual intervention. The results must be logged and easily visible to administrators and end-users. We recommend completing a port-mapping checklist for each workstation during a pilot test before full deployment.
Shortlist logic for 2025: how we ranked the Top 5
Our rankings are not based on which monitor has the highest peak specifications. We prioritize models that deliver the most consistent and predictable performance for CT and MRI review.
Which model remains trusted after a year of CT/MRI use? We ranked models based on their ability to ensure consistent review across an entire department, valuing stable grayscale and predictable workflows over peak specifications.
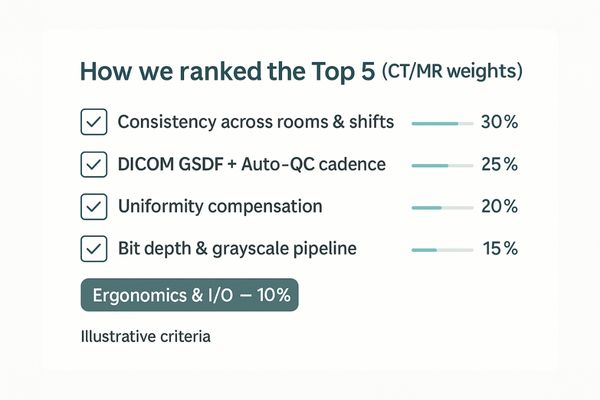
How We Ranked (CT/MRI-focused Weights)
- Consistency across rooms & shifts — 30%
- DICOM GSDF + Auto-QC cadence — 25%
- Uniformity compensation — 20%
- Bit depth & grayscale pipeline — 15%
- Ergonomics & I/O for PACS — 10%
This methodology shifts the focus to features that promote long-term stability and reliability. We heavily weighted automated quality assurance13 with front sensors, superior screen uniformity compensation14, and deep bit-depth processing for flawless grayscale rendering. Practical ergonomics and versatile connectivity were also key considerations, as they directly impact daily workflow and uptime.
Conclusion
The top 3MP radiology monitors for CT and MRI are defined by their ability to provide consistent, stable, and DICOM-compliant image fidelity for confident diagnostic review. The five models listed cover both grayscale-centric and mixed-modality color/mono reading roles, enabling departments to standardize deployment according to specific tasks. 🖥️
👉 For detailed guidance and Reshin’s 3MP radiology monitor solutions, contact martin@reshinmonitors.com.
-
Explore this link to discover top-rated 3MP radiology monitors that ensure image fidelity and consistency for accurate diagnostics. ↩
-
Understanding image fidelity is crucial for radiologists; this resource explains its significance in diagnostic accuracy and patient care. ↩
-
Understanding DICOM GSDF is crucial for ensuring accurate medical imaging, making this resource invaluable for radiologists. ↩
-
Exploring this topic will reveal how active luminance stabilization enhances image quality, essential for precise diagnostics. ↩
-
Understanding the DICOM Part 14 GSDF standard is crucial for ensuring accurate image representation in radiology. ↩
-
Exploring how a luminance stabilization circuit functions can enhance your knowledge of maintaining image quality in medical imaging. ↩
-
Understanding LUTs is crucial for grasping how monitors achieve superior image quality, especially in medical imaging. ↩
-
Exploring this topic reveals the technology behind high-quality displays, essential for accurate medical diagnostics. ↩
-
Explore this link to understand how a dual-head setup enhances diagnostic efficiency and reduces eye strain for radiologists. ↩
-
Discover the importance of anti-glare coatings in minimizing reflections and enhancing comfort during long reading sessions. ↩
-
Explore this link to understand how DisplayPort enhances connectivity and performance in diagnostic monitors. ↩
-
Learn about the benefits of automated calibrations for maintaining compliance and performance in medical environments. ↩
-
Explore this link to understand how automated quality assurance enhances product reliability and quality, ensuring long-term stability. ↩
-
Learn about superior screen uniformity compensation and its significance in achieving flawless display quality and user experience. ↩