The cath lab is a high-stakes environment where teams need to see multiple live and static images at once. Using generic displays creates signal delays, glare, and inconsistent image quality, compromising patient safety.
Cath labs demand real-time, multi-source viewing: 4K/60 and 12G-SDI keep latency low, AR-bonded fronts cut glare and aid disinfection; DICOM grayscale with color-gamma runs in parallel, while templated layouts and ALC/CBS sustain QC from procedure to control room—boosting safety and efficiency.
The cardiac catheterization lab1 is a unique clinical environment, blending real-time interventional imaging with diagnostic review. A typical procedure involves live fluoroscopy, hemodynamic monitoring, intravascular ultrasound (IVUS)2, and reference images from prior studies, all of which must be viewed simultaneously. This complex, multi-source workflow demands more from a display than any standard monitor can deliver. The core requirements are twofold: pristine, low-latency image presentation inside the procedure room and consistent, standards-compliant review in the control room. Success hinges on a display ecosystem that can guarantee signal integrity from source to screen, manage multiple inputs without compromise, and maintain its calibrated performance over thousands of hours under challenging conditions. It is not just about showing an image; it is about building a reliable, real-time visual system that functions as a seamless extension of the clinical team.
[Cath Lab ](Cath Lab Display "Cath Lab ")Workflow: In-Procedure Display vs Control-Room Review
Cath lab teams work in two connected but distinct zones, each with different visual needs. A display optimized for the sterile field is not ideal for the detailed analysis done in the control room.
The in-procedure display prioritizes low latency and visibility for the operator, while the control-room display requires DICOM compliance and multi-window flexibility for the supporting technicians.
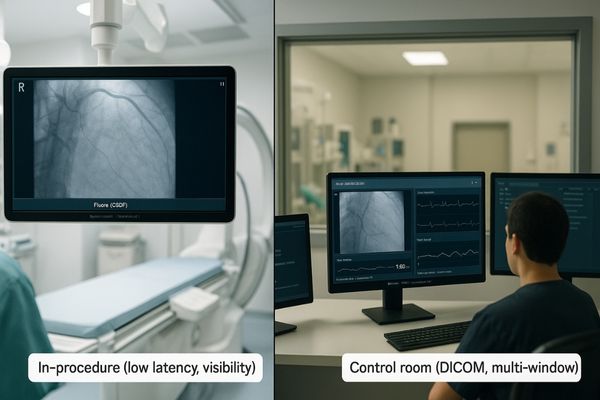
The cath lab workflow is split across two environments: the sterile procedure room and the adjacent control room. The large, boom-mounted display inside the lab serves the interventional cardiologist. Its primary job is to present a real-time, high-quality view3 of the live fluoroscopy feed. Here, priorities are minimal latency, high brightness to overcome ambient light, and excellent glare control. The operator must have an instantaneous and clear view to guide catheters and deploy devices safely. In contrast, the control room is the domain of the radiologic technologist and other support staff who manage the imaging systems and monitor the patient. Their workstations must handle a greater variety of tasks, from adjusting C-arm parameters to retrieving prior studies and documenting the procedure. Consequently, control-room displays must offer robust multi-window management, DICOM-compliant grayscale4 for reviewing reference images, and stable performance for consistent quality control across different cases and operators.
Low Latency & Signal Integrity: Why 4K/60 and 12G-SDI Matter
During a delicate cardiac procedure, even a split-second video delay can be dangerous. Standard video cables like HDMI are not reliable enough for the OR and can suffer from interference and signal loss.
Cath lab imaging is a real-time system that requires 4K/60 resolution and lossless 12G-SDI transport for robust, low-latency performance over long distances and resistance to electromagnetic interference.
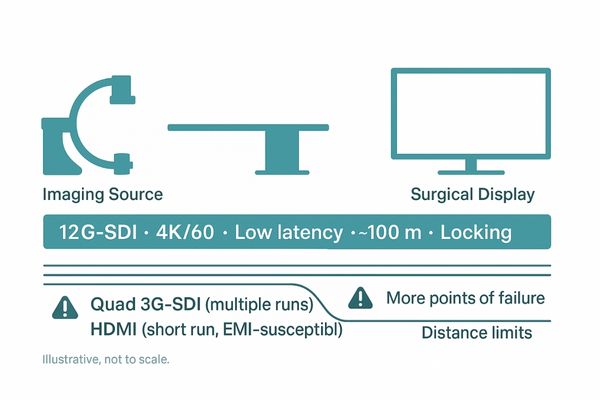
The cath lab is a real-time imaging system where signal integrity is directly linked to patient safety. The interventional cardiologist relies on immediate visual feedback to perform complex procedures. For this reason, both latency and signal quality are non-negotiable. The current standard of care is 4K resolution at 60 frames per second (2160p60), which provides the detail and fluid motion needed for precision work. However, delivering this signal from the C-arm or imaging source to the display is a challenge. Consumer-grade cables like HDMI are unreliable over long distances and susceptible to electromagnetic interference (EMI) from other equipment. The professional solution is 12G-SDI, a standard that transports an uncompressed 4K/60 signal over a single, robust coaxial cable for distances exceeding 50 meters. Its locking connector and superior EMI tolerance make it ideal for the demanding cath lab5 environment, ensuring a lossless, artifact-free image from source to screen. A surgical monitor like the MS431P with native 12G-SDI6 inputs ensures this critical signal path is maintained.
Multi-Source Layouts: Fluoro, Hemodynamics, US, Priors on One Canvas
Cath lab operators are forced to look at multiple different screens for different information. This constant head-turning divides attention, increases the risk of error, and slows down the procedure.
Replace freeform tiling with templated multi-window layouts (PIP/PBP/quad) and bind per-window settings to each template. This strategy, where "position implies meaning," cuts coordination overhead and improves focus.
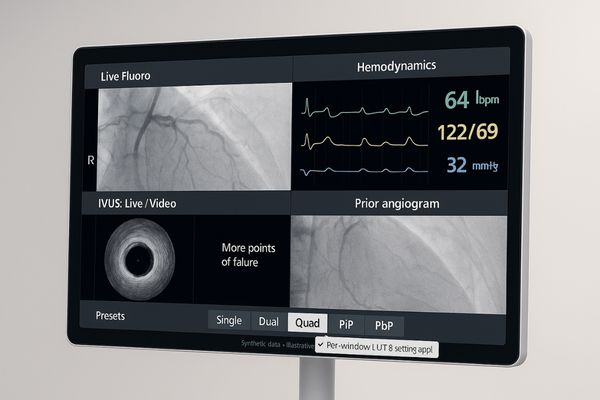
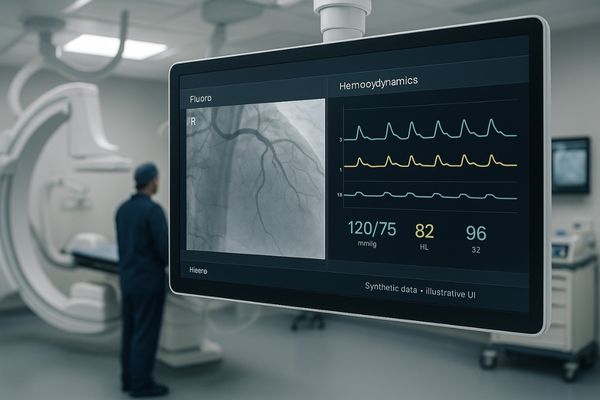
A key challenge in the cath lab is presenting a wealth of dynamic and static information in a coherent, easily digestible format. A single display may need to show live fluoroscopy, real-time hemodynamic pressure waves, an IVUS feed, and a reference angiogram from a prior study. Simply tiling these sources in a freeform layout creates clutter and cognitive overload. The solution is to use structured, templated layouts like Picture-in-Picture (PIP)7, Picture-by-Picture (PBP), or quad-view. More importantly, these templates should be intelligent. By binding specific display settings (e.g., DICOM GSDF8 for the reference image, high-contrast video settings for the fluoro) to each window within a template, the display ensures every source is shown correctly. This approach, where "position implies meaning," allows the team to develop a consistent visual workflow. The top-left quadrant is always fluoro, the bottom-right is always hemodynamics. This predictability reduces communication overhead between the operator and technician and minimizes the risk of misinterpreting data.
Glare Control & Wipe-Clean Design: Flat Front Glass and Optical Bonding
Standard monitors in a cath lab are difficult to clean and their screens reflect bright overhead lights. This glare obscures the image, and seams around the bezel can harbor contaminants.
Under bright OR lights, anti-reflective (AR) glass with optical bonding improves contrast and suppresses glare. A seamless, flat front glass design facilitates rapid and effective wipe-down disinfection cycles.
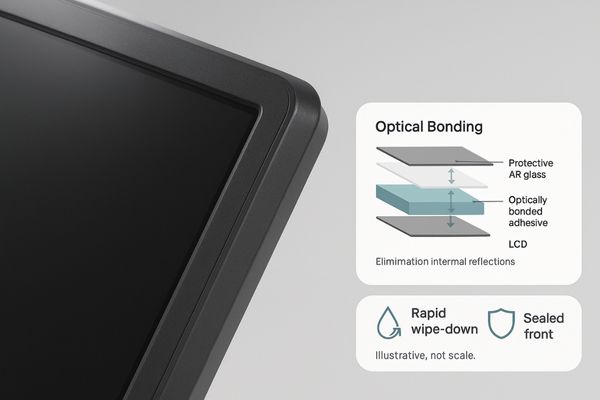
The physical design of a cath lab display is just as important as its electronic performance. The procedure room is brightly lit, creating significant potential for glare and reflections on the monitor screen. To combat this, high-end surgical displays use anti-reflective (AR) coated protective glass9. This is often enhanced with optical bonding, a process that laminates the glass directly to the LCD panel, eliminating the internal air gap. This technique dramatically improves contrast and viewability by minimizing internal reflections, making the image appear crisp and clear even under direct overhead lighting. The second critical design element is hygiene10. Displays in a sterile or semi-sterile environment must withstand repeated cleaning with harsh disinfectants. A monitor with a seamless, "true flat" front glass, lacking a raised bezel where contaminants can collect, is essential. This design allows for a quick and thorough wipe-down between procedures, supporting strict infection control protocols and ensuring long-term durability.
Image Standards & Consistency: DICOM Grayscale, Gamma Color, ALC/CBS
In the control room, technicians need to view new images alongside old ones. If the displays are not consistent, it is impossible to know if a perceived change is real or just a monitor artifact.
Control-room review requires DICOM-compliant grayscale alongside parallel gamma-based color processing. Onboard stability systems like Ambient Light Control (ALC) and Constant Brightness System (CBS) guard against drift.
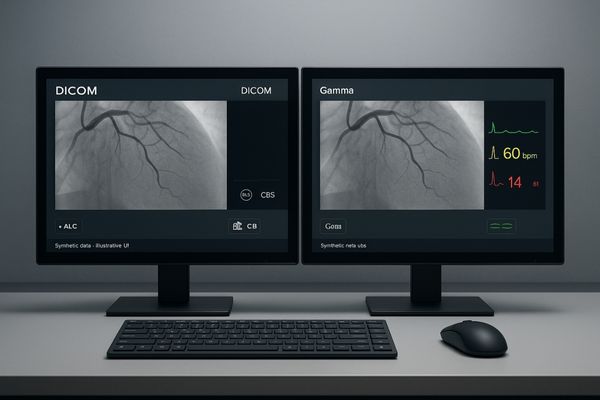
While the in-procedure display focuses on real-time video, the control-room workstation is a hub for multimodality review. Here, the technician must be able to view a live, color-gamma-based feed next to a static, DICOM-compliant grayscale reference image. This requires a display with parallel processing pipelines that can render both standards accurately and simultaneously without cross-contamination. Beyond this initial calibration, long-term consistency is key. Ambient Light Control (ALC)11 uses a front sensor to measure the room’s lighting and adjust the display’s brightness to maintain perceptual consistency. A Constant Brightness System (CBS)12 uses an internal backlight sensor to counteract brightness fluctuations from warm-up and aging. Together, these technologies ensure that an image viewed in the morning looks identical to one viewed in the afternoon, and a monitor in one control room matches the performance of a monitor in another. This guards against diagnostic drift and ensures reliable quality across the entire team.
QC & Acceptance: From Commissioning to Periodic Self-Tests
Hospitals often install displays without a clear plan for ongoing quality control. This leads to performance degradation over time, which can go unnoticed until it potentially impacts a clinical decision.
Make QC procedural and traceable with scheduled self-tests for luminance and GSDF compliance, complete with alarms and logs. This provides an auditable record of performance from initial commissioning to daily use.

A medical display is a precision instrument, and its performance must be actively managed throughout its lifecycle. A robust Quality Control (QC) program13 is not an option; it is a necessity. This begins at commissioning, with a formal acceptance test to verify that the display meets all specified performance criteria out of the box. From there, QC should become a procedural and automated part of the workflow. Modern medical displays incorporate features for scheduled self-testing. These tests can automatically check for luminance stability and conformance to the DICOM GSDF curve14 at regular intervals (e.g., daily or weekly) without user intervention. The results are stored in an internal log, creating a traceable, auditable history of the display’s performance. The system can be configured to generate an alert if any parameter drifts out of specification, notifying biomedical engineering or the department manager. This proactive approach ensures continuous compliance and replaces subjective visual checks with objective, data-driven quality assurance.
| QC Parameter | In-Procedure Check | Control Room Check | Automation |
|---|---|---|---|
| Latency/Resolution | Visual validation of 4K/60 feed | N/A | Manual (at installation) |
| Luminance | Visual check for brightness | Automated sensor measurement | Daily/Weekly Self-Test |
| Grayscale (GSDF) | N/A (Video focus) | Automated conformance test | Daily/Weekly Self-Test |
| Layouts | Functional test of PIP/PBP | Functional test of layouts | Manual |
Human Factors & Integration: Booms, Wall Displays, and Reading Desks
Integrating large displays into a crowded cath lab can be challenging. Poorly positioned monitors can obstruct movement, create ergonomic issues for staff, and fail to provide a clear line of sight.
Proper integration considers ergonomics and workflow. Boom-mounted displays offer flexibility in the procedure room, while wall displays serve the wider team, and dedicated desks optimize the control-room experience.
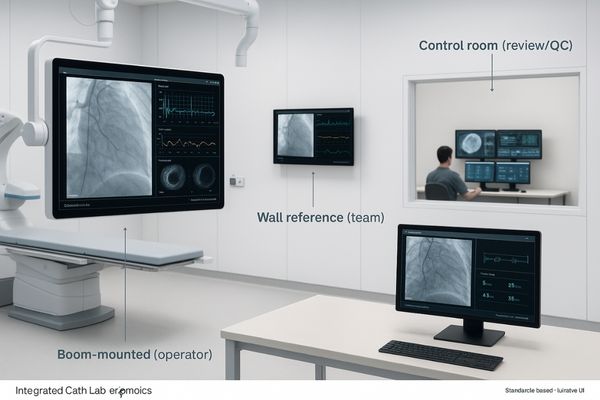
Effective technology integration is about more than just plugging in a monitor; it is about considering the human factors of the clinical environment. In the cath lab, the primary in-procedure display, often a large format model like the MS551, must be mounted on an articulated ceiling boom. This provides maximum flexibility, allowing the screen to be positioned optimally for the operator regardless of their position around the patient table, and moved out of the way when not in use. Large, supplementary wall-mounted displays can serve as a secondary reference for the entire team, showing vital signs or other global information. In the control room, the focus shifts to ergonomics at the desk15. Technicians spend hours at these workstations, so displays must be paired with adjustable stands or monitor arms to ensure proper viewing height and angle, reducing neck and eye strain. A successful integration project plans for these different use cases, ensuring that each display is not only technically capable but also physically positioned to enhance, not hinder, the team’s workflow.
Conclusion
By selecting cath lab displays with robust signal integrity, intelligent layouts, and automated QC, hospitals can create a safer, more efficient, and more consistent imaging environment from procedure to review.
👉 For tailored cath lab display recommendations—signal chain design, ergonomic layouts, and automated QC—contact Martin at martin@reshinmonitors.com; we’ll help you design a safer, more consistent workflow.
-
Explore this link to understand the significance of cardiac catheterization labs in modern medicine and their role in patient care. ↩
-
Learn about IVUS technology and its critical role in enhancing the accuracy of cardiac procedures. ↩
-
Understanding the advantages of real-time imaging can enhance procedural efficiency and patient safety. ↩
-
Exploring DICOM standards can improve your knowledge of image quality and interoperability in medical imaging systems. ↩
-
Discover advancements in cath lab technology that improve patient safety and procedural efficiency. ↩
-
Explore this link to understand how 12G-SDI enhances image quality and reliability in critical medical environments. ↩
-
Explore this link to understand how PIP enhances clarity in medical imaging, improving workflow and reducing cognitive overload. ↩
-
Learn about DICOM GSDF to see how it standardizes image display, ensuring accurate interpretation in clinical settings. ↩
-
Explore this link to understand how AR coatings enhance visibility and performance in surgical environments. ↩
-
Learn why maintaining hygiene in cath lab displays is crucial for infection control and patient safety. ↩
-
Explore this link to understand how ALC enhances display performance and ensures consistent image quality in varying lighting conditions. ↩
-
Learn about CBS technology to see how it maintains brightness consistency, crucial for accurate image diagnostics over time. ↩
-
Understanding QC programs is crucial for ensuring the reliability and performance of medical displays, enhancing patient safety. ↩
-
Exploring the DICOM GSDF curve will provide insights into standardized image quality, essential for accurate medical diagnostics. ↩
-
Discover insights on how proper ergonomics can enhance technician comfort and efficiency, vital for long hours in control rooms. ↩