Choosing a medical display on headline specs alone can be risky. It often leads to audit failures and diagnostic inconsistency because performance is not verified or maintained over time.
Choose a DICOM-compliant display by verified GSDF, task-matched resolution, tight uniformity, and a predictable QA cadence—not peak specs.
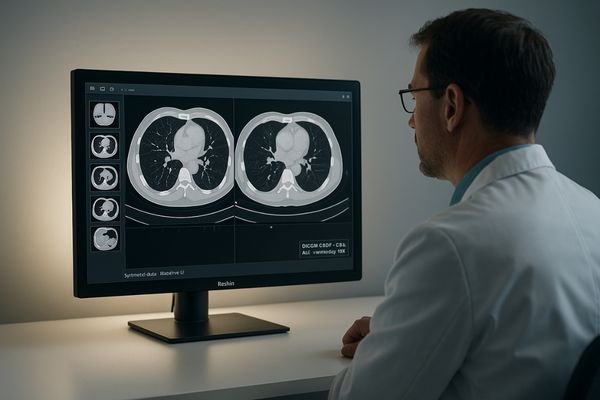
A truly professional medical display is defined not by its datasheet but by its ability to deliver verifiable, consistent performance across its lifecycle. This guide moves beyond peak numbers to focus on the metrics that underpin diagnostic confidence and fleet-wide consistency. We break down five pillars of DICOM compliance1: verifying the GSDF curve, matching resolution to modality, ensuring stable luminance and uniformity, governing color alongside grayscale, and implementing a practical quality assurance workflow2. These principles form a robust framework for selecting a display that ensures every pixel is perceived as intended, day after day.
Defining DICOM compliance: GSDF, JND, acceptance vs routine QC
Simply buying a “DICOM-compliant” monitor is not enough. Without verification, grayscale performance will drift, creating diagnostic inconsistencies across your institution.
Compliance requires initial GSDF acceptance testing and routine constancy QC to hold the curve within tight tolerances, ensuring perceptual consistency and preventing diagnostic drift.
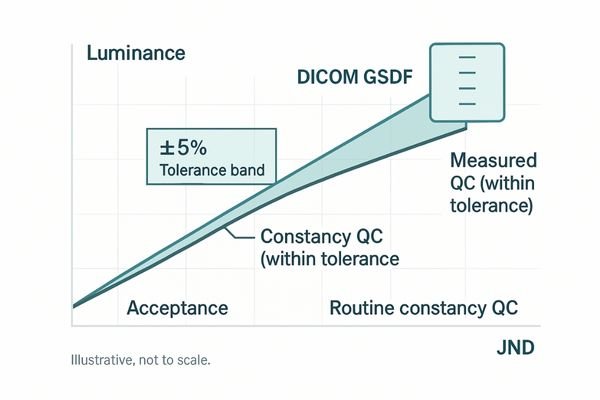
The foundation of DICOM compliance is the Grayscale Standard Display Function (GSDF)3, which aligns luminance steps with human visual perception (Just Noticeable Differences, JNDs). This ensures subtle changes in image data remain visible to the radiologist. Compliance is a process, not a permanent state: it begins with acceptance testing to verify GSDF conformance, then continues with scheduled constancy QC to counter inevitable drift. A clinical review monitor such as the MD46C integrates automated QC functions4 that make scheduled checks practical. This preserves cross-device perceptual consistency and makes audit outcomes predictable.
Resolution & pixel density by modality: 3MP/5MP/8–12MP thresholds
Using the wrong resolution for a modality is inefficient—and risky. Low resolution can obscure critical findings; over-speccing simple tasks wastes capital.
Match resolution and bit depth to the clinical task. 3–5MP suits general radiology; 8–12MP is justified for mammography and comparison-heavy PACS to sustain diagnostic confidence.
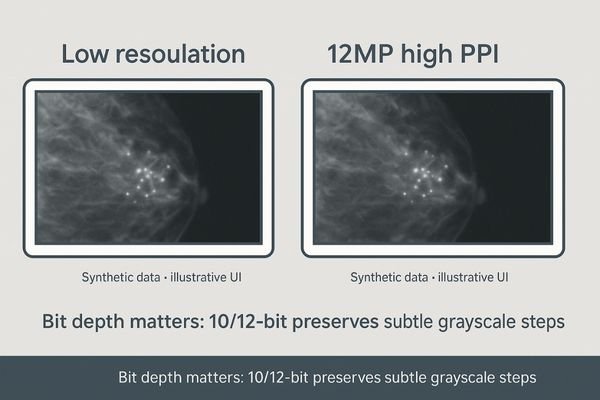
Choose by pixel density (PPI) at typical viewing distance and by the grayscale pipeline5. Bit depth is a gating factor for low-contrast visibility; a 10/12-bit pipeline preserves diagnostically relevant grayscale steps that 8-bit clips. For comparison-heavy reading such as mammography, a single consolidated 12MP display6 like the MD120C eliminates the central bezel of dual setups and provides a bezel-free canvas for arranging current and prior studies—reducing eye and head travel. For CT, MRI, and DR, 3–5MP displays typically balance detail with cost-effectiveness. Justify higher resolutions with specific clinical benefits, not fashion.
| Modality | Recommended Resolution | Justification |
|---|---|---|
| Mammography | 8MP – 12MP | Micro-calcifications; comparison-heavy reading |
| General PACS (CT/MRI/DR) | 3MP – 5MP | Balanced detail for routine diagnostic reads |
| Clinical Review | 2MP – 3MP | Reports, worklists, non-diagnostic viewing |
Luminance, uniformity & stability: CBS, compensation, and ALC
High peak brightness is a misleading metric. Diagnostic confidence erodes if corners are dim or if luminance fades after year one.
Clinical confidence relies on stable, uniform luminance. CBS, uniformity compensation, and ALC work together to create reproducible reading conditions year-to-year.
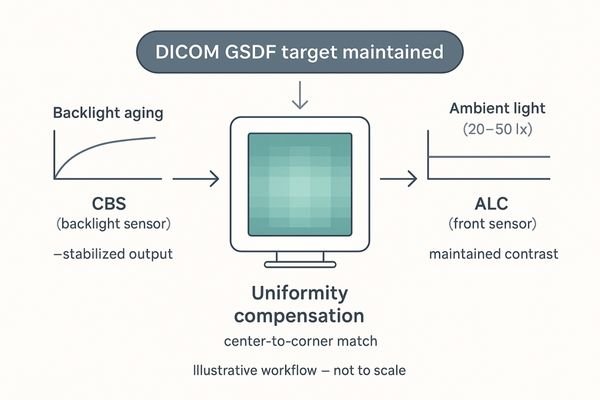
Three technologies are essential. A Constant Brightness System7 (CBS) uses an internal sensor to stabilize backlight output against aging. Uniformity compensation corrects spatial luminance variation so corners and edges match center luminance and grayscale tracking, preventing hot spots or dark corners from masking subtle findings. Ambient Light Compensation8 (ALC) measures room illuminance and adjusts output to preserve contrast and reduce visual fatigue. A diagnostic display like the MD33G combines these features to keep conditions stable, reproducible, and compliant—vital for multi-site consistency and internal audits.
Color in a DICOM-compliant workflow: grayscale vs color and per-window control
Modern workflows are not exclusively grayscale. Radiologists often view color Doppler ultrasound or endoscopy alongside DICOM-true CT/MRI.
Real-world reading mixes grayscale and color. Efficiency requires per-window control—independent gamma and color settings for each source—so every modality remains standards-true on the same screen.
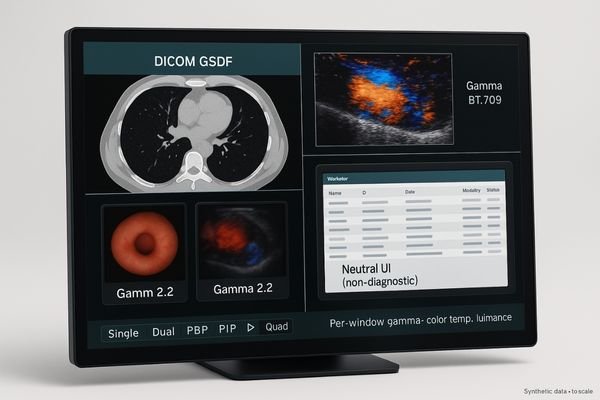
Applying a single DICOM calibration9 globally mis-maps color images; a global sRGB mode mis-maps grayscale contrast, undermining DICOM fidelity. The solution is per-window control. A multimodality display10 like the MD85CA lets users assign independent calibration parameters—gamma, color temperature, and luminance—to each window or input. A radiologist can view a DICOM-calibrated MRI, a color-accurate ultrasound, and a patient worklist on the same screen, each rendered to its standard, without workflow penalty.
Practical QA workflow: acceptance tests, periodic checks, logs & fleet governance
Without a structured plan, a fleet will drift apart, inviting inconsistent diagnoses and failed audits.
Treat acceptance as baseline, then establish a cadence of periodic checks, drift reviews, and log exports. Centralized governance scales quality and speeds root-cause analysis.
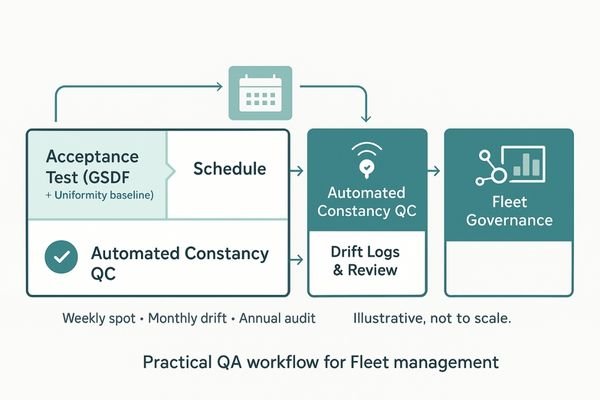 quality assurance11 is continuous. Start with comprehensive acceptance testing12 to set baselines. Implement scheduled constancy QC to monitor drift; many checks can be automated. Clinical monitors such as the MD26C provide OSD-accessible tools—lightbox mode, single/dual toggles, and quick QC checks—that shorten daily micro-steps. Set a cadence—weekly spot checks, monthly drift review, annual full audit—so governance grows with your fleet.
Conclusion
Choose a display by verified GSDF, task-matched resolution, uniformity and stability, and a predictable QA cadence to ensure long-term diagnostic confidence and compliance. 🩺
👉 For professional advice and Reshin medical-grade display solutions, contact martin@reshinmonitors.com today.
-
Understanding DICOM compliance is crucial for ensuring diagnostic accuracy and display performance in medical imaging. ↩
-
A solid quality assurance workflow is essential for maintaining display performance and reliability in medical environments. ↩
-
Understanding GSDF is crucial for ensuring accurate image display in radiology, enhancing diagnostic quality. ↩
-
Exploring automated QC functions reveals how they streamline quality control, ensuring consistent and reliable medical imaging. ↩
-
Understanding the grayscale pipeline is crucial for improving diagnostic accuracy in medical imaging. ↩
-
Exploring the advantages of a 12MP display can enhance your knowledge of optimal imaging solutions for better patient outcomes. ↩
-
Understanding CBS can enhance your knowledge of display technology and its impact on image quality. ↩
-
Exploring ALC will help you grasp how displays adapt to lighting conditions, improving visual comfort. ↩
-
Understanding DICOM calibration is crucial for maintaining image fidelity in medical imaging, ensuring accurate diagnoses. ↩
-
Exploring multimodality displays can enhance your knowledge of how they improve workflow and image accuracy in radiology. ↩
-
Exploring this resource will provide insights into effective quality assurance practices that can enhance your clinical operations. ↩
-
Understanding acceptance testing is crucial for establishing baselines and ensuring product quality; this link will deepen your knowledge. ↩