Clinicians report that images seem dimmer over time, forcing them to constantly adjust settings. This subtle degradation can mask critical details, leading to diagnostic uncertainty and potential errors.
Brightness decay is the progressive loss of a display’s luminance and contrast, which obscures clinical findings. Early detection through a systematic quality assurance program is essential to prevent misdiagnosis and maintain diagnostic confidence.
The reliability of a radiological diagnosis depends on the consistent and accurate representation of image data. When a display’s brightness decay1s, it is not merely a matter of inconvenience; it is a fundamental corruption of the visual evidence presented to the clinician. This gradual decline in performance can be insidious, often going unnoticed until a significant diagnostic discrepancy occurs. It silently undermines the very foundation of image-based medicine2: the ability to trust what you see. This article defines brightness decay, details its clinical and operational consequences, explains root causes, and presents a practical, auditable framework for early detection and control—so every room shows images you can trust.
Definition of brightness decay
Brightness decay is often mistaken for a simple dimming of the screen. In reality, it is a complex failure of the display’s core performance characteristics.
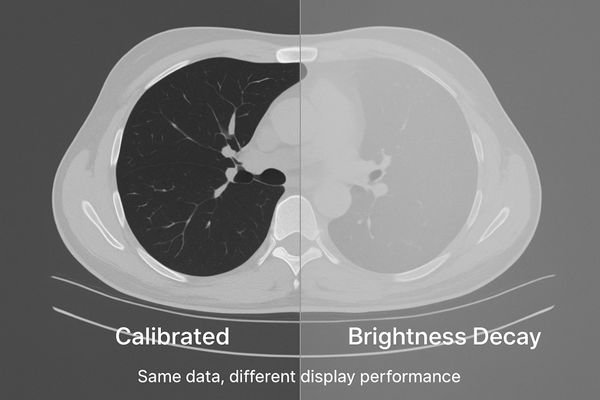
Brightness decay is a progressive loss of peak luminance and contrast stability. It manifests as a rising black level and deviation from the GSDF curve, requiring constant user adjustments.
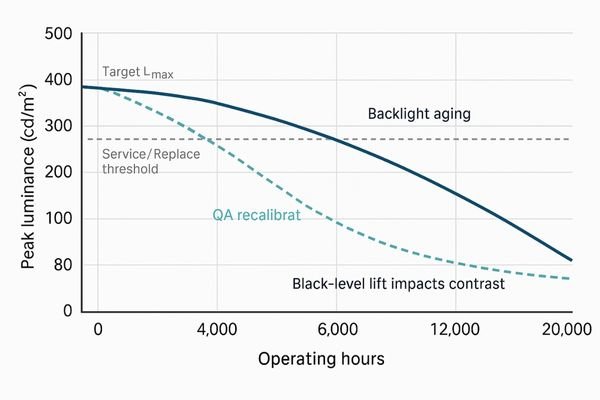
Brightness decay is a multifaceted technical failure, not just a simple loss of light output. It is best defined as the progressive and often irreversible loss of a display’s ability to maintain its specified peak luminance (Lmax) and stable contrast ratio. Two coupled effects drive clinical risk: dimmer whites and black-level lift3 (higher Lmin). Together they compress dynamic range and reduce overall contrast.
Beyond luminance: GSDF deviation4
Critically, decay causes the grayscale response to drift from the DICOM Part 14 GSDF. The mapping between pixel value and perceived brightness is no longer perceptually linear, distorting subtle tissue differences. Common field signs include dull whites, crushed or elevated darks, and rising frequency of window/level tweaks to “make it look right.”
Clinical impact of brightness decay
A dim or inconsistent display forces radiologists to second-guess their interpretations. This hesitation ripples through the diagnostic workflow.
Decay reduces lesion conspicuity, invalidates prior-to-current comparisons, increases reading times and repeat scans, and weakens medico-legal defensibility without QA evidence.
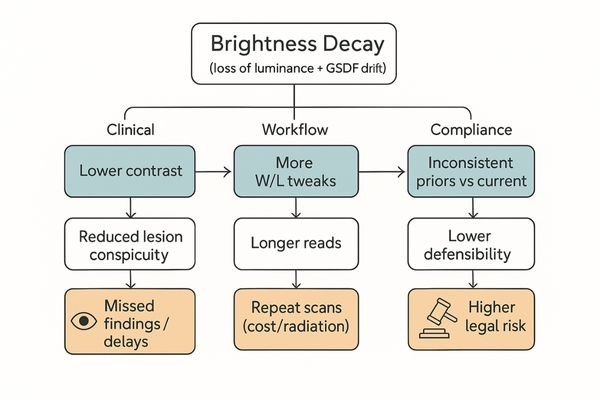
Subtle pathologies—low-contrast nodules, faint microcalcifications, isodense bleeds—depend on precise grayscale rendering5. As contrast falls, findings slip below perception, creating false negatives and delays. Comparisons to priors become unreliable if the monitor’s baseline has drifted. Operationally, more W/L manipulation lengthens reads and can spur unnecessary repeat studies. Without documented QA, institutions face higher medico-legal exposure.
Operational and compliance consequences
Unstable displays add friction (time per study, rescans, radiation exposure) and undermine defensibility in audits. A standardized QA program6 converts subjective complaints into objective evidence and corrective actions.
Causes of brightness decay
Brightness decay is not random—it’s the predictable result of physical degradation plus environmental and procedural stressors.
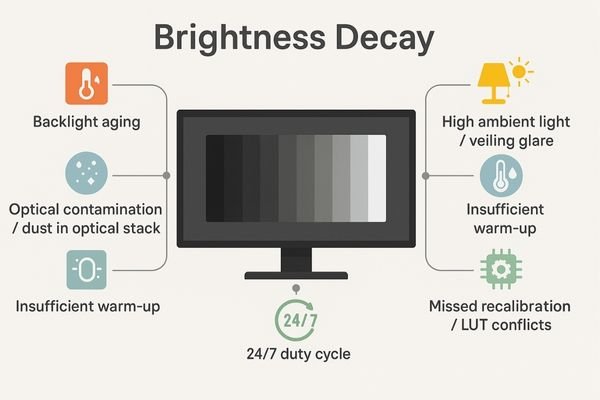
Primary causes are backlight aging and optical contamination; contributors include stabilization sensor drift, insufficient warm-up, high ambient light, 24/7 duty cycles, and missed recalibration.
Inherent technological factors
Backlight units (LED/CCFL) produce less light with hours and heat. Optical stack contamination7 (dust/film) scatters/absorbs light. In units with closed-loop stabilization, the front sensor or control loop can drift, missing luminance targets.
Operational and environmental stressors
Insufficient warm-up (typically 20–30 min), high ambient light8 and veiling glare, round-the-clock duty cycles, and procedural gaps (missed recalibration; GPU/OS/viewer LUT conflicts) accelerate drift and keep devices out of compliance.
Solutions + recommended products
Simply replacing dim monitors is reactive and costly. A deterministic display program prevents decay from eroding clinical trust.
Set and document targets; calibrate to DICOM GSDF; confirm a 10-bit signal path; control ambient light; lock viewer presets; and run scheduled, logged QA (JND, ΔL/L, uniformity).
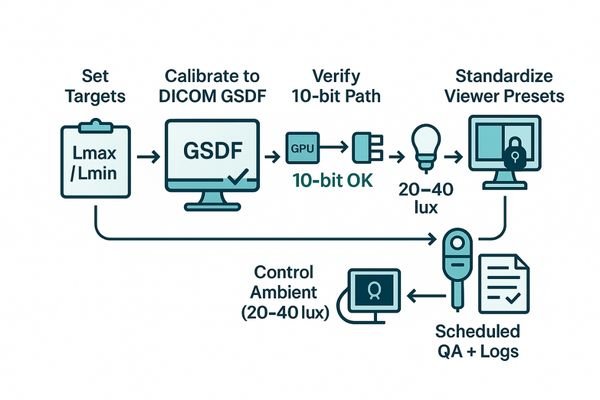
Start by defining target luminance and black level by room type, then calibrate every clinical display to GSDF9 and verify conformance after warm-up. Confirm the 10-bit pipeline from source to screen to avoid banding. Standardize and lock PACS presets to eliminate user-introduced variability. Maintain reading rooms at 20–40 lux10 and mitigate glare. Sustain performance with a cadence of spot checks and full QA, with signed logs to create audit-ready evidence.
Recommended diagnostic models
| Model | Primary use case | Key feature |
|---|---|---|
| MD52G | Primary CT/MR diagnosis | Auto GSDF, closed-loop luminance stabilization, uniformity control |
| MD46C | Mixed CT/DR/PACS | Diagnostic GSDF with stabilization and QC tooling |
| MD33G | Secondary review bays | Compact diagnostic with GSDF and uniformity management |
| MD32C | Fleet standardization | Calibratable diagnostic color; simplifies enterprise QA |
| MD26C | Entry / training | Cost-effective GSDF path and uniformity control |
Quick implementation checklist
- Targets locked: set white (e.g., 350–400 cd/m²) and black level; document by room.
- GSDF calibration: verify end-to-end; remove OS/GPU/viewer LUT conflicts.
- 10-bit pipeline: confirm source → GPU → cable → display; stable EDID; no banding.
- Ambient control: reading rooms 20–40 lux; mitigate veiling glare; enforce warm-up policy.
- Standardized presets: lock PACS window/level; minimize ad-hoc overrides.
- Scheduled QA: monthly spot checks + quarterly full QA (JND, ΔL/L, uniformity) with signed logs.
Acceptance thresholds (post-calibration)
| Metric | Acceptance target | Notes |
|---|---|---|
| GSDF tracking (JND index) | < 10 | Lower is better; trend drift over time |
| Luminance stability (ΔL/L) | ≤ 10% | After warm-up; confirm stabilization holds |
| Spatial uniformity (max deviation) | ≤ 15% | Center vs. corners/edges |
| Peak luminance vs target | ≥ 85% of target | If <85% → service or replace |
| Reading room ambient | 20–40 lux | Log during QA runs |
FAQ
Q: Do we need 4K to fix decay?
A: No. Prioritize stability and GSDF tracking; resolution is secondary.
Q: How often should we check luminance?
A: Monthly spot checks; quarterly full QA. Increase cadence for 24/7 units.
Q: Can Window/Level adjustments mask decay?
A: No. Without calibration, W/L remains inconsistent across rooms.
Q: Is there a simple self-check?
A: Use TG18-QC. If visible grayscale steps differ by >2 vs. baseline, investigate with a photometer.
Q: When should a unit be pulled from service?
A: If peak luminance drops below 85% of target or JND > 15 after warm-up.
Conclusion
Detecting brightness decay early is a clinical safeguard, not just a technical routine. Standardize GSDF calibration, stabilize luminance, control ambient light, and enforce scheduled QA to keep cross-room grayscale consistent and trustworthy. Need a site-wide checklist or demo units? Contact info@reshinmonitors.com.
-
Understanding brightness decay is crucial for ensuring accurate radiological diagnoses and maintaining image quality. ↩
-
Exploring image-based medicine will highlight the importance of reliable imaging for effective clinical decision-making. ↩
-
Understanding black-level lift is crucial for diagnosing display issues and improving image quality. ↩
-
Exploring GSDF deviation helps in grasping how display performance affects medical imaging accuracy. ↩
-
Understanding grayscale rendering is crucial for improving image quality and reducing false negatives in diagnostics. ↩
-
Exploring the benefits of a standardized QA program can enhance operational efficiency and compliance in healthcare settings. ↩
-
Understanding optical stack contamination is crucial for maintaining display quality and performance. ↩
-
Exploring the effects of high ambient light can help optimize display settings for better visibility. ↩
-
Exploring GSDF will provide insights into display calibration standards, ensuring accurate medical imaging. ↩
-
Understanding the optimal lighting levels can enhance the quality of clinical displays and improve diagnostic accuracy. ↩