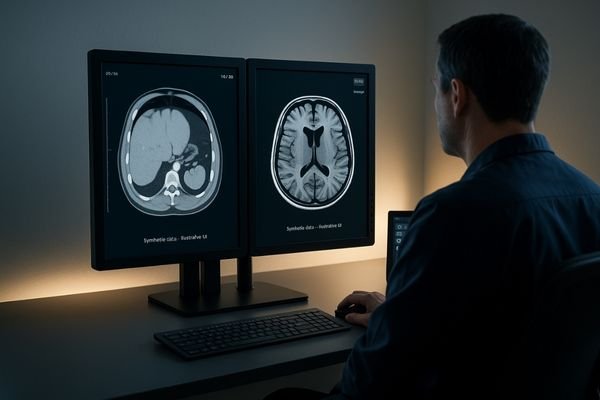
Relying on non-diagnostic displays for clinical review creates inconsistency and risk. Without DICOM compliance and stable luminance, radiologists can miss subtle findings, leading to diagnostic drift over time.
2025 Picks
✅ Reshin: MD22CA / MD26C / MD26GA
⭐ Barco: MDNC–2521 / MDNG–2121
⭐ EIZO: RX250 / MX216
Selecting the right 2MP diagnostic display1 is about ensuring long-term reliability and accuracy for everyday clinical review. While higher-resolution monitors are essential for primary diagnosis of certain modalities, the 2MP display remains a cornerstone of the diagnostic workflow. For these roles, the most valuable features are the ones that guarantee consistent performance day after day. This guide breaks down the essential selection criteria, from DICOM compliance2 and automated quality assurance to ergonomics and connectivity, to help you choose a monitor that enhances diagnostic confidence across your entire institution.
What “best” means for a 2MP diagnostic PACS display in 2025 (selection criteria)
Chasing the highest brightness or contrast ratio often leads to purchasing monitors that are ill-suited for the task. The most critical attributes for a clinical review display are consistency and reliability.
The best 2MP monitor is a task-fit workhorse. It prioritizes DICOM-true grayscale, stable luminance, and tight uniformity to ensure consistent clinical review across different rooms, users, and shifts.
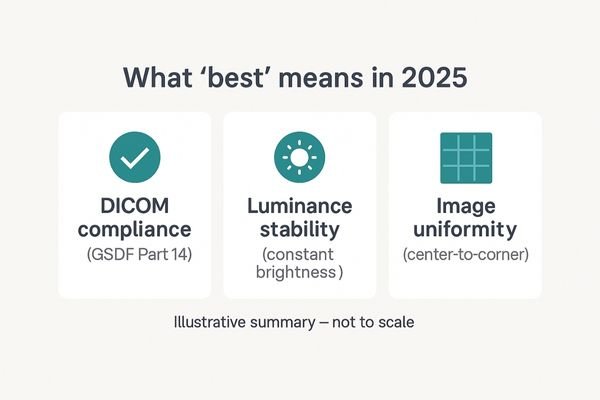
When we evaluate a 2MP diagnostic display, the definition of "best" shifts from peak performance to sustained accuracy. In a busy hospital, a clinician needs to trust that the image they see is identical across different workstations and shifts. This trust is built on three pillars: strict adherence to the DICOM Part 14 Grayscale Standard Display Function (GSDF)3, stable luminance over the monitor’s entire life, and excellent screen uniformity. A model like the MD22CA is designed around this philosophy of long-term consistency. True value lies not in a spec sheet’s maximum numbers, but in the monitor’s ability to be a dependable tool for diagnostic review. As a shortlist rule: if a 2MP model cannot provide automated QC with logging4, uniformity compensation, and adequate I/O, it should be eliminated from consideration immediately.
Where 2MP fits in a PACS workflow (acquisition, clinical review, reporting)
Misplacing a 2MP display in a role requiring a 5MP or 8MP monitor is a common error. This can lead to missed findings in mammography or other high-resolution imaging modalities.
A 2MP display excels as a foundational tool. It is the ideal choice for technologist acquisition stations, clinician review desks, and general-purpose reporting where primary diagnosis of high-resolution studies is not the main task.
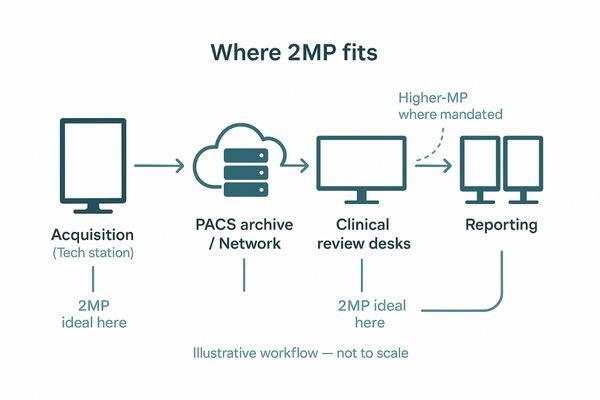
In 2025, the 2MP diagnostic monitor5 holds several critical, well-defined roles within the modern PACS ecosystem. Its primary function is not to replace higher-megapixel monitors for primary diagnosis. Instead, it serves as the reliable backbone for other essential tasks. Technologists at acquisition stations use 2MP displays for quality control. Clinicians on hospital floors and in outpatient clinics rely on them for reviewing reports and key images. It is also the workhorse for many general radiology reporting tasks. Its purpose is to deliver dependable, DICOM-compliant image presentation6 for a high volume of daily readings. From a cost perspective, deploying 2MP monitors for acquisition, clinical review, and reporting allows a facility to cover 70–80% of its daily reading tasks with the lowest possible total cost of ownership.
Image accuracy first: DICOM Part 14, sustained luminance, uniformity
A monitor that looks good on day one but drifts out of compliance is a liability. Without stable performance, diagnostic confidence erodes with every passing day.
Perceived truth in radiology is DICOM compliance plus sustained performance. The real value is a monitor that looks the same on day 1,000 as it did on day one through stabilization and compensation technologies.
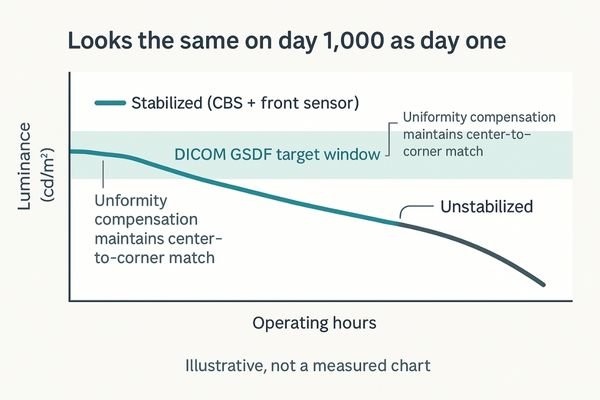
The foundation of any diagnostic display is its ability to accurately render medical images. The DICOM Part 14 GSDF7 is the standard that ensures this. While passing an acceptance test proves initial compliance, the true measure of a monitor’s quality is its ability to maintain that compliance. Top-tier monitors like the MD26GA employ several key technologies to achieve this. A built-in front sensor, a brightness stabilization circuit8, and a uniformity compensation system work together to prevent diagnostic drift. The uniformity target is critical: ensuring that brightness and grayscale consistency between the center and corners of the screen directly determines whether a low-contrast detail is visible regardless of its location. This active maintenance ensures long-term confidence in every reading.
Practical QA for 2MP radiology screens: auto-QC cadence and logging
Manual quality assurance is time-consuming, prone to human error, and often neglected. This "set it and forget it" approach leads to non-compliant displays remaining in clinical use.
Quality assurance must be practical, automated, and visible. A quarterly or monthly auto-QC cadence with accessible logs converts compliance from a checkbox item into daily clinical assurance.
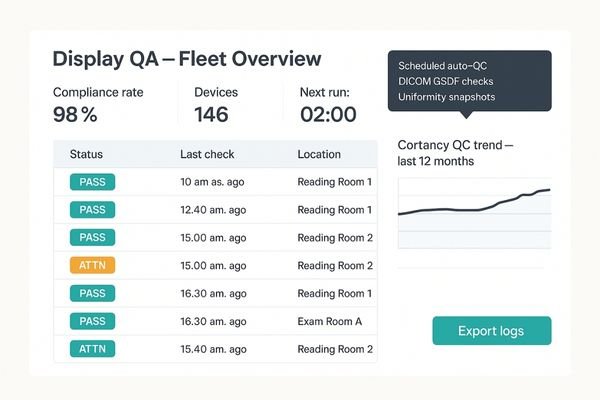
For a quality assurance program to be effective, it must be seamless. The most reliable 2MP diagnostic monitors integrate automated self-calibration capabilities9. Using a built-in sensor, the monitor can run its own DICOM conformance tests10 on a pre-set schedule without user intervention. The results are stored and reported to a central QA server. This automated cadence ensures every display is consistently verified. This visible QA is crucial; the ability to check the last calibration time and result via the OSD or management software reduces physician anxiety and minimizes rework communication. This practical, visible approach transforms compliance from a periodic task into a continuous background process that underpins daily diagnostic confidence.
Ergonomics for PACS rooms: choosing between 21.3″ and 24″
Simply choosing the "biggest" screen is not an effective ergonomic strategy. An oversized or poorly positioned display can cause neck strain and visual fatigue, reducing radiologist productivity.
Ergonomics beats inches. A 21.3-inch display suits tight spaces and portrait layouts, while a 24-inch model offers more room for RIS/PACS toolbars. Both benefit from low glare and easy OSD access.
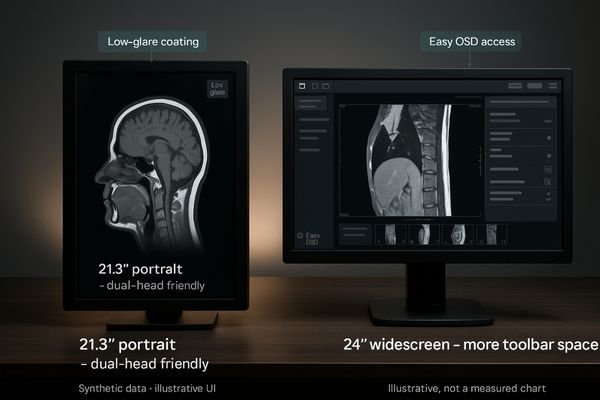
Choosing the right screen size is about matching the display to the workspace and workflow. The traditional 21.3-inch 2MP monitor (1600×1200) is ideal for dual-head portrait setups. In contrast, the 24-inch widescreen 2MP monitor, like the MD26C (1920×1200), provides extra horizontal real estate for PACS panes or patient lists. More important than size are ergonomic features. An anti-glare screen coating11 is non-negotiable. Furthermore, a smart default luminance policy12, which sets the start-up brightness to a comfortable threshold for the typical ambient lighting in a reading room, prevents the "power-on glare" that forces immediate manual adjustment. Easy OSD access for quick adjustments further reduces friction and fatigue.
Connectivity that de-risks integration: DP/HDMI/DVI/VGA/BNC basics
Assuming a new monitor will easily connect to an older workstation is a recipe for trouble. A drawer full of adapters introduces signal failure points and complicates troubleshooting.
Abundant port selection is an insurance policy. A mix of modern (DP) and legacy (DVI, VGA) ports minimizes the need for adapters, reducing intermittent signal loss and simplifying support.
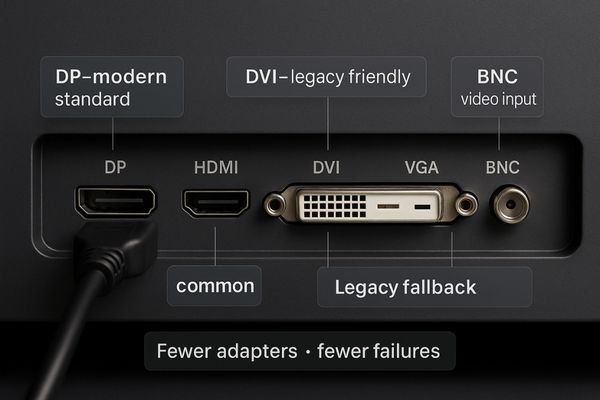
In a large hospital with a mixed fleet of workstations, connectivity cannot be an afterthought. The best way to de-risk integration is to select a monitor with a comprehensive set of inputs13. DisplayPort (DP)14 is the modern standard, but a vast number of existing workstations still rely on DVI, and some older systems require VGA. A monitor equipped with all these inputs provides maximum flexibility and eliminates the need for adapters, which are a common source of signal failure. Fewer adapters equals fewer support tickets, as native ports significantly reduce the black screens and flickering issues that disrupt clinical work. Having the right port built-in is a simple but powerful feature that saves time and prevents downtime.
Bit depth & grayscale processing at 2MP: keeping low-contrast detail
Focusing only on resolution misses a key aspect of image quality. The ability to discern subtle differences in tissue density depends heavily on the monitor’s grayscale processing pipeline.
Bit depth still matters at 2MP. A clean 10-bit or 12-bit pipeline is crucial for avoiding color banding and preserving the subtle, low-contrast gradients found in CT and MRI studies.
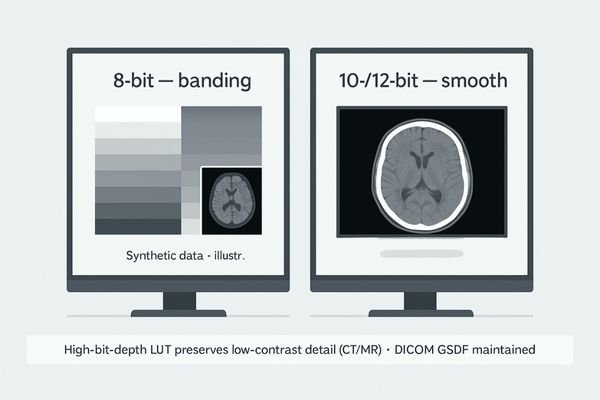
While a 2MP monitor is not for detecting micro-calcifications, it is frequently used to review CT and MRI scans where diagnosis hinges on subtle tissue density variations. An 8-bit display, with only 256 shades of gray, can cause "banding" where smooth gradients appear as distinct steps. A monitor with a 10-bit or 12-bit internal look-up table (LUT) and processing pipeline can render over 1,024 shades of gray, ensuring smooth tonal transitions. This strong low-contrast fidelity15 is essential. The value of a high-bit-depth pipeline16 lies in avoiding banding in CT and MRI images, thereby guaranteeing the credibility of the "barely visible" details that are critical for an accurate diagnosis.
Editor’s Picks
For facilities looking to standardize their 2MP fleet, aligning monitor features with specific roles is key. The following models are engineered for distinct use cases within the PACS workflow.
- MD26C — 24" 1920×1200: The "sweet spot" size for acquisition stations and daily clinical review, featuring a one-touch lightbox mode and uniformity compensation for the broadest deployment.
- MD22CA — 21.3" 1600×1200: Ideal for mixed-modality review seats, offering both color and monochrome modes with constant brightness stabilization for hassle-free cross-departmental viewing.
- MD26GA — 21.3" 1600×1200: Built for grayscale-centric review, with 12-bit processing and extensive DICOM presets for the most stable and nuanced grayscale performance.
| Model | Size / Res. | DICOM / Auto-QC | Brightness/Uniformity | Modes | Ports (quick) | Best for |
|---|---|---|---|---|---|---|
| MD26C | 24", 1920×1200 | Yes | Uniformity + stable luminance | Lightbox | DP / DVI / VGA | Acquisition & daily review |
| MD22CA | 21.3", 1600×1200 | Yes | CBS + stable luminance | Color/Mono + Lightbox | DP / DVI / VGA / BNC | Mixed review seats |
| MD26GA | 21.3", 1600×1200 | DICOM presets | Stable luminance | Film viewer | DP / HDMI / DVI / VGA / BNC | Grayscale-centric review |
Decision Checklist
Use this checklist to ensure your chosen 2MP monitor meets the demands of a modern PACS environment:
- DICOM Part 14 Compliance: Does it have automated calibration with a clear schedule and accessible logs?
- Sustained Performance: Does it feature technology for sustained target luminance and screen uniformity compensation?
- Grayscale & Bit Depth: Does it utilize a 10-bit or 12-bit processing pipeline to prevent banding?
- Real-World Ergonomics: Does it have a low-glare screen and an intuitive OSD with a sensible default brightness?
- I/O & Compatibility: Does it have the necessary DP, DVI, and VGA ports (plus HDMI/BNC if needed) to avoid adapters?
- Workspace Fit: Is the size (21.3″ vs. 24″) and aspect ratio appropriate for the intended desk and workflow?
Conclusion
The best 2MP diagnostic monitor provides consistent, DICOM-compliant images through automated QA, practical ergonomics, and reliable connectivity, ensuring long-term diagnostic confidence for everyday clinical review.
-
Explore this link to understand the key features that make a 2MP diagnostic display reliable and effective for clinical reviews. ↩
-
Learn about DICOM compliance to ensure your diagnostic displays meet industry standards for accuracy and reliability. ↩
-
Understanding GSDF is crucial for ensuring accurate medical imaging, making it essential for clinicians and radiologists. ↩
-
Exploring automated QC can enhance your knowledge of maintaining display accuracy, vital for reliable diagnostics. ↩
-
Explore how 2MP diagnostic monitors enhance efficiency and cost-effectiveness in medical imaging. ↩
-
Learn about DICOM standards and their significance in ensuring high-quality medical imaging. ↩
-
Understanding DICOM Part 14 GSDF is crucial for ensuring accurate medical image rendering, which is vital for diagnostics. ↩
-
Exploring how brightness stabilization circuits function can enhance your knowledge of monitor technology and its impact on image quality. ↩
-
Explore this link to understand how automated self-calibration enhances diagnostic monitor reliability and quality assurance. ↩
-
Learn about DICOM conformance tests to see how they ensure compliance and improve the quality of medical imaging. ↩
-
Explore this link to understand how anti-glare coatings enhance visibility and reduce eye strain, making your workspace more comfortable. ↩
-
Learn about smart luminance policies and how they optimize brightness for different environments, enhancing your viewing experience. ↩
-
Learn why having multiple input options can streamline operations and reduce technical issues in healthcare environments. ↩
-
Explore this link to understand how DisplayPort enhances connectivity and performance in clinical settings. ↩
-
Exploring low-contrast fidelity can enhance your knowledge of image quality in CT and MRI scans, vital for accurate medical assessments. ↩
-
Understanding high-bit-depth pipelines is crucial for ensuring accurate diagnoses in medical imaging, especially for subtle details. ↩