Worried about missing critical details in medical images? Poor monitor brightness can hide subtle lesions and compromise diagnoses. Let’s explore why brightness is absolutely vital for diagnostic displays.
Brightness in diagnostic medical displays is critical because it directly affects the visibility of subtle tissue variations and lesions. Sufficient brightness, typically 400-1000 cd/m², ensures physicians can distinguish fine grayscale differences essential for accurate diagnosis.

We make specialist medical monitors. Throughout my years working with radiologists and imaging specialists, I’ve seen firsthand how monitor brightness1 can make or break a diagnosis. The difference between seeing and missing a small lesion often comes down to the display’s ability to present subtle grayscale variations2 clearly.
In medical imaging, we’re not just looking at pictures. We’re searching for tiny abnormalities that could indicate serious conditions. A shadow that’s barely visible on a dim monitor might be an early-stage tumor. This is why understanding brightness requirements isn’t just technical knowledge—it’s about patient safety and diagnostic accuracy3.
What Does DICOM Require for Brightness?
Confused about DICOM brightness standards? Using non-compliant monitors risks inconsistent image display and potential diagnostic errors. Let’s clarify what DICOM actually requires.
DICOM Part 14 doesn’t mandate specific brightness values but requires displays to follow the Grayscale Standard Display Function (GSDF). This typically means diagnostic monitors need 400-1000 cd/m² to properly display the full range of grayscale values.
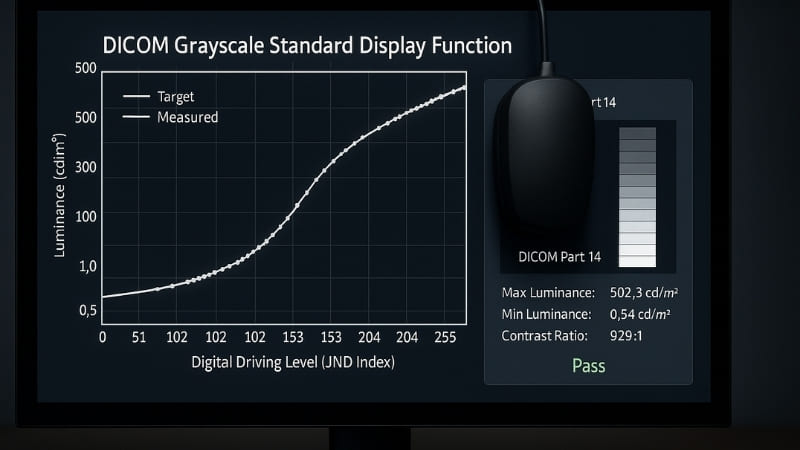
My first insight from years of working with medical displays is this: Diagnostic monitors typically require brightness between 400–1000 cd/m²4 and strict DICOM Part 14 compliance5. DICOM Part 14 establishes the Grayscale Standard Display Function6, which ensures that grayscale images appear consistent across different displays. This standard doesn’t say "your monitor must be exactly 500 cd/m²." Instead, it defines how the human eye should perceive differences in grayscale values across the entire brightness range of the display. The reason we need 400-1000 cd/m² is practical. At lower brightness levels, our eyes struggle to distinguish between adjacent grayscale values, especially in darker regions of an image. This could mean missing a subtle nodule in lung tissue or overlooking early signs of disease. The GSDF curve takes into account how human vision works—we see brightness differences logarithmically, not linearly. A properly calibrated display following DICOM standards ensures that a 10% difference in pixel values appears as a consistent visual difference whether in bright or dark image areas.
DICOM Brightness Requirements Breakdown
| Brightness Range | Application | Key Benefit |
|---|---|---|
| 400-500 cd/m² | General radiology, CT review | Adequate for most diagnostic tasks |
| 500-700 cd/m² | Multi-modality reading | Better detail in dark regions |
| 700-1000 cd/m² | Mammography, high-precision work | Maximum grayscale discrimination |
The GSDF ensures that regardless of the absolute brightness level, the relative perception of grayscale differences remains consistent. This is why simply having a bright monitor isn’t enough—it must be DICOM calibrated to display medical images correctly.
Does Brightness Affect Lesion Detection?
Can a dim monitor really cause you to miss a tumor? The fear of overlooking critical findings keeps many radiologists awake at night. Let’s examine the direct link between brightness and detection rates.
Yes, brightness significantly affects lesion detection. Studies show that monitors with inadequate brightness can reduce detection rates by up to 30%, particularly for low-contrast lesions in mammography and chest radiography.
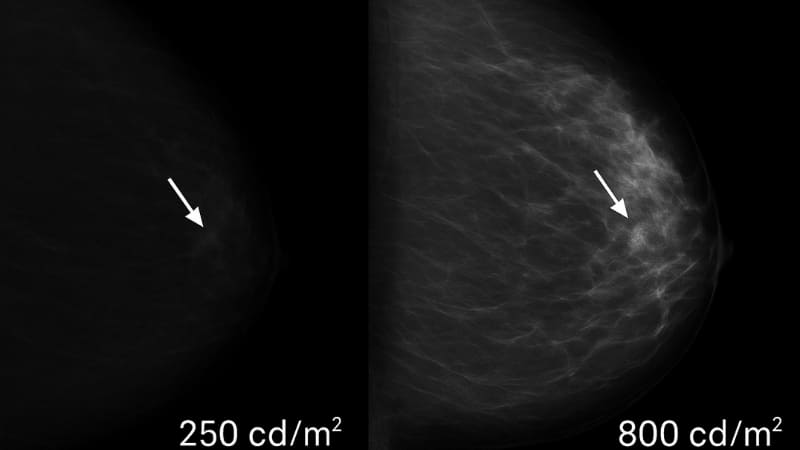
This brings me to my second key insight: Brightness impacts grayscale continuity7, which is crucial for detecting subtle lesions — especially in mammography and radiology. I once worked with a hospital that was experiencing an unusual number of false negatives in their mammography screening program. After investigating, we discovered their monitors had degraded to about 300 cd/m², well below recommended levels. The radiologists were literally unable to see certain low-contrast lesions that became visible once we installed properly bright displays. In mammography particularly, we’re looking for microcalcifications and subtle tissue density changes that might indicate early breast cancer. These features often have very low contrast against surrounding tissue. When a monitor lacks sufficient brightness, these subtle differences disappear into the background noise. The human visual system needs adequate light levels to distinguish fine grayscale variations. Below certain brightness thresholds, our contrast sensitivity drops dramatically8, especially for small objects. This isn’t about comfort or preference—it’s about the fundamental limits of human vision.
How Brightness Affects Different Imaging Modalities
- Mammography: Requires highest brightness (>500 cd/m²) for detecting microcalcifications
- Chest X-rays: Medium brightness (400-500 cd/m²) sufficient for most pathologies
- CT Scans: Benefits from higher brightness for subtle soft tissue differentiation
- MRI: Generally less brightness-dependent but still requires DICOM compliance
Research has consistently shown that radiologists perform better lesion detection tasks on brighter displays, with the most significant improvements seen in detecting low-contrast abnormalities.
Does Monitor Brightness Degrade Over Time?
Is your monitor as bright as the day you bought it? Many don’t realize their displays gradually dim, potentially compromising diagnostic accuracy over months and years.
Yes, all LCD monitors experience brightness degradation, typically losing 30-50% of initial brightness over 30,000-50,000 hours of use. This degradation can significantly impact diagnostic accuracy if not properly managed through calibration.
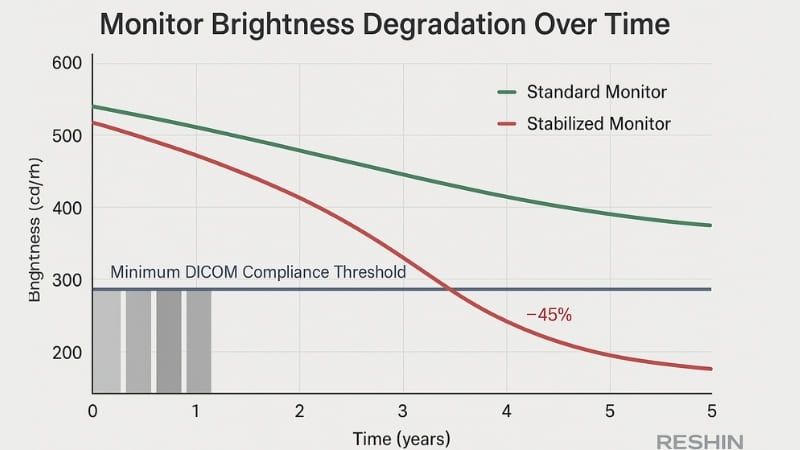
This degradation issue is why my third insight is so important: Brightness degrades over time9, so auto-compensation or calibration10 is essential for long-term image reliability. LCD backlights, whether CCFL or LED, gradually lose their output over time. This isn’t a defect—it’s physics. The phosphors in the backlight slowly degrade with use, producing less light for the same electrical input. What’s concerning is that this degradation happens so gradually that users often don’t notice. A radiologist might unconsciously adapt to the slowly dimming display, not realizing they’re working with suboptimal brightness until a calibration check reveals the problem. I’ve seen cases where monitors that started at 500 cd/m² had dropped to 250 cd/m² after just three years of heavy use. That’s a 50% reduction! At these reduced brightness levels, the monitor can no longer display the full DICOM GSDF curve properly, meaning some grayscale values become indistinguishable. This is why quality diagnostic monitors include brightness stabilization circuits11. These systems continuously monitor the backlight output and automatically adjust power to maintain consistent brightness throughout the display’s lifetime.
Managing Brightness Degradation
| Strategy | How It Works | Benefit |
|---|---|---|
| Auto-stabilization | Built-in sensors adjust backlight power | Maintains constant brightness |
| Regular QA checks | Monthly measurements track degradation | Early detection of issues |
| Calibration schedule | Quarterly adjustments to DICOM GSDF | Ensures continued compliance |
| Replacement planning | Track hours of use vs. expected lifetime | Prevent unexpected failures |
Dr. Amy Chen, whom I frequently consult with, implements a strict quality assurance program where every diagnostic monitor is checked monthly. She’s found that monitors with good stabilization technology maintain their brightness within 10% of initial values for at least 50,000 hours, while those without can drop below acceptable levels in half that time.
Do All Departments Need the Same Brightness?
Should every medical display in your hospital be equally bright? Over-specifying can waste budget, while under-specifying risks patient safety. Let’s determine what each department actually needs.
Not all departments require the same brightness levels. Radiology and mammography need 500-1000 cd/m², while clinical review in general wards may function adequately with 300-400 cd/m². The key is matching brightness to the diagnostic task.
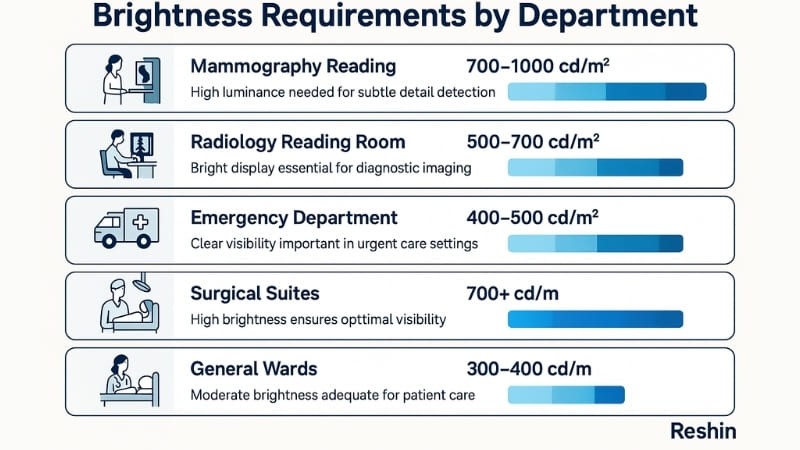
Understanding departmental needs is crucial for both clinical effectiveness and budget management. My fourth insight addresses this: Consistent and sufficient brightness is necessary for comparing multimodal images and reducing eye strain for physicians. In a radiology department where physicians compare CT, MRI, and X-ray images side by side, all monitors should have similar brightness levels. This consistency prevents the eye from constantly readjusting when looking between screens, reducing fatigue and improving diagnostic accuracy. However, a monitor used in the emergency department primarily for viewing lab results and basic X-rays doesn’t need the same 1000 cd/m² brightness as a mammography workstation. The key is understanding what each department does with their displays. Primary diagnostic reading12 requires the highest brightness and most stringent DICOM compliance13. Clinical review for treatment planning needs good brightness but may tolerate slightly lower levels. Administrative displays for viewing reports need only basic brightness levels. This differentiation allows hospitals to allocate resources effectively while ensuring each area has appropriate equipment for their specific needs
Brightness Requirements by Department
- Radiology Reading Rooms: 500-1000 cd/m² for primary diagnosis
- Mammography: 700-1000 cd/m² for detecting microcalcifications
- Emergency Department: 400-500 cd/m² for urgent review
- ICU/Critical Care: 400-500 cd/m² for monitoring and review
- General Wards: 300-400 cd/m² for clinical reference
- Surgical Suites: 700+ cd/m² to overcome bright OR lights
Each department’s unique lighting conditions and diagnostic requirements determine their optimal brightness needs. What works in a dim reading room won’t suffice in a brightly lit ICU.
How to Choose a Reliable Bright Diagnostic Monitor?
Overwhelmed by monitor specifications and marketing claims? Making the wrong choice could impact patient care for years. Let’s identify what truly matters when selecting a diagnostic display.
Choose diagnostic monitors with initial brightness of 500+ cd/m², built-in stabilization technology, DICOM calibration capability, and ambient light sensors. Verify the manufacturer provides calibration software and long-term brightness warranties for reliability.
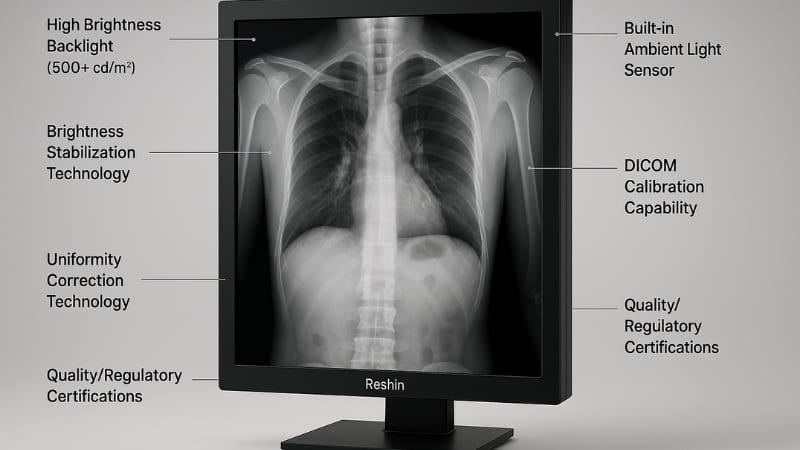
After decades in this field, I’ve learned that choosing a diagnostic monitor requires looking beyond just the peak brightness specification. My fifth insight captures what we strive for at Reshin: Reshin diagnostic displays14 offer high brightness, strong contrast, and ambient light sensors15 to meet clinical accuracy standards. A reliable diagnostic monitor must start with adequate brightness—I recommend at least 500 cd/m² for general radiology. But initial brightness is just the beginning. The monitor must maintain this brightness over its lifetime, which requires quality backlight technology and stabilization circuits. DICOM calibration capability16 is non-negotiable. Without it, even the brightest monitor won’t display medical images correctly. The monitor should come with calibration software and support for external calibration sensors. Ambient light sensors are increasingly important as they automatically adjust display brightness based on room conditions, ensuring optimal viewing while reducing eye strain. Look for manufacturers who stand behind their brightness claims with warranties. At Reshin, we guarantee our monitors will maintain at least 80% of their initial brightness for the warranty period, giving hospitals confidence in their investment.
Essential Features Checklist
- Initial Brightness: Minimum 500 cd/m² for diagnostic use
- Brightness Uniformity: >80% across the entire screen
- Stabilization Technology: Automatic brightness compensation
- DICOM Calibration: Built-in or software-based GSDF compliance
- Ambient Light Sensor: Automatic brightness adjustment
- Quality Assurance Tools: Built-in QA tests and reporting
- Warranty Coverage: Brightness guarantee for 3-5 years
- Service Support: Local calibration and maintenance services
When evaluating monitors, request demonstration units to test in your actual clinical environment. The way a monitor performs in your specific lighting conditions matters more than specifications on paper.
Conclusion
Brightness is vital for diagnostic accuracy, affecting lesion detection and DICOM compliance. Choose monitors with 500+ cd/m² initial brightness, stabilization technology, and proper calibration support for reliable long-term performance.
-
Understanding monitor brightness is crucial for accurate diagnoses in medical imaging, impacting patient safety and treatment outcomes. ↩
-
Subtle grayscale variations are key to identifying abnormalities; learning more can enhance your understanding of imaging technology. ↩
-
Exploring diagnostic accuracy can reveal how it directly influences patient care and the effectiveness of medical treatments. ↩
-
Brightness levels are critical for accurate image interpretation in medical diagnostics. Learn more about this requirement and its implications. ↩
-
Understanding DICOM Part 14 compliance is crucial for ensuring accurate medical imaging and diagnosis. Explore this link to learn more. ↩
-
The Grayscale Standard Display Function is vital for consistent image quality in diagnostics. Discover its significance through this resource. ↩
-
Understanding this relationship is vital for improving diagnostic accuracy in medical imaging, especially in detecting subtle lesions. ↩
-
Learning about contrast sensitivity can enhance our understanding of visual perception and its implications in various fields, including medicine. ↩
-
Understanding brightness degradation is crucial for maintaining optimal display performance and image reliability in critical applications. ↩
-
Exploring auto-compensation and calibration methods can help ensure your monitor maintains accurate brightness levels for reliable diagnostics. ↩
-
Learn about brightness stabilization circuits to understand how they enhance monitor longevity and performance, ensuring consistent image quality. ↩
-
Discover the specific requirements for diagnostic reading to understand how they impact image interpretation and patient care. ↩
-
Learn about DICOM compliance to see how it ensures image quality and consistency across different medical imaging devices. ↩
-
Explore the features of Reshin diagnostic displays to understand how they ensure clinical accuracy and optimal performance in medical imaging. ↩
-
Discover how ambient light sensors enhance the performance of diagnostic monitors by adjusting brightness for optimal viewing conditions. ↩
-
Learn about the significance of DICOM calibration capability in ensuring accurate medical image display, a must for any reliable diagnostic monitor. ↩