Choosing the right display setup is confusing. Using a single fusion monitor for all tasks can be inefficient, while relying only on specialized single-signal screens creates silos and slows down correlation.
Use multimodal fusion for cross-modality correlation and overlays; choose single-signal for focused, modality-specific reading. With DICOM grayscale + color-gamma pipelines, low-latency links, and templated layouts, select per scenario to maximize diagnostic efficiency and consistency.
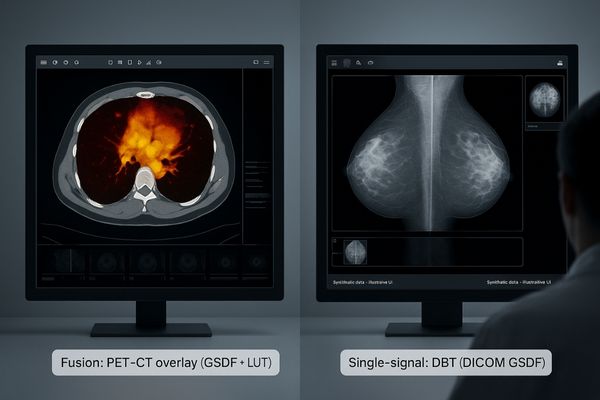
The central question is not whether fusion or single-signal displays are better, but which is right for the specific clinical task. This decision directly impacts diagnostic efficiency, accuracy, and total cost of ownership. Image fusion1, where data from multiple sources like PET and CT are combined into a single overlay, provides an invaluable spatial and temporal reference. It allows clinicians to see both anatomical structure and metabolic function in a single glance. In contrast, single-signal viewing is about deep, focused analysis within one modality, such as scrutinizing a Digital Breast Tomosynthesis (DBT)2 study where every subtle gray level matters. Making the correct choice requires a display capable of honoring the distinct technical requirements of each approach. It demands a robust understanding of clinical needs paired with technology that can deliver either a unified visual context or an uncompromised, modality-specific view.
Clinical Intent First: When to Fuse vs Stay Single-Signal
Clinicians often struggle to correlate findings across different imaging studies. Manually comparing a PET scan on one screen with a CT on another increases cognitive load and the time to diagnosis.
Use fusion for cross-modality correlation like PET-CT, creating a unified reference. Choose single-signal for fine-detail scrutiny within one modality like DBT to avoid interference and misreads.
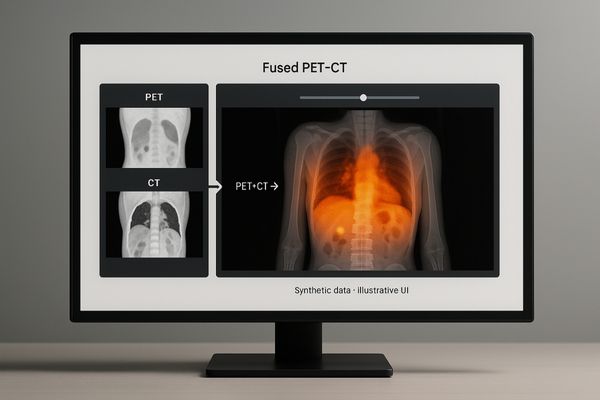
The decision to use a fused display or a single-signal setup must begin with the clinical intent. If the primary goal is cross-modality correlation3, then fusion is the clear choice. For example, in oncology, overlaying the metabolic data from a PET scan onto the anatomical map of a CT scan allows a radiologist to precisely locate tumor activity. Similarly, viewing a color Doppler ultrasound side-by-side with a CT angiography scan on the same canvas provides a comprehensive vascular assessment. In these scenarios, a multimodality display4 like the MD85CA acts as a powerful correlative tool, creating a unified spatial reference that makes diagnosis faster and more intuitive. Conversely, for tasks that demand meticulous inspection of fine details within a single modality, a dedicated single-signal environment is superior. Reading a dense DBT study requires absolute fidelity to the DICOM grayscale standard, without any potential interference from color processing pipelines. In this case, fusion becomes a distraction, and focused, single-signal reading is essential to avoid misinterpretation.
Image Quality & Standards: Parallel, Isolated DICOM and Color Gamma
Using one display for both grayscale and color images can lead to critical errors. A monitor calibrated for DICOM will wash out color, while one set for color will distort grayscale tonality.
Grayscale must follow DICOM Part 14 while color follows a gamma law. A display must have physically or logically isolated pipelines, which can be bound to layout templates for repeatable consistency.
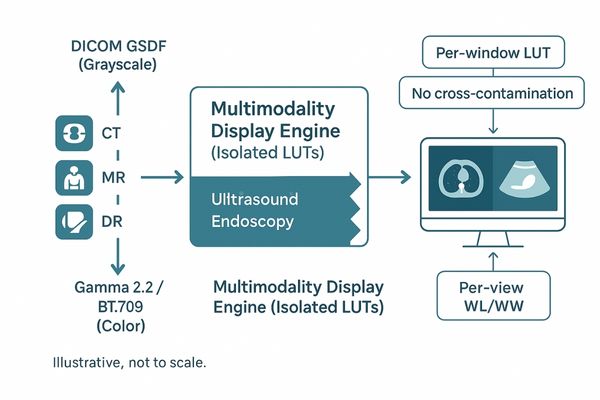
The technical foundation for any high-performance multimodality monitor is its ability to maintain parallel, isolated processing pipelines. This is non-negotiable. Grayscale images, such as those from CT, MR, or DR, must strictly adhere to the DICOM Part 14 Grayscale Standard Display Function (GSDF)5 to ensure perceptual linearization and diagnostic interchangeability. Color images from ultrasound, endoscopy, or pathology require a different standard, typically a gamma law like BT.709 or BT.20206, to render hues accurately. A monitor that uses a single, global setting for both is fundamentally flawed. True multimodality displays, like the MD120C, feature distinct hardware LUTs (Look-Up Tables) and processing paths for each signal type. This architecture ensures that a radiologist can view a DICOM-compliant X-ray in one window and a rich-color endoscopic video in another, simultaneously, with neither representation compromising the other. By binding these isolated pipelines to recallable layout templates, we transform consistency from a manual, ad-hoc adjustment into a repeatable, auditable process.
Density & Layouts: 12MP/8MP Dense Views vs Multi-Monitor Specialization
Workstation layouts often create friction. A single large screen can become cluttered, while multiple monitors force constant head-turning and divide a clinician’s attention, increasing fatigue and toggling time.
Single high-resolution panels increase "view density," reducing interaction. Multi-monitor setups reduce task interference. For strong comparative needs, use a single dense screen; for distinct roles, use specialized multi-monitor setups.
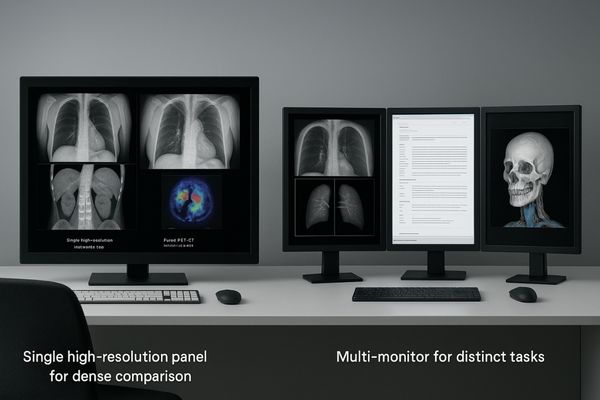
The choice between a single large screen and a multi-monitor setup is a trade-off between viewing density and task separation. Single high-resolution panels, such as 8MP or 12MP displays, excel at increasing "view density7." They allow a radiologist to see multiple high-resolution images—like bilateral mammograms with several priors—on one canvas without panning, zooming, or switching windows. This significantly cuts down on eye saccades and interaction cost, which is ideal for workflows with strong comparative needs. In these cases, a dual-screen diagnostic monitor like the MD46C offers a large, seamless canvas for direct comparison. In contrast, multi-monitor setups8 are superior when the workflow involves distinct, concurrent tasks. For instance, a radiologist might use one primary diagnostic monitor for interpreting a grayscale study, a second monitor for the reporting system and patient EMR, and a third for color reference images or 3D reconstructions. This physically separates the digital workspace and can reduce task interference, clarifying the workflow.
Realtime & Transport: 4K/60 and 12G-SDI in the OR
In the operating room, image latency or signal failure is not an option. Surgeons need a real-time view, but complex video chains with multiple cables create points of failure and interference.
The OR must prioritize real-time robustness. 4K/60 video over long-run, interference-resistant 12G-SDI cabling minimizes latency and jitter, delivering a clear image to the surgical team.
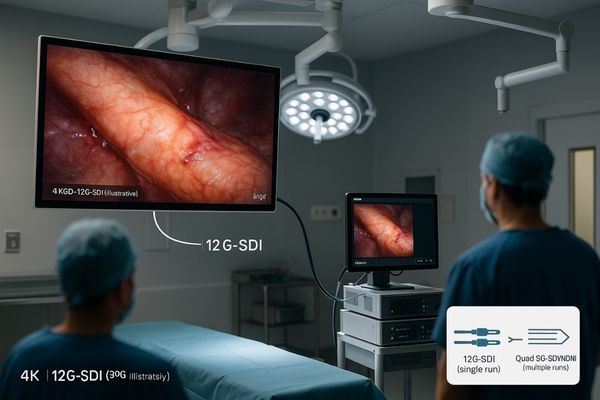
In the high-stakes environment of the operating room, the priority shifts from diagnostic interpretation to real-time robustness. Surgeons performing minimally invasive procedures depend on an immediate, crystal-clear view of the surgical field. There is no tolerance for latency, jitter, or signal degradation. This is where the combination of 4K/60 resolution9 and 12G-SDI transport10 becomes critical. The 4K resolution provides the necessary detail to identify delicate anatomical structures, while a 60Hz frame rate ensures fluid motion. 12G-SDI is the ideal transport mechanism for this data, providing a high-bandwidth, uncompressed signal over a single, long-run coaxial cable that is highly resistant to the electromagnetic interference common in an OR.like the MS322PB, when used with modalities like fluoroscopy, must present this information with absolute clarity and reliability. Multi-view modes like Picture-in-Picture (PIP) and Picture-by-Picture (PBP) further enhance the workflow by allowing surgeons to see live feeds alongside reference images on the same screen, reducing the need for the team to coordinate views across multiple displays.
Consistency & QC: Luminance Stability, Uniformity, Ambient-Light Control
A monitor’s performance degrades over time, often unnoticed. This slow drift in brightness and uniformity can silently compromise diagnostic accuracy across an entire department, leading to inconsistent reads.
Long-term luminance stability, uniformity compensation, and ambient light control matter more than peak contrast. Periodic QC with logged data outperforms ad-hoc calibration against time-driven drift and ensures consistency.
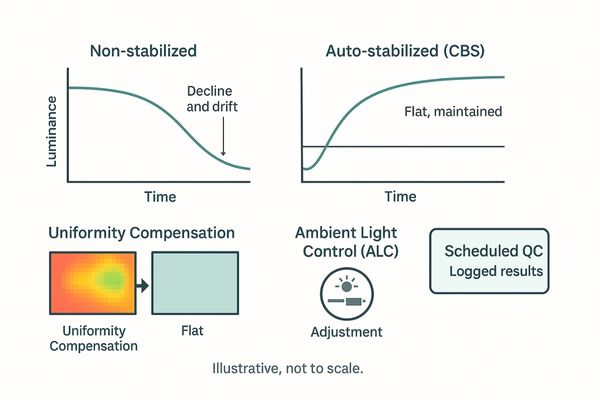
While pixel count and peak brightness are often highlighted, the true marks of a medical-grade display are its long-term consistency and stability. These factors are far more critical to diagnostic confidence than one-off performance specifications. Three technologies are paramount. First, luminance stabilization11 uses a front or backlight sensor to ensure the monitor maintains its calibrated brightness from warm-up and throughout its lifespan. Second, uniformity compensation12 corrects for minor brightness variations across the screen, ensuring an anomaly is equally visible in the center or a corner. Third, an ambient light control sensor adjusts the display to maintain perceptual consistency despite changes in room lighting. A general diagnostic monitor like the MD33G must possess these features to be reliable for daily clinical use. A scheduled, automated Quality Control (QC) process that periodically checks and logs these parameters is superior to infrequent, manual calibration. It provides an auditable record of compliance and ensures that every workstation in the department performs identically, preventing diagnostic drift.
Decision Tree: Match by Workstation, Scenario, Budget
Without a clear framework, hospitals often buy the wrong displays for the wrong tasks. This leads to overspending on features that are not needed and under-investing in capabilities that are critical.
To choose correctly, evaluate the use case by balancing three factors: clinical task, technical requirements, and budget. This structured approach ensures the best fit for every workstation, from reading rooms to ORs.
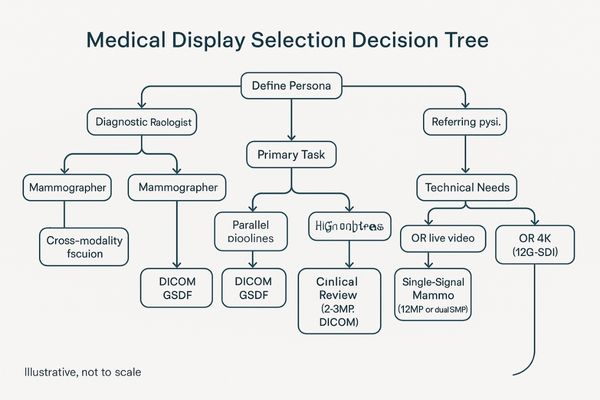
The optimal display is not always the one with the highest specifications but the one that best fits the specific use case. A simple decision tree can guide this process effectively. First, define the workstation persona13: is this for a diagnostic radiologist, a mammographer, a surgeon, or a referring physician? Second, identify the primary clinical scenario: does the task involve cross-modality fusion, single-signal deep reading, or general clinical review? Third, consider the budget and existing infrastructure. By mapping these needs, a clear choice emerges. For example, a PET-CT reading room requires a high-end fusion display with parallel pipelines. A mammography suite needs a high-brightness, single-signal display. For general PACS review on a ward, a cost-effective but DICOM-compliant clinical display14 is sufficient. This structured approach, using products like the versatile MD45C for flexible setups, prevents misallocation of resources and ensures that every dollar spent directly contributes to improved diagnostic workflow and patient care.
| Factor | Fusion Display | Single-Signal Display |
|---|---|---|
| Clinical Task | Correlation, Overlays (e.g., PET-CT) | Deep Dive, Scrutiny (e.g., DBT) |
| Key Technology | Parallel Processing Pipelines | DICOM Fidelity, High Brightness |
| Ideal Persona | Oncologic Radiologist, Surgeon | Mammographer, Specialist |
| Layout Focus | Dense comparative views (Single Screen) | Task-specific views (Multi-Monitor) |
TCO & Team Efficiency: Turn Specs into Process Assets
Hospitals often receive hardware without the processes to manage it. This leads to inconsistent use, compliance gaps, and a higher total cost of ownership as teams struggle with manual setups.
Deliver a "process package," not just hardware. This includes templates, checklists, and logs to ensure day-one readiness, long-term auditability, and maximum team efficiency, lowering the total cost of ownership.

The true value of a medical display investment is realized when its technical specifications are translated into durable process assets for the clinical team. Simply delivering a pallet of monitors is not enough. To lower the Total Cost of Ownership (TCO)15 and maximize team efficiency, a complete "process package16" should be part of the delivery. This package moves beyond hardware specs to provide actionable tools. It should include pre-configured layout templates for common procedures, with per-pane parameters for grayscale and color already set. It must also contain a clear acceptance checklist for go-live, a defined cadence for automated QC, and a system for generating and storing calibration logs. Having these assets from day one eliminates guesswork, reduces training time, and ensures every workstation is used consistently and correctly. This approach makes the deployment smoother and ensures the institution is always ready for an audit, with a complete, traceable history of each display’s performance and compliance.
Conclusion
The choice between fusion and single-signal displays is scenario-dependent; matching the right display technology and workflow to the specific clinical task is essential for maximizing diagnostic efficiency.
👉 Need help mapping fusion vs single-signal displays to your workflow? Contact Martin at martin@reshinmonitors.com — we’ll recommend the right setup.
-
Explore how Image fusion enhances diagnostic accuracy and efficiency by combining data from multiple imaging sources. ↩
-
Learn about the advantages of DBT in providing detailed analysis for breast cancer screening and diagnosis. ↩
-
Understanding cross-modality correlation can enhance diagnostic accuracy and improve patient outcomes in medical imaging. ↩
-
Exploring the benefits of multimodality displays can reveal how they streamline diagnosis and improve visualization in complex cases. ↩
-
Understanding GSDF is crucial for ensuring accurate grayscale image display in medical imaging, enhancing diagnostic reliability. ↩
-
Exploring gamma laws helps in grasping how color accuracy is achieved in imaging, vital for effective visual diagnostics. ↩
-
Understanding view density can help you choose the right display setup for your needs, enhancing productivity and efficiency. ↩
-
Exploring the benefits of multi-monitor setups can reveal how they can improve your workflow and task management. ↩
-
Explore how 4K/60 resolution enhances surgical precision and clarity, crucial for successful minimally invasive procedures. ↩
-
Learn about the benefits of 12G-SDI transport in delivering high-quality, uncompressed video signals essential for surgical environments. ↩
-
Understanding luminance stabilization is crucial for ensuring consistent brightness in medical displays, enhancing diagnostic accuracy. ↩
-
Exploring uniformity compensation helps grasp how it corrects brightness variations, ensuring reliable diagnostics across the entire screen. ↩
-
Understanding workstation personas helps tailor display solutions to specific medical roles, enhancing efficiency and patient care. ↩
-
Exploring DICOM-compliant displays reveals their importance in ensuring standardized medical imaging, crucial for accurate diagnostics. ↩
-
Understanding TCO helps in making informed decisions about medical display investments, ensuring long-term savings and efficiency. ↩
-
Exploring the components of a process package can enhance deployment strategies and improve clinical team efficiency. ↩