Your hospital just invested in new "DICOM-compliant" monitors, but radiologists still report inconsistencies between workstations. This ambiguity creates doubt and undermines the entire purpose of the investment.
True DICOM Part 14 compliance is not a marketing label but an evidence-based system. Hospitals must perform objective verification to ensure grayscale consistency, protect diagnostic integrity, and meet audit requirements.
In medical imaging, consistency is not a luxury; it is a clinical necessity. The DICOM (Digital Imaging and Communications in Medicine) standard is the bedrock of this consistency, and Part 14 is its most critical component for visual fidelity. Yet, the term "DICOM compliant" is frequently misused in marketing, leading to a dangerous gap between a monitor’s advertised features and its actual clinical performance. Simply selecting a "DICOM mode" from a menu is not enough. True compliance requires a systematic, evidence-based approach to verification. This article will demystify what DICOM Part 141 actually is, explain why rigorous verification matters, and provide a practical, step-by-step guide for hospitals to ensure the monitors they rely on are not just compliant in name, but verifiably accurate in practice.
What is DICOM Part 14?
Many assume DICOM Part 14 is just a setting on a monitor. In reality, it is a rigorous standard for the entire imaging chain, from source to screen.
DICOM Part 14 defines the Grayscale Standard Display Function (GSDF), a perceptual model that ensures consistent grayscale rendering and preserves detail across all compliant devices and viewing conditions.

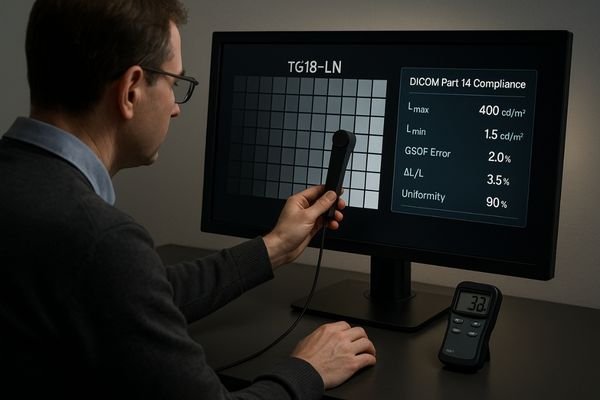
DICOM PS 3.14, or Part 14, specifies a standardized function called the Grayscale Standard Display Function (GSDF)2. This is not just an arbitrary brightness curve; it is a precisely defined, perceptually linearized standard. The GSDF is based on extensive research into the human visual system, specifically mapping the digital pixel values in an image to luminance levels on a screen in a way that corresponds to just-noticeable differences (JNDs). In simple terms, it ensures that each step in the grayscale has a visually equal weight, preserving the visibility of subtle details in both the darkest and brightest parts of an image. True compliance means that the entire imaging pipeline—from the signal source, through the graphics card’s lookup table (LUT), to the monitor’s final light output—is measured and calibrated. The result is a measured performance curve that accurately tracks the GSDF standard between the monitor’s minimum and maximum luminance (Lmin and Lmax). This is not a factory preset; it is a verifiable state backed by acceptance records, enabling true consistency across different rooms, modalities, and devices.
Why it matters: clinical and operational impact
When grayscale rendering is inconsistent, so are clinical interpretations. The impact extends from patient outcomes to departmental efficiency and legal defensibility.
Perceptual consistency reduces misreads and repeat scans, makes follow-up comparisons reliable, and creates auditable records that speed up audits, reduce disputes, and lower operational overhead.
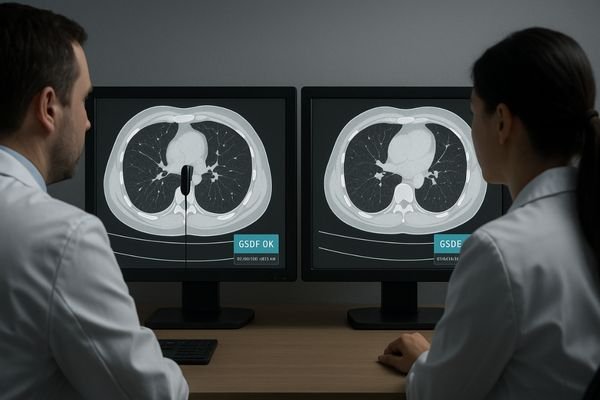
The clinical impact of failing to achieve true DICOM Part 14 compliance is profound. When displays render grayscale inconsistently, a subtle lesion visible on one workstation may be completely invisible on another. This directly increases the risk of misreads and diagnostic errors. For longitudinal studies, where a clinician compares a current scan to a prior one to track disease progression, stable conspicuity is essential. Without GSDF conformance3, it is impossible to know if a change in a lesion’s appearance is real or simply an artifact of display drift. This uncertainty can lead to unnecessary follow-up scans, increasing patient radiation exposure and healthcare costs.
Operational and Financial Benefits
Operationally, the benefits of a verifiably compliant display fleet are equally significant. Having auditable records of calibration and quality assurance (QA) dramatically speeds up regulatory audits and simplifies the tender process for new equipment. It reduces disputes between clinicians over subjective image appearance and minimizes training effort, as the visual experience is standardized. Furthermore, by ensuring displays operate within their specified, calibrated luminance range, you avoid the common practice of "over-driving" brightness to compensate for poor setup, which shortens the display’s lifespan.
How hospitals verify: day-1 acceptance steps
Verification is not a theoretical exercise. It is a hands-on, data-driven procedure that should be performed on every new clinical display before it is put into service.
A structured acceptance test involves a warm-up, ambient light control, use of TG18/TG270 test patterns, and objective measurement of Lmax/Lmin, GSDF error, stability, and uniformity, with all results logged.
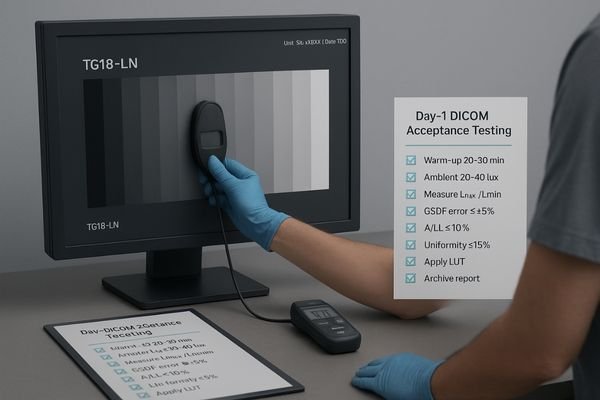
Day-1 acceptance testing is the critical first step in building a compliant imaging ecosystem. This is a formal process that must be documented for every single clinical display (tools: calibrated photometer, lux meter, TG18/TG270 test patterns, LUT-capable calibration software).
The Acceptance Protocol
The protocol begins with a 20–30 minute warm-up period to allow the monitor to reach thermal and luminance stability. During this time, control the ambient light in the room to the target level of 20–40 lux at the viewing position. Next, display standardized test patterns, such as those from the AAPM TG18 or TG270 reports. Using a calibrated photometer, perform a series of objective measurements. This includes capturing the maximum and minimum luminance (Lmax/Lmin) to define the display’s dynamic range. The most important step is to measure the display’s response at multiple grayscale steps and compare it to the GSDF curve, ensuring the error is within an acceptable threshold (e.g., ≤±5%). You must also measure luminance stability (ΔL/L, e.g., ≤10%) and screen uniformity (e.g., ≤15%). Once the measurements are complete, generate and apply the corrected lookup table (LUT)4 and produce a formal calibration report. This report, along with screenshots or photometer data, should be archived as the official birth record of the display’s compliance.
Constancy QA: periodic checks and logging
Compliance is not a one-time event; it is a state that must be maintained. A regular schedule of quality assurance checks is essential to detect and correct drift.
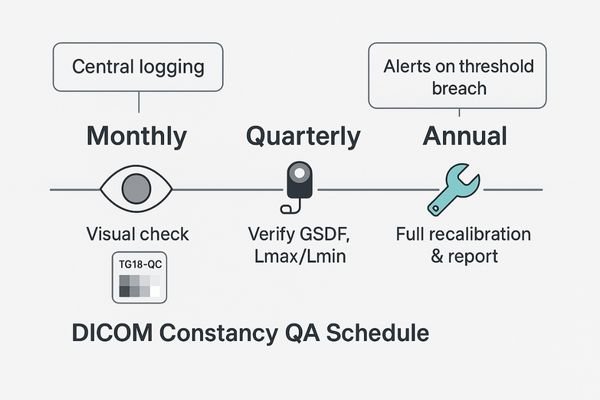
Implement a QA schedule of monthly visual checks, quarterly photometer verification of key metrics, and an annual full recalibration. All results must be logged to create an auditable history.
After a monitor passes its day-1 acceptance test, its performance will inevitably begin to drift over time due to component aging and environmental changes. A robust Constancy QA program is designed to catch this drift before it becomes clinically significant. This program should be a scheduled, multi-tiered process.
A Tiered Approach to Maintenance
On a monthly basis, a quick visual check should be performed by the user or a technician using a simple test pattern like the TG18-QC. This allows for the rapid identification of any gross visual artifacts or changes. On a quarterly basis, a more rigorous check should be performed with a photometer to verify the key performance indicators: GSDF conformance, Lmax, and Lmin. This quantitative check ensures the display has not drifted outside its established performance thresholds. Annually, a full recalibration—repeating the entire day-1 acceptance protocol—should be performed to reset the display to its baseline. For displays equipped with built-in luminance stabilization or Automatic Luminance Control (ALC)5 sensors, these features should be enabled. The system should be configured to generate alerts if any QA check breaches the predefined thresholds. Crucially, all results from every check must be centrally logged to build a continuous, auditable performance history for each device.
Common pitfalls and how to avoid them
Many hospitals fall into common traps that create a false sense of security about DICOM compliance. Recognizing these pitfalls is the first step toward building a truly robust system.
Common pitfalls include confusing "DICOM mode" with true compliance, ignoring ambient light, performing one-time calibrations without follow-up QA, and managing mixed-brand workstations without a unified baseline.
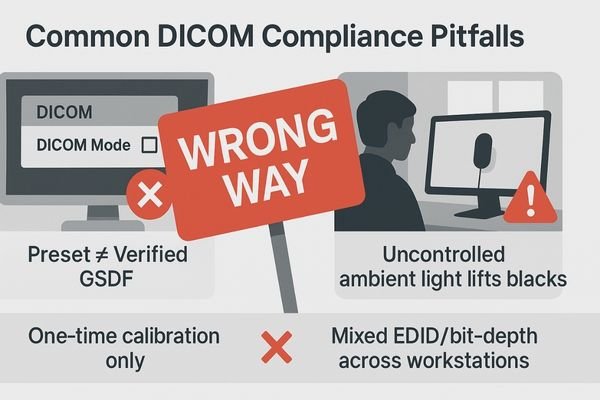
The path to verifiable DICOM compliance is fraught with common but avoidable pitfalls. The most prevalent is mistaking a monitor’s "DICOM supported" or "DICOM mode" feature for actual compliance. This is a dangerous assumption; a factory preset is not a substitute for a site-specific, measurement-based calibration and verification report. Another frequent error is focusing only on adjusting brightness and contrast controls subjectively. True compliance is about the entire GSDF curve, which cannot be assessed by eye alone and requires a photometer.
Systemic and Environmental Oversights
Perhaps the biggest pitfall is the "one and done" approach to calibration. Performing an acceptance test without implementing a follow-up Constancy QA program is like taking a single blood pressure reading and assuming a patient’s health is guaranteed for life. Performance will drift, and without periodic checks, that drift will go unnoticed. Forgetting the environment is another critical mistake; a perfectly calibrated display is immediately compromised by uncontrolled ambient lighting, which raises the effective black level and compresses the grayscale. Finally, many institutions fail to manage their fleet as a system, allowing mixed brands and workstations to operate with different EDID settings, bit-depths, and software presets, creating a state of digital chaos that makes consistency impossible. A related oversight is failing to record ambient illuminance (lux) during acceptance and QA; without this, results are hard to reproduce or compare across rooms.
Solution: make compliance a system
Lasting compliance is not achieved by buying a product or running a test. It is achieved by building an integrated system of technology, procedures, and documentation.
Standardize on GSDF calibration with luminance stabilization, unify technical settings and QA templates, perform all tests under controlled lighting, and use automated software for verification and logging.
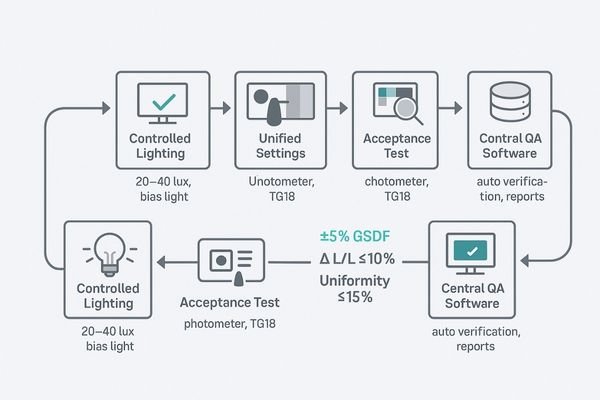
The only durable solution to the challenge of DICOM compliance is to treat it as a system, not a series of isolated tasks. This system integrates hardware, software, environment, and procedures into a cohesive whole. The foundation is standardized hardware that supports GSDF calibration and features built-in front sensors for automated luminance stabilization. This should be paired with a unified policy for technical settings across all workstations, locking down EDID, bit-depth, and PACS viewer presets to eliminate variability. All acceptance and constancy tests must be performed under controlled lighting conditions to ensure the results are meaningful and repeatable. The core of the system is a centralized QA software platform that automates the verification process, guides the user through the measurements, and automatically archives the results in a central database. For multi-monitor workstations and multiview layouts, the system must include side-by-side checks to guarantee perceptual matching between all adjacent screens or panes (confirm each pane’s mapping, resolution, and that GSDF/luminance targets remain within thresholds).
Recommended DICOM-Compliant Monitors
| Model | Primary Use Case | Key Compliance Features |
|---|---|---|
| MD52G | 5MP Grayscale Diagnosis | Integrated GSDF calibration, luminance stabilization, uniformity control, supports exporting calibration/QA reports |
| MD85CA | 8MP Multimodality Color | High-res panel with grayscale channel verification, built-in QA logging, suitable for fusion/MDT rooms |
| MD33G | 3MP Grayscale General Use | Cost-effective path to verifiable compliance for general radiology; stable luminance and uniformity controls |
| MS321PB | 32″ 4K Surgical | GSDF-aligned grayscale reference for OR; verification via hospital protocol and acceptance logging |
| MS550P | 55″ Hybrid OR / Wall | Large-format multiview with reference GSDF checks for team review; document pane mapping and thresholds |
FAQ
As teams work to implement a formal DICOM verification program, several practical questions consistently arise. Here are answers to a few of the most common ones.
What’s the difference between “DICOM mode” and “meets DICOM Part 14”?
"DICOM mode" is typically a static factory preset that applies a generic gamma curve. "Meets DICOM Part 14" means the entire imaging pipeline has been objectively measured on-site, a custom LUT has been generated and applied, and the resulting GSDF curve is verified to track the standard within specific tolerances. Compliance requires auditable proof, not just a label.
Which thresholds should hospitals check on day-1 acceptance?
Key day-1 acceptance thresholds are: GSDF error within ±5% of the standard curve, luminance stability (ΔL/L) within 10%, screen uniformity within 15% deviation from the center, and controlled ambient light at the eye position around 20–40 lux. You must also document the final Lmax and Lmin values with archived screenshots or photometer logs.
What tools and patterns are required for verification?
The essential toolkit includes a calibrated, high-quality photometer for measuring luminance; a lux meter for measuring ambient room light; standardized digital test patterns like the AAPM TG18 or TG270 suite; calibration software capable of generating and applying LUTs; and a formal QA template or software to archive the results.
How often should constancy QA be performed after acceptance?
A standard, defensible schedule is: monthly visual checks with a simple test pattern, quarterly photometer measurements to verify GSDF tracking and luminance levels, and a complete annual recalibration. All results must be logged to maintain an unbroken audit trail.
Do color monitors and multiview layouts need verification too?
Absolutely. For color monitors, you must verify the grayscale channel’s conformance to GSDF. For multiview layouts (PIP/PBP/quad), you must confirm that each individual pane or window maintains its resolution and that its GSDF and luminance targets remain within the required thresholds. Locking the EDID and bit-depth for each input is critical for stability.
Conclusion
True DICOM compliance is an evidence-based practice—a routine built on controlled environments, measurable curves, repeatable procedures, and auditable logs—that ensures durable clinical and audit readiness.
- Understanding DICOM Part 14 is crucial for ensuring visual fidelity in medical imaging. Explore this link to gain insights into its significance. ↩
- Understanding GSDF is crucial for ensuring accurate image representation in medical imaging, enhancing diagnostic capabilities. ↩
- Exploring GSDF conformance will help you grasp its role in maintaining image consistency and improving patient care. ↩
- Exploring LUTs will enhance your knowledge of display calibration techniques and improve your setup. ↩
- Learn about ALC technology and its benefits in maintaining optimal display performance and consistency. ↩