- Map clinical tasks to visual specs in minutes
- Shortlist 4K OR and DICOM reading options fast
- Use acceptance/QC checklists to cut onboarding time
This guide maps clinical needs directly to monitor specifications. We focus on how features like 4K resolution with AR-bonded glass, 12G-SDI connectivity, and automated DICOM-QC with ALC/CBS solve real-world problems in the OR and reading room, helping you select a monitor that passes acceptance today and scales for tomorrow.
This guide provides a rapid framework for selecting the right medical-grade display1. The core principle is to start with the clinical task and map it directly to the required visual specifications and hardware features. Instead of getting lost in datasheets, this approach focuses on the practical questions that matter. Does the workflow demand real-time motion clarity for surgery or perfect grayscale consistency for diagnostics? Is the environment a sterile OR requiring wipe-clean surfaces or a reading room where ambient light changes? By breaking down the selection process into user roles, technical requirements, and lifecycle considerations, you can confidently shortlist monitors that not only meet today’s acceptance criteria but are also equipped to handle the demands of tomorrow. We built our surgical series2, including versatile models like the MS321PB, with this philosophy in mind, ensuring features like multi-image modes and robust I/O are standard.
User roles and scenarios: OR, Endoscopy, Cath Lab, Radiology, Clinic
Mis-matching role and environment is common. For example, diagnostic reading displays in bright ORs suffer glare and lack wipe-clean fronts, while OR monitors in reading rooms are not tuned for DICOM GSDF.
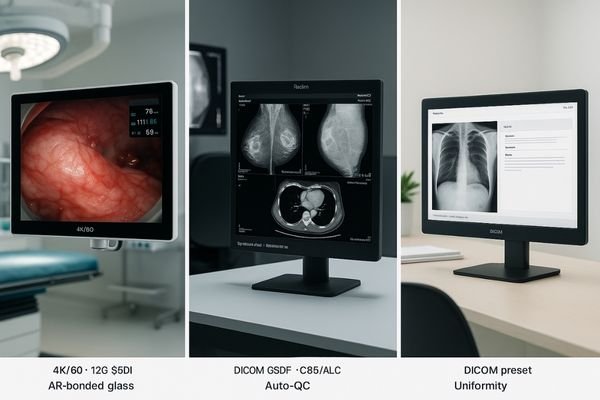
Match the display to the user role and environment. ORs need 4K clarity and hygiene, while radiology demands DICOM compliance and stability. Clinics require cost-effective, DICOM-ready review stations.
The selection process must begin with the user and their environment. Each clinical scenario imposes a unique set of demands on a display. For the operating room, endoscopy suite, or cath lab, the priorities are real-time 4K image quality3, low latency, and robust hygiene. For these applications, a surgical monitor like the MS322PB is designed specifically to thrive under bright OR lights. In contrast, the radiology reading room is a controlled environment focused on diagnostic interpretation, where strict DICOM Part 14 compliance4 for grayscale accuracy is the non-negotiable requirement. For general clinics and technologist workstations, a cost-effective clinical display with DICOM presets offers a balance of quality and value, ensuring consistency without the cost of a primary diagnostic monitor.
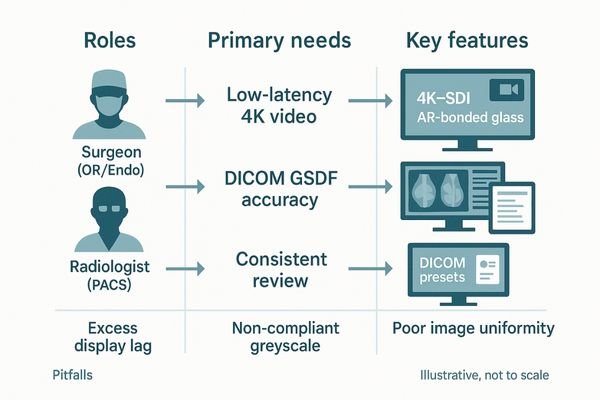
| User Role/Scenario | Primary Need | Key Features | Common Pitfalls |
|---|---|---|---|
| Surgeon (OR/Endo) | Low-latency 4K/60 video feed | 12G-SDI, AR-bonded glass, Multiview | Using long HDMI runs causes signal jitter or dropouts |
| Radiologist (PACS) | DICOM GSDF accuracy & stability | Auto-QC, CBS/ALC, 8–12MP | Using an OR display leads to inaccurate grayscale reads |
| Technologist/Clinician | Consistent image review | DICOM presets, uniformity comp. | Inconsistent gamma settings cause poor contrast |
Size and resolution by viewing distance: 19–55", 2–12MP, 4K
Picking a monitor that is too small or has insufficient resolution for the viewing distance can force clinicians to zoom excessively, leading to fatigue and slower workflow.
Select size and resolution based on کاربر distance and task. For desks, use 2-5MP monitors. For ORs and cath labs, use larger 4K screens from 27-55" for clear visibility from a distance.
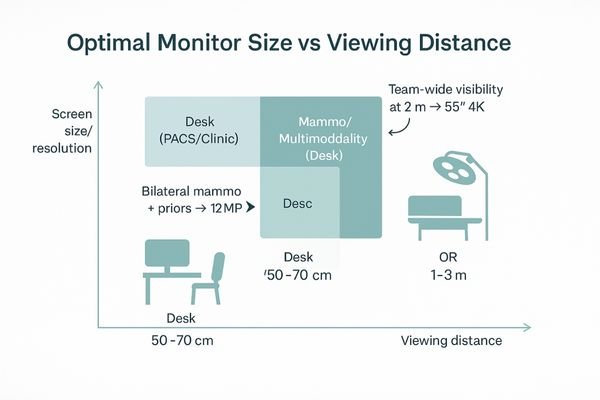
The right combination of screen size and resolution is dictated by the viewing distance and clinical task.
- Desk (50–70 cm): A 21–30" monitor with 2–5MP resolution is ideal for general PACS and clinical review.
- Mammo/Multimodality (Desk): An 8–12MP fusion display is needed to view bilateral studies, priors, or fused datasets (e.g., PET/CT) on a single screen. A dedicated mammography monitor like the 5MP MD52G allows for viewing detailed DBT studies.
- OR (1–3 m): Larger 27–55" 4K (8MP) screens5 like the MS550P are essential for team-wide visibility, providing the pixel density needed to resolve fine anatomy from across the room.
Grayscale vs color pipelines and DICOM GSDF compliance
Using a single uncalibrated monitor for both grayscale and color images is a risk. It can hide subtle pathologies in a radiograph or misrepresent tissue color in an endoscopic video, impacting clinical decisions.
A medical display must have separate, calibrated pipelines for grayscale (DICOM Part 14) and color (gamma-based). Create per-window presets (GSDF vs. Gamma) with hotkeys, and capture a one-page ‘acceptance snapshot’ (luminance, ΔGSDF, white point) for audits.
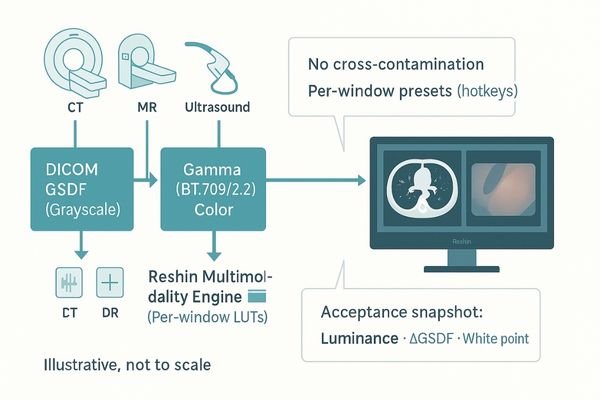
One of the most critical technical differentiators of a true medical-grade display is its ability to manage grayscale and color information independently and accurately. Grayscale images must be rendered according to the DICOM Part 14 Grayscale Standard Display Function (GSDF)6 for diagnostic consistency. Color images from endoscopy or ultrasound follow different standards, typically based on a gamma curve like BT.7097. A high-performance multimodality monitor like the MD120C must process both in parallel. This allows a clinician to view a DICOM-compliant CT scan in one window and a color-accurate ultrasound in another, on the same screen, with absolute confidence that neither image is compromising the other.
Luminance stability and ambient light: CBS and ALC essentials
A monitor’s brightness naturally degrades over time and fluctuates with room lighting. This drift can cause inconsistencies in image interpretation, silently undermining diagnostic confidence across the department.
Constant Brightness System (CBS) and Ambient Light Control (ALC) are essential. CBS counteracts aging effects, while ALC adjusts for room light, ensuring stable and consistent image presentation.
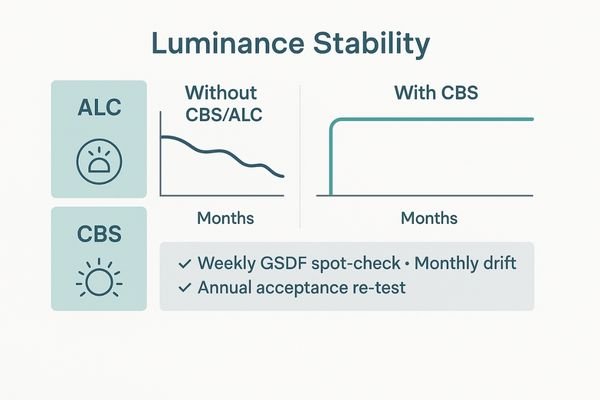
While peak brightness is an attractive specification, long-term luminance stability is far more critical for diagnostic confidence. A monitor’s performance should not degrade significantly from the moment it is commissioned. A Constant Brightness System (CBS)8 uses an integrated backlight sensor to guarantee a stable, calibrated luminance level for years. Ambient Light Control (ALC)9 uses a front-facing sensor to adjust the display’s brightness to match room conditions. A reliable clinical review display like the MD33G incorporates both.
- Weekly: Quick GSDF spot-check using built-in test patterns.
- Monthly: Review automated luminance drift logs.
- Annual: Full acceptance re-test and room light audit.
Interfaces and latency: HDMI, DP, 12G-SDI, multi-source workflows
Connecting imaging equipment can be a nightmare of incompatible ports and signal problems. Using the wrong cable can introduce latency or artifacts, which is unacceptable during a live surgical procedure.
List all image sources first, then map them to the monitor’s I/O panel. For surgery, prioritize 12G-SDI for low-latency, long-run 4K60. For diagnostics, DP and HDMI suffice.
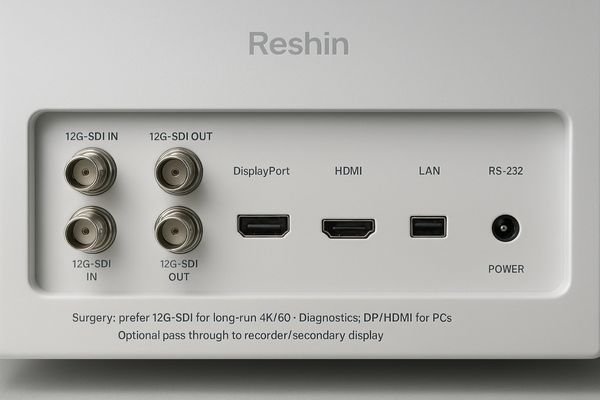
A monitor is only as good as the signal it receives. Use this checklist to ensure seamless integration:
- Source List: Document each source’s resolution, frame rate, color space, connector type, and required cable length.
- Transport: Prioritize 12G-SDI for long-distance, interference-resistant 4K60 runs. Use DisplayPort (DP) for primary PC connections and HDMI for auxiliary sources.
- Routing: Does the monitor need pass-through outputs to send the signal to a recorder or secondary display? A versatile surgical display like the MS270P often includes this.
- Latency Budget: Account for the total delay from camera to processor to transport to the display.
AR glass and optical bonding for hygiene and glare control
Standard monitor screens reflect overhead OR lights, obscuring the image. Their plastic bezels have seams that trap fluids and contaminants, making proper disinfection difficult and time-consuming.
AR-bonded glass is crucial for the OR. It cuts glare for better visibility and creates a seamless, flat front that is easy to wipe clean. Flat, sealed fronts reduce ingress and shorten wipe-downs under harsh disinfectants; avoid crevice-prone bezels.
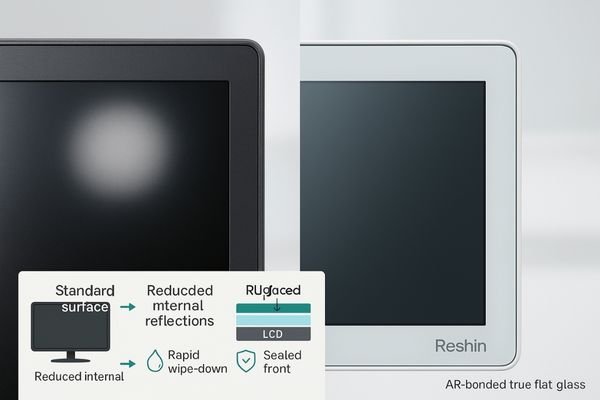
In the brightly lit environment of an operating room, glare is a constant enemy. Premium surgical displays use anti-reflective (AR) coated protective glass10. This is enhanced with optical bonding11, a process that laminates the glass directly to the LCD panel, eliminating the air gap. This technique drastically reduces internal reflections and improves contrast. This technology also serves a critical hygiene function. The process creates a true flat-front surface with no bezel or seam where fluids and contaminants can collect. This seamless design is compatible with harsh chemical disinfectants and allows for rapid wipe-downs between procedures, supporting stringent infection control protocols.
Multiview layouts: PIP, PBP, and two-to-eight split views
Surgeons and radiologists often need to compare multiple images at once. Tiling windows on a single-source display or looking back and forth between monitors is inefficient and increases cognitive load.
Use built-in, templated multiview functions (PIP, PBP, quad-view) to consolidate multiple sources onto one screen. This improves situational awareness, reduces equipment clutter, and streamlines comparative workflows.
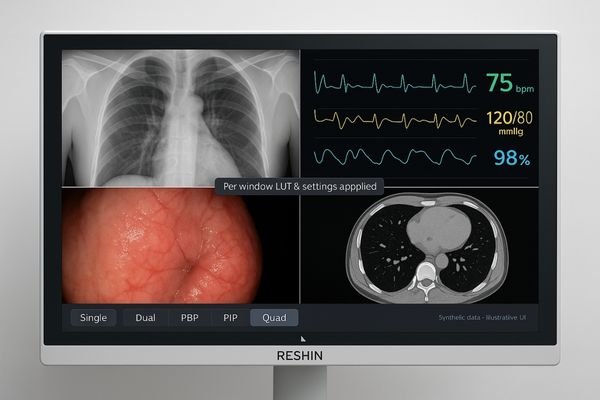
Modern medical workflows frequently require the simultaneous visualization of multiple image sources. An advanced display can present all necessary information on one unified canvas using templated layouts that become second nature to the clinical team.
- Fluoro+Vitals12: Live fluoroscopy in the main window with vital signs in a small Picture-in-Picture (PIP) window.
- US+CT: An ultrasound and a CT scan shown side-by-side in a Picture-by-Picture (PBP) layout with independent gamma settings.
- PET-CT Fusion13: A quad-view showing the PET, CT, fused image, and a reference image, with synchronized zoom and pan on a fusion display like the MD85CA.
Acceptance, QC routines, and lifecycle cost considerations
Buying a monitor is just the first step. Without a plan for quality control, its performance will degrade unnoticed, creating compliance risks and eroding the value of the investment over time.
Download: Acceptance Checklist & QC Schedule (PDF/Excel)
Choose displays with built-in, automated QC features. This simplifies acceptance testing and lowers total cost of ownership (TCO). A 2% luminance drift reduction across 3 years typically saves ≥N technician-hours and retests.
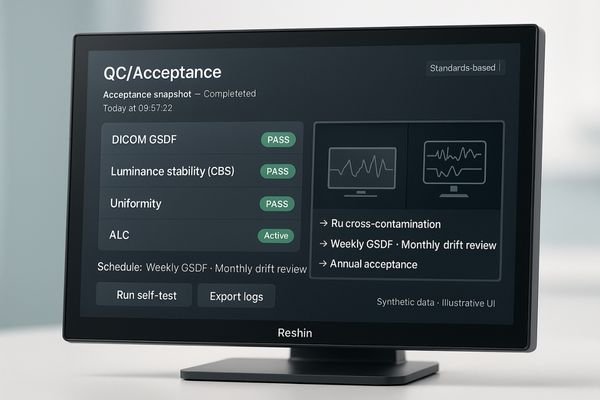
Thinking about Total Cost of Ownership (TCO)14 means looking beyond the initial purchase price. A key factor in lowering TCO is simplifying and automating Quality Control (QC)15. A display with built-in, automated QC routines can perform self-tests for DICOM compliance and luminance stability, logging the results for easy auditing. This simplifies initial acceptance testing and ensures that all monitors in a department, like the versatile MD45C, perform to the same standard. By selecting a monitor designed for easy management and verifiable performance, you ensure it remains a reliable clinical asset for its entire lifespan, minimizing support costs and maximizing its return on investment.
Conclusion
To select the right medical monitor, follow three steps: 1) List your sources and user roles, 2) Map to required image specs and hygiene features, and 3) Run acceptance tests using built-in QC presets. 🩺
👉 For expert guidance and tailored solutions, reach out at martin@reshinmonitors.com.
-
Explore this link to understand the essential criteria for choosing a medical-grade display that meets clinical needs. ↩
-
This resource will provide insights into the key features of surgical series monitors, ensuring optimal performance in medical settings. ↩
-
Explore this link to understand how real-time 4K image quality enhances surgical precision and outcomes. ↩
-
Learn about DICOM Part 14 compliance to ensure accurate grayscale imaging for diagnostics in radiology. ↩
-
Explore how 4K (8MP) screens enhance visibility and detail in medical imaging, crucial for accurate diagnoses. ↩
-
Understanding GSDF is crucial for ensuring diagnostic consistency in medical imaging. ↩
-
Exploring BT.709 will enhance your knowledge of color standards in medical imaging, vital for accurate diagnostics. ↩
-
Understanding CBS can enhance your knowledge of monitor stability and performance, crucial for diagnostic applications. ↩
-
Exploring ALC will help you appreciate how monitors adapt to lighting conditions, improving viewing experience and accuracy. ↩
-
Explore this link to understand how AR coatings enhance visibility and hygiene in surgical environments. ↩
-
Learn about optical bonding’s role in reducing reflections and enhancing image quality in medical displays. ↩
-
Explore how Fluoro+Vitals enhances real-time patient monitoring and improves clinical decision-making. ↩
-
Learn about the advantages of PET-CT Fusion for comprehensive imaging and better patient outcomes. ↩
-
Understanding TCO helps in making informed purchasing decisions, ensuring long-term savings and efficiency. ↩
-
Exploring automation in QC can reveal strategies to enhance productivity and reduce errors in your operations. ↩