Reading studies with mixed imaging types on separate screens creates friction. This siloed approach forces radiologists to mentally stitch together data, increasing cognitive load and the risk of missed findings.
Same-screen multimodality needs parallel, isolated pipelines for DICOM grayscale and color gamma, reinforced by CBS/ALC and templated multi-window layouts. With 4K/60 and 12G-SDI low-latency links, workflows align from reading rooms to ORs, improving consistency and decision speed.
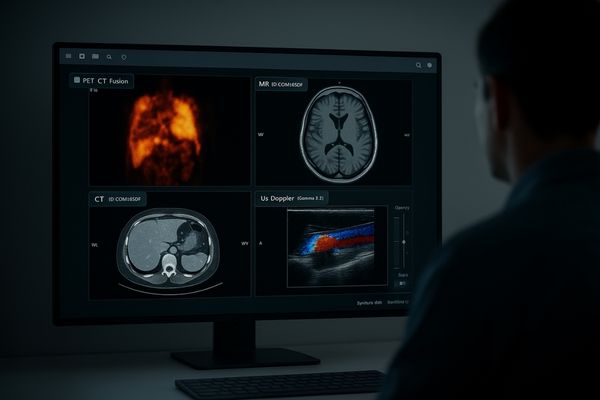
Modern diagnostic workflows increasingly rely on correlating information from disparate imaging modalities. A single case might involve reviewing a grayscale CT scan, a color Doppler ultrasound, and a functional PET overlay. Each of these requires a distinct display treatment to be viewed accurately. A general-purpose monitor simply cannot render them all correctly on one screen. This is where a dedicated multimodality display1 becomes essential. It’s not just about having a large, high-resolution screen; it’s about the underlying technology that can process and present each image type according to its specific standard—simultaneously. For instance, the system must apply a DICOM GSDF curve2 to the CT slice while rendering the ultrasound with its native color gamma, all without compromise. By providing this capability, we empower clinicians to see a holistic view of the patient’s condition, enabling them to make more informed and confident decisions directly at the workstation without needing to switch between different displays or rooms.
From Multimodality Data to Clinical Decisions: The Display Pipeline
Clinicians need to compare grayscale and color images side-by-side, but standard displays cannot render both accurately at once. This forces a choice between correct tonality or correct color saturation, compromising diagnostic confidence.
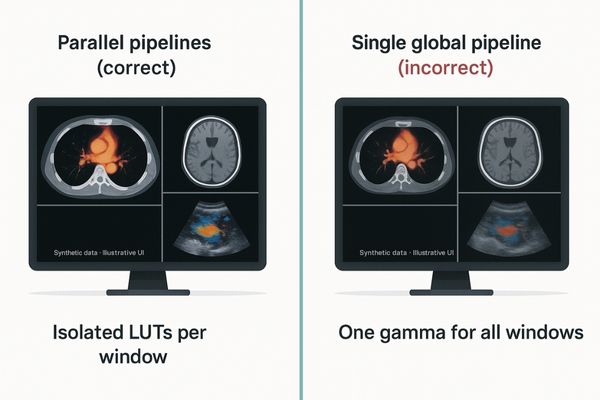
The core of multimodality viewing is not just pixels but parallel, isolated pipelines for DICOM grayscale and calibrated color. This segregation ensures each view is rendered accurately without cross-contamination.
The cornerstone of effective same-screen multimodality analysis is a display architecture built on parallel, isolated processing pipelines. When a display uses a single, global setting for gamma and color, it inevitably leads to cross-contamination. Adjusting the screen for an accurate DICOM Part 143 grayscale view will desaturate color images, while optimizing for vibrant color will distort the perceptual linearization of the grayscale data. A true multimodality display4 avoids this compromise. It maintains separate, independent pipelines for DICOM-compliant grayscale rendering and calibrated color gamma. For example, a diagnostic display like the MD85CA can process and show a grayscale MRI with its precise tonal range in one window while simultaneously presenting a vivid color-flow doppler image in another, with each adhering to its specific standard. We extend this capability with window-level controls that can be applied on a per-view basis. These settings can then be saved as recallable layout templates, ensuring that display consistency becomes a procedural guarantee rather than a manual, artisanal effort by the user.
Parallel—and Isolated—Pipelines for DICOM Grayscale and Color Gamma
Using a single monitor for mixed imaging types often leads to visual errors. A shared global gamma setting means either the grayscale CT is wrong or the color ultrasound is wrong.
To prevent cross-contamination between grayscale tonality and color saturation, we use independent window-level controls and per-view DICOM Part 14 compliance, hardened into recallable templates for procedural consistency.
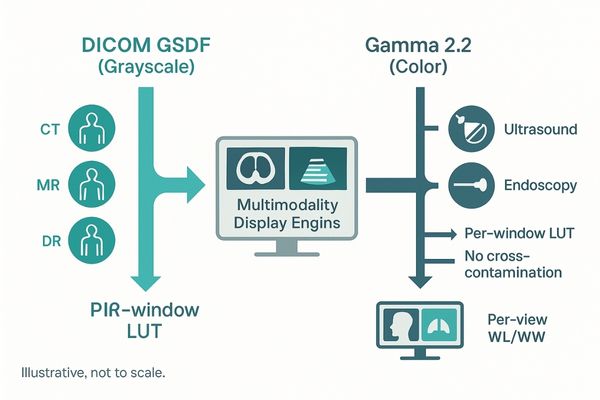
The fundamental challenge in multimodality display is managing fundamentally different types of image data on a single screen. Grayscale images, such as CT or MR, must adhere to the DICOM Part 14 Grayscale Standard Display Function (GSDF)5 to ensure perceptual uniformity and diagnostic interchangeability. Color images, from sources like ultrasound or endoscopy, typically rely on standard gamma curves like 2.2 to be rendered accurately. A monitor that applies one global setting to all windows cannot satisfy both requirements. If it’s set to DICOM, color information becomes washed out and diagnostically unreliable. If set to a standard color gamma, the subtle but crucial gray level distinctions in a radiograph are lost. The only robust solution is a display architecture that maintains isolated pipelines. Each window or input source is processed independently, with its own dedicated Look-Up Table (LUT)6. The MD32C, for instance, can render a DICOM-calibrated chest X-ray in one window and a full-color pathological slide in another, with zero cross-contamination. This ensures that every piece of clinical data is presented with absolute fidelity.
Resolution & Layouts: 12MP/8MP Single Screens vs. Multi-Monitor Setups
Radiologists face a trade-off between screen real estate and task focus. Is it better to have one massive screen for everything, or multiple specialized screens for different tasks?
Single high-MP screens are best for dense, comparative views, while multi-monitor setups excel at separating specialized tasks. The rule is: go single high-MP for comparison; go multi-monitor for distinct roles.
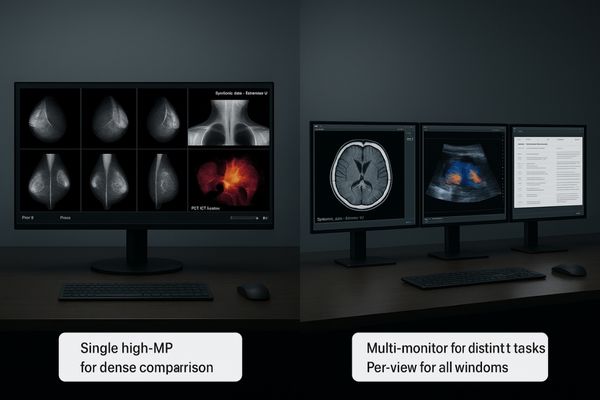
Choosing the right display configuration depends heavily on the primary clinical task. For workflows that involve dense comparison—such as reviewing a current mammogram against multiple priors or analyzing functional PET-CT overlays—a single, large, high-resolution screen7 significantly reduces interaction cost. With a 12MP display like the MD120C, a radiologist can view bilateral mammograms alongside DBT slices without panning, zooming, or switching screens, keeping their focus entirely on the diagnostic task. Conversely, multi-monitor setups8 excel when tasks and roles are distinct. A common configuration includes a high-quality primary diagnostic display for grayscale images paired with a smaller clinical review monitor for patient data, reporting software, and color reference images. This physical separation helps organize the workflow. A good rule of thumb is to consolidate onto a single high-megapixel screen when the core task is a direct comparison of multiple, similar images. Use a multi-monitor setup when the workflow involves managing disparate tasks or information types, such as active diagnosis versus administrative reporting.
| Configuration | Best Use Case | Primary Benefit |
|---|---|---|
| Single 12MP/8MP | Dense image comparison (e.g., Mammography with priors, PET-CT) | Reduced interaction cost; focused attention. |
| Dual 5MP/6MP | Standard PACS reading (e.g., Chest CT) | Traditional, widely adopted layout. |
| Multi-Monitor (Mixed) | Separated tasks (e.g., Diagnosis + Reporting + EMR) | Physical organization of workflow. |
Consistency & Stability: Luminance Control, Uniformity, and Ambient Light
A new display looks great, but its brightness and uniformity can drift over time. This slow degradation of image quality can compromise diagnostic accuracy without the radiologist even noticing.
Long-term stability and cross-station consistency are paramount. Prioritize luminance stabilization, uniformity compensation, and ambient light control first to make pixel scaling deliver real-world gains.
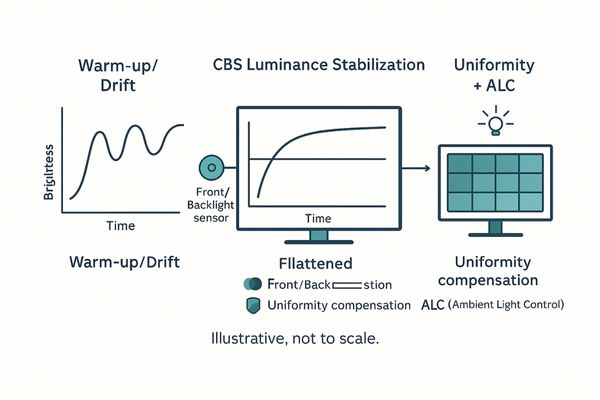
While high resolution is important, its value is quickly eroded if the display’s performance is not consistent over time and across different workstations. The most critical features for long-term diagnostic confidence are those that ensure stability. The first is luminance stabilization9, often achieved with a Constant Brightness System (CBS) that uses a backlight sensor to counteract brightness fluctuations caused by warming up and aging. The second is uniformity compensation, which corrects for the inevitable slight variations in brightness across the screen, ensuring that a lesion appears the same whether it’s in the center or the corner. Finally, an integrated Ambient Light Control (ALC) sensor10 measures the room’s lighting conditions and adjusts the display’s brightness to maintain a consistent, calibrated state. Without these foundational technologies, even an 8MP or 12MP display will drift into non-compliance. A monitor like the MD45C incorporates these features to guarantee that what the radiologist sees on day one is the same as what they see on day one thousand, ensuring the gains from high resolution are measurable and reliable.
Multi-Input & Multi-Window: Window-Level Strategies from PACS to the OR
Freeform window layouts create chaos and inconsistency. When users can place any image anywhere, the cognitive effort to find and compare relevant views increases, slowing down reading sessions.
Codify common image combinations as templated layouts with per-window DICOM and gamma settings. One-touch multi-view modes for single, dual, quad, and up to 8 views can meaningfully cut viewing time.
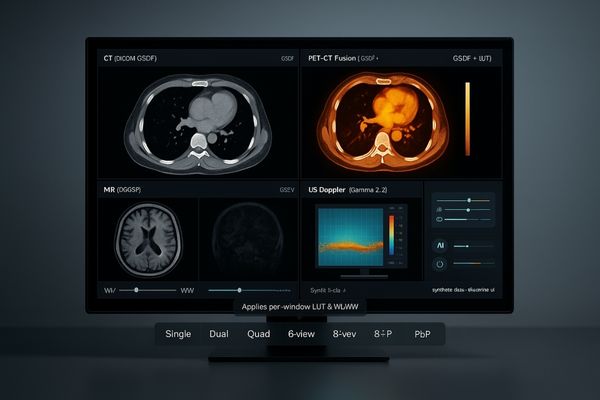
To truly streamline multimodality analysis11, we must move beyond freeform layouts and toward structured, templated viewing environments. In a busy reading room, consistency is speed. By codifying common viewing combinations—such as a current CT scan next to a prior MR—into pre-set templates, we can dramatically reduce the time spent on manual window management. These are not just simple picture-by-picture (PBP) splits; each window in the template should have its own stored display properties. For example, a "PET-CT" template would automatically assign a DICOM GSDF curve to the CT window and a hot-iron color map to the PET window. A versatile diagnostic monitor like the MD46C excels here, offering multiple inputs and sophisticated internal processing to support one-touch switching between single, dual, quad, and even up to eight-view layouts. This approach turns the display into an active partner in the diagnostic process, where position implies meaning. This structured workflow12 reduces cognitive load and allows clinicians to focus on interpretation rather than interface manipulation.
Bandwidth & Latency in the OR: 12G-SDI and 4K/60 in Practice
In the operating room, signal integrity is a matter of patient safety. Complex setups with multiple cables are prone to failure, interference, and latency, which are unacceptable during surgery.
12G-SDI provides interference-resistant, long-run transport for 4K/60 video. Paired with AR glass and optical bonding, it ensures robust visibility and low latency, even under harsh OR conditions.

The modern operating room is a data-rich environment with numerous live video feeds from endoscopes, C-arms, and room cameras. Delivering these signals to the surgical display reliably and with minimal latency is a critical challenge. For 4K video at 60 frames per second (2160p60), the 12G-SDI13 standard has emerged as the most practical solution. It allows for the transport of a full-bandwidth, uncompressed 4K signal over a single, robust coaxial cable for distances up to 100 meters. This single-cable approach drastically simplifies installation and reduces points of failure compared to older quad-link 3G-SDI or distance-limited consumer standards like HDMI. In the OR, this technical robustness is paired with physical durability. Surgical displays must feature AR-coated, impact-resistant glass with optical bonding to reduce glare from harsh overhead lights. They also need to be sealed for frequent disinfection. This combination of high-bandwidth, low-latency signal transport and a rugged physical design ensures surgeons always have a clear, real-time view of the operative field.
Compliance & Delivery: QC, Acceptance, and Workstation Personas
Deploying medical displays across a hospital is not a one-size-fits-all task. Using the same monitor for primary diagnosis, clinical review, and surgical acquisition leads to overspending and non-compliance.
Think in workstation personas. Bundle models with I/O, cables, mounts, and acceptance SOPs tailored for specific roles like reading, consultation, and acquisition to simplify tenders and deployment.
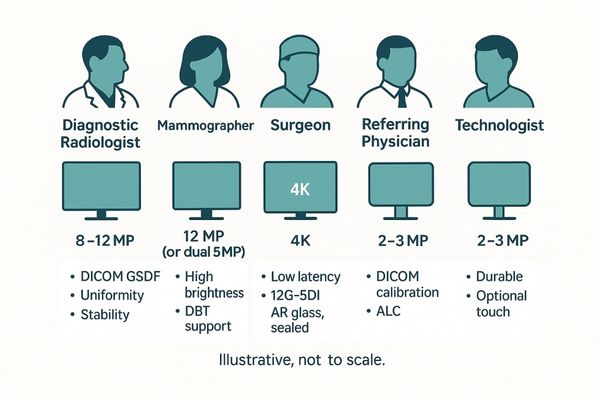
A successful enterprise-wide deployment strategy begins with defining workstation "personas." Each clinical role has unique requirements for resolution, features, and compliance. By tailoring display bundles to these personas, hospitals can optimize performance and cost. For example, a primary mammography reading station requires a 12MP monitor, while a referring physician’s office needs a cost-effective 2MP clinical review display like the MD22CA that is still DICOM-calibrated14 for consistent viewing. A surgeon needs a 4K display with specific video inputs. Building a tender around these personas streamlines procurement. It allows vendors to propose a complete solution, including the specific display model, required I/O matrix, appropriate cable lengths, mounting options (desk stand vs. VESA arm), and—crucially—a standard operating procedure (SOP) for quality control and acceptance testing upon delivery. This approach transforms a complex hardware rollout into a predictable, repeatable process, ensuring that every user gets the right tool for their job, backed by traceable calibration and clear QC documentation.
| Persona | Primary Task | Recommended Resolution | Key Features |
|---|---|---|---|
| Diagnostic Radiologist | Primary Interpretation | 8MP / 12MP | DICOM, Uniformity, Stability |
| Mammographer | DBT / Tomosynthesis | 12MP (or Dual 5MP) | High Brightness, DICOM |
| Surgeon | Surgical Visualization | 4K | Low Latency, 12G-SDI, IP65 |
| Referring Physician | Clinical Review | 2MP / 3MP | DICOM Calibration, ALC |
| Technologist | Image Acquisition | 2MP / 3MP | Durable, Touchscreen Optional |
Conclusion
By integrating parallel pipelines, stable performance, and persona-based deployment, we transform multimodality displays from simple screens into instruments that drive faster, more consistent, and more confident clinical decisions.
👉 For architecture reviews and deployment playbooks tailored to multimodality display workflows, contact Martin at martin@reshinmonitors.com — we’ll help you design a faster, more reliable setup.
-
Explore how multimodality displays enhance diagnostic accuracy by integrating various imaging modalities into a single view. ↩
-
Learn about the DICOM GSDF curve’s role in ensuring accurate image representation in medical diagnostics. ↩
-
Understanding DICOM Part 14 is crucial for ensuring accurate grayscale rendering in medical displays. ↩
-
Exploring multimodality displays can enhance your knowledge of advanced imaging techniques and their applications. ↩
-
Understanding GSDF is crucial for ensuring accurate grayscale image display in medical imaging. ↩
-
Exploring LUTs will enhance your knowledge of how images are processed for optimal display quality. ↩
-
Explore this link to understand how high-resolution screens enhance diagnostic accuracy and workflow efficiency in medical imaging. ↩
-
Discover how multi-monitor setups can streamline clinical tasks and improve productivity in healthcare settings. ↩
-
Understanding luminance stabilization is crucial for ensuring consistent display performance over time. ↩
-
Exploring ALC sensors can help you grasp how they maintain display brightness in varying lighting conditions. ↩
-
Explore this link to understand how multimodality analysis enhances diagnostic accuracy and efficiency in healthcare. ↩
-
Discover the benefits of a structured workflow in clinical settings, leading to better patient outcomes and streamlined processes. ↩
-
Explore this link to understand how 12G-SDI enhances video quality and reliability in surgical environments. ↩
-
Exploring DICOM calibration helps ensure consistent image quality in medical imaging, which is vital for accurate diagnoses. ↩