Choosing the right PACS display feels overwhelming. Focusing solely on megapixels can lead to a purchase that is either overkill for the task or, worse, inadequate for critical diagnoses.
Pick megapixels by task, not pride: 2–3MP for general PACS and acquisition, 4–5MP when fine detail decides the report (including mammography), 8–12MP when multimodality needs fewer bezels and head turns. Then lock truth in with DICOM Part 14, luminance stabilization, uniformity, and the right size/orientation for the room.
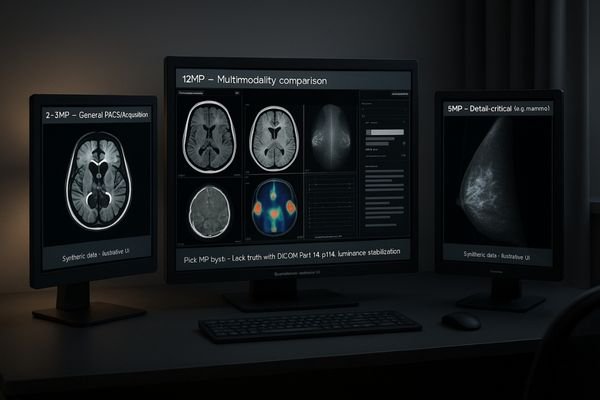
The number of megapixels on a diagnostic display1 is not a score to be maximized; it is a specification to be matched precisely to a clinical need. The most critical error in outfitting a reading room is treating all displays as interchangeable or assuming that more pixels always means a better diagnosis. The truth is that a display’s resolution must be selected based on the specific imaging modalities it will be used for. An effective selection process prioritizes clinical application, ensuring that every pixel serves a diagnostic purpose and is backed by unwavering image quality standards2.
Modality-first: map PACS tasks to 2–12MP without guesswork
Relying on megapixel counts alone often leads to poor purchasing decisions. This can result in radiologists working with displays that are not suited for their specific diagnostic tasks, increasing eye strain and risk.
The selection process starts with the clinical need. Analyze the modalities reviewed, the typical number of simultaneous images, and the diagnostic risk of a missed detail before considering a megapixel specification.
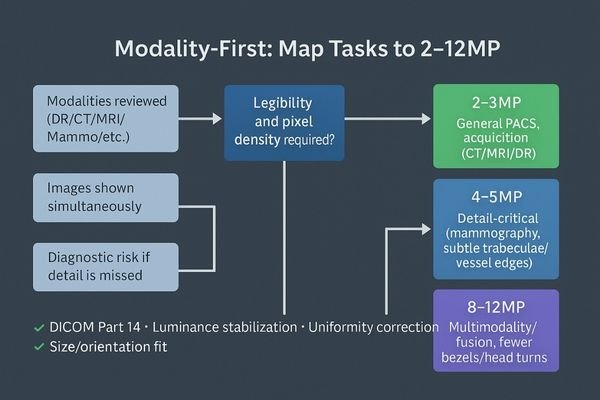
I stopped treating megapixels as a bragging right the day I watched a junior radiologist miss a faint lung line on a poorly calibrated panel. That experience solidified my core principle: resolution is only useful when the grayscale representation is faithful to the data3 and perfectly uniform across the entire screen. My selection process, therefore, ignores the megapixel count at the outset. Instead, it begins with a series of critical questions. First, which specific modalities will be read on this workstation? Second, how many images are typically displayed simultaneously for a standard case? Third, and most importantly, what is the diagnostic consequence if a subtle edge, fine texture, or low-contrast lesion goes soft? Only after these questions are answered does it make sense to choose the appropriate MP tier. This modality-first approach4 ensures that the hardware serves the clinical requirement, turning the display into a precise diagnostic instrument rather than just a high-resolution screen.
2–3MP for general PACS & acquisition: DR/CT/MRI daily reading
Outfitting every workstation with the highest-resolution display is an expensive and often counterproductive strategy. For many common tasks, this is simply pixel overkill, which can strain GPUs and make user interfaces too small.
For routine DR, CT, and MRI review, a 2–3MP display is the honest and efficient choice. The priority here is unwavering adherence to DICOM Part 14 and luminance stability, not raw pixel count.
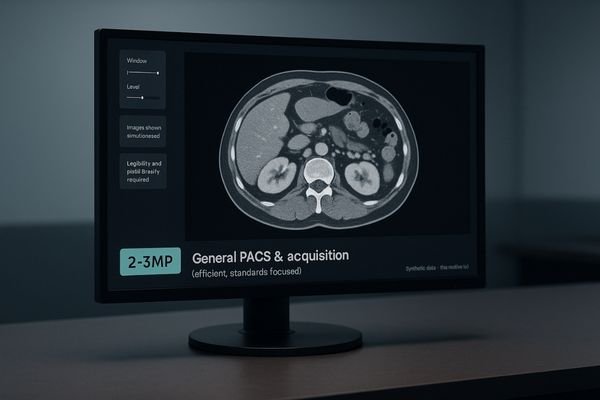
For the daily workhorse of general PACS review and technologist acquisition stations, a 2-megapixel or 3-megapixel display is the most logical and efficient solution. This resolution tier provides a sufficient pixel grid for the demands of most Digital Radiography (DR), Computed Tomography (CT), and Magnetic Resonance Imaging (MRI) studies without overwhelming the workstation’s graphics processor or shrinking text and UI elements to an unreadable size. In this context, chasing exotic pixel counts is far less important than focusing on the foundational pillars of image quality. My priority for these stations is absolute adherence to the DICOM Part 14 Grayscale Standard Display Function (GSDF)5 to ensure perceptual linearity. This must be paired with built-in luminance stabilization6, which uses a front sensor for closed-loop feedback to maintain brightness, and ambient light compensation to adjust for room conditions. Features like these, found on a reliable monitor such as the MD32C, ensure that image truth remains steady from the first case on Monday morning to the last on Friday night.
4–5MP when detail decides: cross-sectional nuance & mammography
For some modalities, the diagnostic decision hinges on the visibility of extremely fine details. A lower-resolution screen might not have the pixel density to render these subtle but critical findings accurately.
When the diagnostic report depends on fine detail, such as in mammography, a 4–5MP display is a necessary investment. Its higher sampling density preserves the integrity of micro-calcifications and subtle tissue patterns.
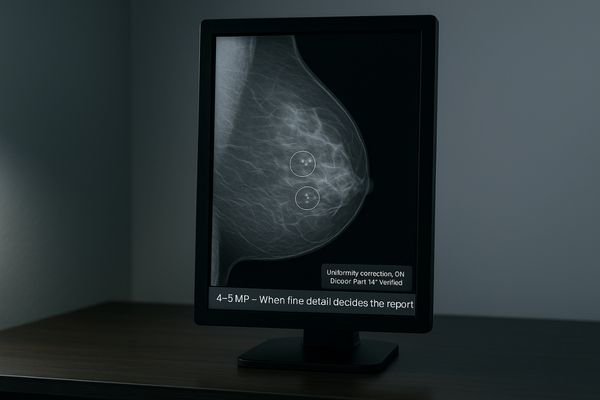
The jump to a 4- or 5-megapixel display is not a luxury; it is a clinical necessity when the diagnostic report is decided by the finest details. Modalities like mammography, with its critical search for micro-calcifications, or certain cross-sectional studies where subtle trabecular patterns or vessel edges are paramount, demand higher pixel density. This increased sampling rate ensures that these critical structures survive the windowing and leveling process without being lost to aliasing or interpolation artifacts. I have learned from experience that a well-calibrated 5MP grayscale display7 like the MD52G offers something more valuable than any spec sheet superlative: diagnostic confidence8. When a radiologist is reviewing a borderline case late at night, the monitor’s ability to render every subtle finding with impeccable sharpness and tight uniformity across the entire panel surface is what allows for a definitive, confident report. This is where the investment in higher resolution pays for itself.
8–12MP for multimodality: consolidate views, cut head/eye travel
Comparing images from multiple studies or modalities often requires toggling between different monitors. This increases head and eye movement, leading to physical fatigue and making direct comparisons inefficient.
High-resolution 8–12MP displays are purpose-built for multimodality reading. They consolidate multiple sources onto a single screen, reducing bezel distraction and physical strain, which allows for more natural image comparison.
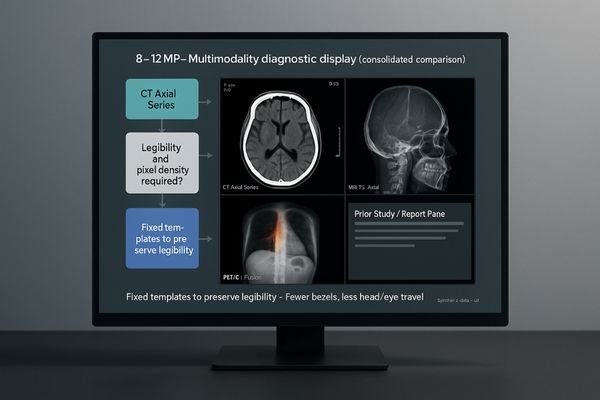
The behavioral shift enabled by 8-megapixel and 12-megapixel displays9 is profound, particularly for complex multimodality readings. These large, high-resolution canvases are designed to solve a physical problem: reducing the number of monitors, bezels, and fatiguing head turns required to compare different studies. A display like the MD120C allows a radiologist to hold two, three, or even four different image sources in native or near-native scale on a single, seamless surface. This makes the comparison of a current CT with a prior PET scan, for example, a much more direct and intuitive process. However, this power must be managed with discipline. To prevent users from accidentally resizing windows in a way that quietly erodes legibility below diagnostic standards, I always advocate for setting up fixed, pre-approved multiview templates10. This ensures that muscle memory, not improvisation, dictates the layout, locking in both efficiency and safety.
| MP Tier | Primary Application | Key Benefits |
|---|---|---|
| 2–3MP | General Radiology (DR, CT, MRI), Acquisition Stations | Efficiency, cost-effectiveness, focus on core quality standards. |
| 4–5MP | Mammography, Detail-Critical Cross-Sectional Imaging | High pixel density preserves fine details and micro-structures. |
| 8–12MP | Multimodality/Fusion Imaging (PET/CT), Comparison Reads | Reduced monitors, less head/eye travel, seamless layouts. |
Beyond megapixels: DICOM Part 14, stabilization, uniformity, size
It is easy to get fixated on a high megapixel count, but this single number is a poor indicator of true diagnostic performance. A high-resolution display that is not properly calibrated is clinically useless.
Pixels are meaningless without standards. DICOM Part 14 compliance, luminance stabilization, spatial uniformity, and correct physical size are what ensure those pixels tell the truth reliably over time.

The megapixel count of a display is merely the canvas; the tools that ensure the image painted on it is diagnostically accurate are what truly matter. These tools are non-negotiable standards. The foundation is strict adherence to DICOM Part 1411, which guarantees that grayscale values are perceived consistently. This must be supported by a closed-loop luminance stabilization circuit that constantly measures and corrects the screen’s brightness to counteract warmup drift and long-term aging. Excellent spatial uniformity12 is also critical, ensuring that a given pixel value looks identical whether it is in the center of the screen or in a corner. Finally, the physical size and orientation of the display must be appropriate for the task. For example, a dual-screen-on-one-panel monitor like the MD46C can be ergonomically superior for comparison-heavy workflows. I would always choose a 3MP display with impeccable GSDF tracking and rock-solid stability over an 8MP panel that drifts by noon. Accuracy only endures when stability is engineered into the system from the start.
Conclusion
The right PACS display is chosen by matching the resolution to the modality and ensuring its fidelity is locked in by unwavering adherence to diagnostic quality standards. 🩻
👉 For expert guidance and Reshin PACS display solutions, contact strong>martin@reshinmonitors.com.
- For routine PACS reading, many hospitals choose 2MP PACS diagnostic monitor for general clinical tasks.
- High-resolution 5MP mammography diagnostic display is essential for breast imaging accuracy.
- Explore our range of radiology monitors for PACS and multimodality imaging designed for CT, MRI, and DR applications.
- Reshin provides DICOM Part 14 compliant diagnostic monitors for consistent grayscale accuracy.
- For multimodality workflows, 8MP PACS diagnostic display supports CT, MRI, and general radiology integration.
- Understanding diagnostic displays is crucial for ensuring accurate medical imaging and effective diagnosis. ↩
- Exploring image quality standards helps ensure that diagnostic displays meet necessary criteria for optimal performance. ↩
- Understanding the significance of resolution and grayscale can enhance diagnostic accuracy and improve patient outcomes. ↩
- Exploring the modality-first approach can help you optimize imaging systems for better clinical results. ↩
- Understanding GSDF is crucial for ensuring accurate image quality in medical imaging, making this resource invaluable for professionals. ↩
- Exploring luminance stabilization will enhance your knowledge of maintaining consistent image quality, essential for effective diagnostics. ↩
- Explore how a 5MP grayscale display enhances diagnostic accuracy and confidence in medical imaging. ↩
- Learn about the importance of diagnostic confidence in improving patient care and decision-making in radiology. ↩
- Explore how these high-resolution displays enhance diagnostic accuracy and efficiency in radiology. ↩
- Learn how structured templates can streamline processes and maintain diagnostic standards in medical imaging. ↩
- Understanding DICOM Part 14 is crucial for ensuring diagnostic accuracy in medical imaging. Explore this link to learn more. ↩
- Spatial uniformity is vital for accurate image interpretation. Discover its significance and impact on display quality through this resource. ↩