As an engineer working on OR video system installations, I treat overscan and underscan as workflow settings, not display “preferences,” because they determine whether teams see the complete clinical frame or a cropped, rescaled version during a procedure.
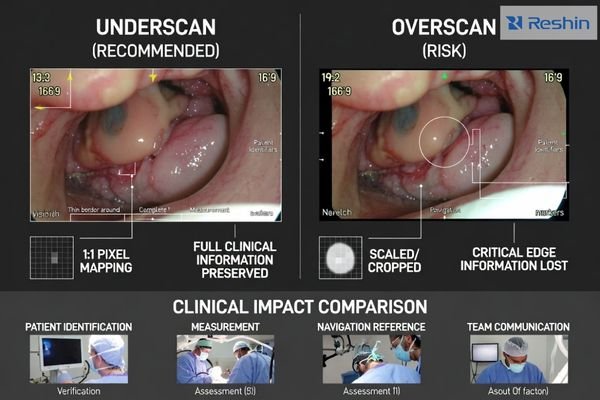
For most OR video chains, the safest default is underscan / 1:1 pixel mapping so the full frame remains visible, including edge UI such as scale bars, measurement markers, patient identifiers, and warning banners. Use overscan only as a last resort to hide unavoidable edge artifacts that cannot be corrected upstream, and keep it minimal because scaling can soften detail, alter geometry, and reduce consistency across side-by-side surgical monitors.
In day-to-day OR integration, the goal is a predictable, repeatable presentation across the entire chain (source → routing/switching/extension → monitor). If edge information is clipped, teams may lose identifiers, scale references, or alerts; if the image is rescaled differently on different screens, comparisons become slower and less reliable. The practical approach is to standardize a default scan mode1, define when exceptions are allowed, and validate the result with real clinical sources rather than generic desktop patterns.
What is overscan/underscan, and why does it matter in the OR?
Overscan and underscan settings control what portion of the video signal surgical teams actually see on their monitors.
Overscan expands the image so outer edges are cropped, while underscan shrinks the image so you see the full frame with a border around it. In the OR, this matters because critical edge content—patient/record identifiers, warnings, scale bars, measurement markers, and endoscopy field boundaries—often sits near the frame limits, and cropping or compressing it can create real workflow risk.
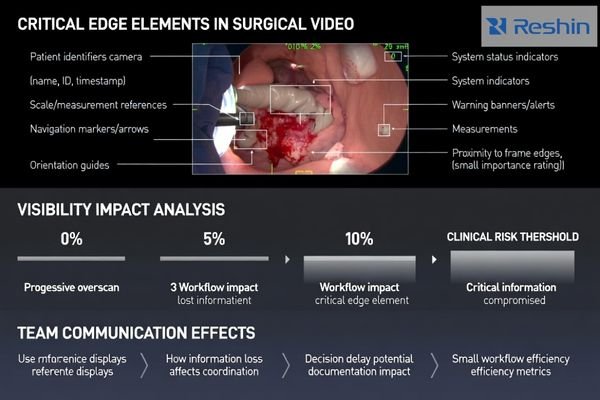
These modes also change perceived sharpness and geometry. Any resizing to fit a different active area can soften fine detail, slightly shift overlay placement, and produce inconsistent results between monitors in the same room. In practice, I aim for a stable “full-frame, correct aspect” baseline so the team sees the same information regardless of which screen they reference.
Frame Boundary Content Preservation
Critical clinical information often appears near video frame edges, including patient identification data, system warnings, measurement scales, and navigation overlays that surgical teams rely on for accurate interpretation and documentation during procedures. A simple rule I use during acceptance is that all four edges must remain readable and complete in the normal working view—if a UI element can disappear, it eventually will at the worst moment.
Visual Consistency and Geometry Accuracy2
Proper overscan/underscan configuration helps keep anatomy and instruments proportionally correct across multiple displays, reducing spatial distortion that can affect interpretation, communication, and documentation. When teams compare a live endoscopy feed to an auxiliary display, any stretching or inconsistent scaling slows confirmation steps and increases “double-check” behavior.
When should you use overscan vs underscan on surgical monitors?
Modern digital OR environments typically benefit from underscan settings that preserve complete frame visibility.
In modern digital OR video chains, underscan / 1:1 full pixel mapping is typically the safer default because it preserves the complete frame, including edge overlays, and avoids clipping measurable content. Overscan is only justifiable when a specific source or downstream device produces unavoidable edge noise or blanking artifacts that cannot be removed upstream; even then, use the smallest overscan that hides non-clinical edge garbage without touching UI or anatomy.
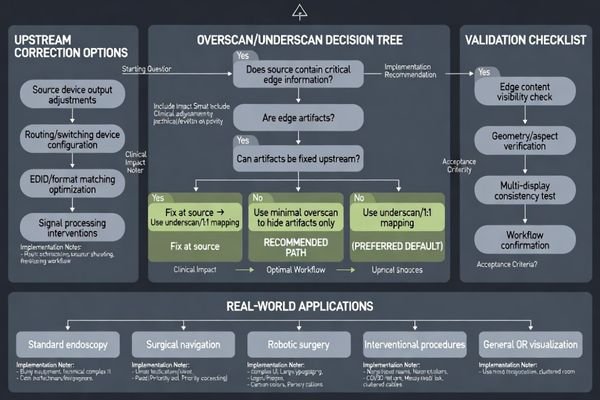
My decision rule is straightforward: if the workflow relies on edge information (IDs, scale bars, warnings, navigation overlays), do not crop it. If artifacts exist, I first attempt to fix them earlier in the chain—source output settings, routing device configuration, and EDID/format matching—because “overscan as a patch” often creates new problems on other screens.
Underscan is preferred in surgical applications3 because the clinical cost of lost edge information is high, while the visual “cost” of a small border is usually acceptable if it preserves completeness and correct geometry. When the team depends on measurements, documentation, or overlay-guided navigation, full-frame visibility and stable aspect handling should outrank cosmetic screen fill.
How do overscan/underscan interact with scaling, sharpness, and aspect ratio?
Overscan and underscan settings create complex interactions with image processing that can affect clinical image quality.
Any time a monitor rescales the incoming image—overscan, underscan, or fitting a non-native resolution—you risk losing pixel-level fidelity and introducing subtle geometry changes. In surgical video, unnecessary scaling can soften texture, reduce edge definition, and make overlays look slightly misregistered, especially if additional sharpening is applied to compensate.
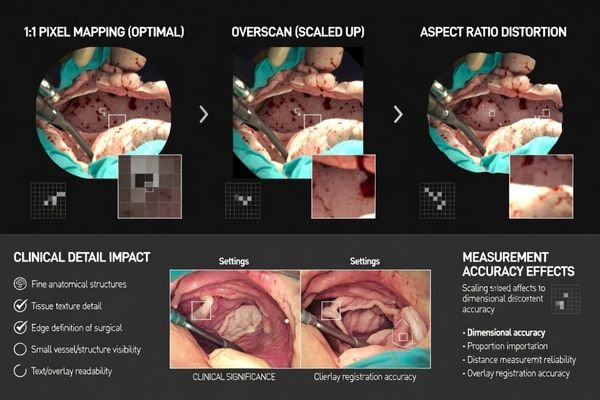
Aspect ratio handling is just as important: forcing “fill” can stretch anatomy or instruments, while “maintain aspect” may add bars but preserves geometry, which is generally preferable for interpretation and documentation. From an engineering standpoint, I treat “maintain aspect + full frame” as the default unless a validated workflow explicitly requires a different presentation mode.
| Setting Type | Image Processing Impact | Clinical Effect | Recommended Usage | Validation Requirement |
|---|---|---|---|---|
| 1:1 Pixel Mapping4 | No scaling, direct mapping | Maximum sharpness preservation | Preferred default | Frame boundary check |
| Minimal Overscan | Slight edge cropping | Artifact removal only | Edge noise elimination | UI visibility confirmation |
| Aspect Preserving | Maintains geometry ratios | Accurate spatial relationships | Measurement applications | Geometry validation |
| Fill Modes | Stretches to full screen | Potential distortion risk | Avoid for surgical use | Distortion assessment |
| Underscan Border | Reduced active area | Complete frame visibility | Critical UI preservation | Border acceptance check |
The practical goal is to keep the chain as close to native mapping as possible: match output resolution and refresh rate from the source to the monitor, disable overscan by default, and use aspect-preserving modes unless a validated workflow requires otherwise.
Small processing steps can add up, especially when multiple devices in the chain each apply their own scaling or enhancement. In rooms with multiple displays, I prioritize consistency: the same source should look the same across screens, so differences are interpreted as clinical—not as formatting side effects.
What step-by-step validation should you do after changing overscan settings?
Systematic validation ensures overscan changes do not compromise clinical workflow or information visibility.
After changing overscan/underscan, validate with the same clinical content teams actually use, not generic desktop patterns. Start by confirming full-frame visibility: patient identifiers, warning banners, scale bars, and navigation overlays must remain fully readable at the edges with no cropping.
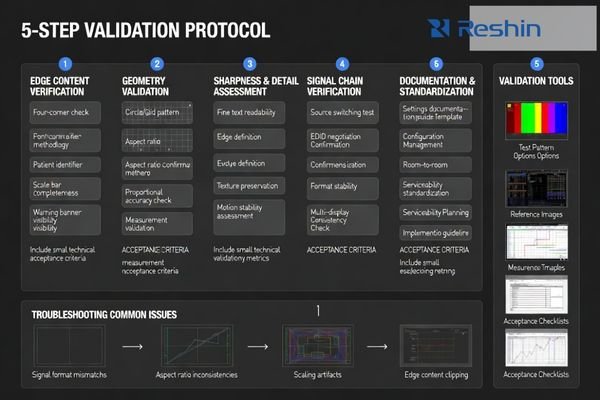
Next, verify geometry using a known circle/grid pattern or the source system’s calibration image to confirm shapes are not stretched and the aspect ratio is correct. Then check sharpness and motion at typical viewing distance: fine text and edges should remain stable, with no new shimmer, aliasing, or processing artifacts introduced by scaling changes.
Clinical Content Verification
Validation must use actual surgical video content5 including endoscopic feeds, fluoroscopy images, and navigation system outputs to ensure that all clinically relevant information remains visible and properly positioned after overscan adjustments are applied. My acceptance shortcut is “four corners + overlays”: if edge UI is complete on all typical sources, you’ve avoided the most common failure mode.
System Chain Testing
Complete validation requires testing through the real routing chain—switchers, extenders, and KVM—because EDID/timing negotiation can change scan behavior or trigger unintended scaling when sources are switched. Document the final settings (source output format, routing profile, monitor scan/aspect mode) so replacements and multi-room deployments remain consistent; if you need help building a repeatable validation checklist for your OR chain, we can assist.
How to select medical displays that make overscan control easier?
Display selection can significantly reduce overscan-related configuration complexity and maintenance requirements.
If overscan issues keep recurring, the best long-term approach is selecting displays and integration practices that keep native mapping predictable and stable across rooms and source changes.
Start by choosing monitors with stable input handling and clear, consistent controls for aspect ratio and scaling, so you can maintain “no overscan / full frame” as the standard configuration without surprises during source switching.
| Clinical Role / Application | Usage Pattern | Display Requirements | Recommended Model | Key Integration Considerations |
|---|---|---|---|---|
| Basic Surgical Procedures | Standard endoscopy, simple cases | Reliable frame mapping | MS192SA | Consistent 1:1 pixel behavior |
| Multi-Modal Integration | Mixed source compatibility | Stable format handling | MS220SA | Predictable EDID negotiation |
| Advanced Surgical Applications | Complex overlays, measurements | Precise geometry control | MS321PC | Controlled scaling/aspect behavior |
| Large Format Visualization | Team coordination displays | Wide compatibility range | MS430PC | Robust format support |
| Hybrid OR Integration | Multi-source environments | Advanced control options | MS431P | Comprehensive format flexibility |
Then evaluate signal-chain compatibility, because displays that cooperate well with common routing equipment reduce EDID surprises that trigger unwanted scaling during source transitions. I recommend validating the intended default mode (1:1 + maintain aspect) across all primary sources and through the full chain, including switching sequences that reflect how the room is actually used.
From an OR operations perspective, prioritize serviceability and configuration control so swapped units can be set back to the same scan mode quickly, and consider standardizing scan/aspect defaults across rooms to reduce variation. A simple acceptance test—edge UI visibility, geometry check, and chain-through switching—makes overscan/underscan settings validated, documented, and repeatable over the lifecycle.
This approach prevents overscan problems through predictable equipment behavior and controlled integration, rather than relying on ad-hoc workarounds that can drift over time and create inconsistencies between screens.
FAQ
Is overscan ever recommended for endoscopy video?
Only as a last resort to hide unavoidable edge noise from a specific source, and even then it should be minimal so it does not crop clinical content or overlays; if possible, fix the artifact upstream instead.
Why do I see a black border when I enable underscan?
That border usually indicates the full frame is being shown and the image is slightly reduced to ensure nothing is clipped; it’s normal and often preferable if it preserves edge UI and correct geometry.
Can overscan/underscan settings change when I switch sources?
Yes—different sources and routing devices can negotiate different timing/EDID profiles, which may trigger different scaling behavior; standardizing output formats and documenting settings helps prevent surprises.
Does overscan affect measurements or overlays?
It can—cropping can hide scale bars or markers, and rescaling can slightly change how overlays look; if measurements matter, validate full-frame visibility and geometry after changes.
Should I change overscan on the monitor or on the source device?
Prefer fixing it upstream on the source or routing device to keep the monitor in a stable "no overscan" mode; changing at the display is acceptable when upstream control is limited.
What is the fastest acceptance check after changing scan mode?
Confirm edge UI is fully visible, run a quick geometry check (circle/grid), then switch through the normal routing path to ensure behavior stays consistent.
Conclusion
Overscan and underscan settings determine whether clinical teams see the complete frame or a cropped, rescaled version of surgical video, so the safest default for most modern OR workflows is full-frame display with overscan disabled and aspect preserved. If overscan is needed to hide unavoidable edge artifacts, keep it minimal and confirm that overlays and anatomy remain intact. After any change, validate edge UI visibility, geometry, sharpness, and behavior through the real routing chain, then document settings for consistency across rooms and replacements.
At Reshin, I approach overscan/underscan as a system integration control: standardize the default, fix artifacts upstream when possible, and verify the result with repeatable clinical tests. When scan modes are configured and documented consistently, teams get complete, proportionally correct visuals that support confident decisions without surprises during source switching.
✉️ info@reshinmonitors.com
🌐 https://reshinmonitors.com/
-
Understanding the significance of a standardized scan mode can enhance your integration processes and improve reliability. ↩
-
Exploring this topic can enhance your knowledge of display performance, crucial for accurate medical interpretations. ↩
-
Exploring the reasons behind underscan in surgical settings can enhance your knowledge of clinical practices and patient safety. ↩
-
Exploring 1:1 Pixel Mapping can enhance your knowledge of maximizing sharpness preservation in imaging. ↩
-
Exploring this resource will provide insights into ensuring the accuracy and clarity of surgical video content during validation. ↩