Choosing between a 27″ and 32″ monitor for your endoscopy tower can be confusing. The wrong decision can lead to ergonomic strain or compromised clarity during critical procedures.
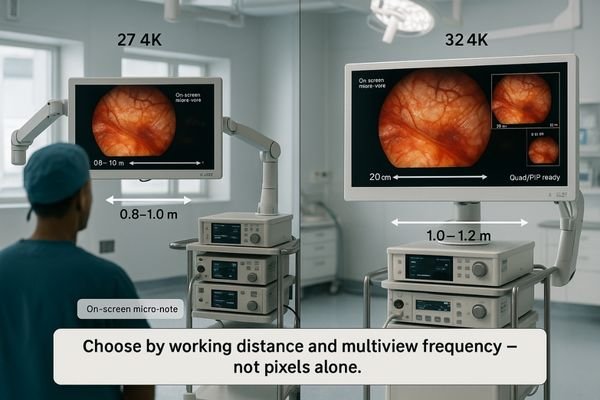
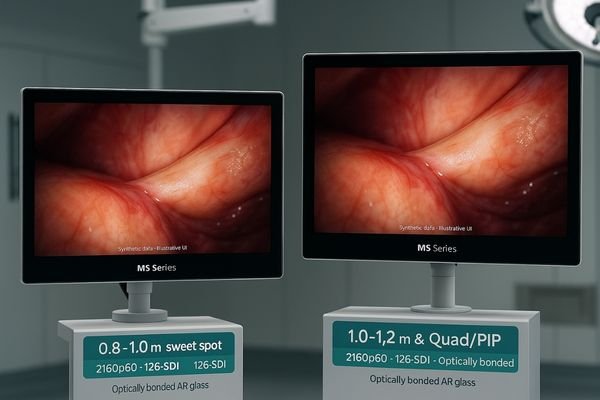
At 0.8–1.0 m, choose 27″ 4K for dense detail with minimal eye travel; at 1.0–1.2 m or when running quad/PIP layouts, 32″ 4K restores legible character size and shared visibility. Pick by working distance and multiview frequency, not by pixels alone.
When equipping an endoscopy tower1 or surgical cart/arm, size is not a stylistic pick; it’s a clinical choice that influences workflow, ergonomics, and confidence. Standardize the working distance (0.8–1.2 m), then choose by legibility and multiview frequency. This guide maps pixel density to angular text size, shows how quad/PIP shifts the math, and flags mount/cabling constraints so your cart fits the room—not the other way around. The goal is to select a monitor that fits seamlessly2 into your workflow, enhancing precision without introducing new challenges.
Define the viewing-distance sweet spots for 27″ vs 32″ at 0.8–1.2 m
Picking a monitor size can feel arbitrary. This uncertainty often leads to a purchase that causes eye strain for the surgeon or forces them to lean in, compromising ergonomics.
The decision becomes predictable when based on distance. At 0.8–1.0 m, a 27″ 4K display offers high pixel density. At 1.0–1.2 m, a 32″ 4K display improves legibility and shared readability.
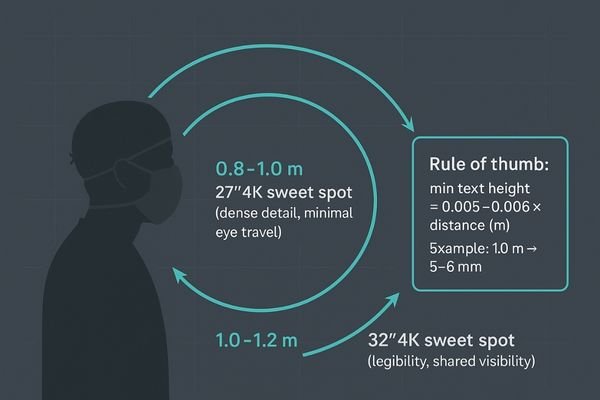
Once the typical working distance for a procedure is standardized, the choice between monitor sizes becomes much clearer. The “sweet spot” is determined by the balance between pixel density and perceived size. Within a close range of approximately 0.8–1.0 meters, a 27″ 4K monitor3 like the MS275PA excels. It compresses the 4K resolution into a highly dense field of view, which preserves the micro-contrast of fine vascular structures and ensures Heads-Up Display (HUD) elements are sharp without requiring significant eye movement. As the cart is positioned farther away, around the 1.0–1.2-meter mark, the larger 32″ screen4 becomes advantageous. It restores the perceived height of characters and the thickness of lines, reducing the team’s dependence on digital zoom and making it easier for multiple people to view the screen comfortably. Plan around the median distance your team actually works at, not the theoretical extremes of the operating room.
Rule of thumb: minimum on-screen text height ≈ 0.005–0.006 × viewing distance (m). At 1.0 m, target ≈ 5–6 mm character height for instant glances.
| Viewing Distance | Recommended Size | Primary Clinical Advantage |
|---|---|---|
| 0.8–1.0 m | 27″ 4K | High pixel density, minimal eye travel, sharp detail. |
| 1.0–1.2 m | 32″ 4K | Improved legibility, better for shared viewing, less zoom needed. |
| Variable / >1.2 m | 32″ 4K | Maintains readable UI and details from farther away. |
Pixel density & UI legibility for endoscopic overlays
High pixel density is necessary—but not sufficient for readability. If surgeons have to lean in to read small text on an overlay, they risk breaking the sterile field and developing poor posture.
Legibility depends on the angular size of text at the eye, not just pixel density. A 32″ monitor is often better for distances of 1.1–1.2 m to keep overlays readable without strain.
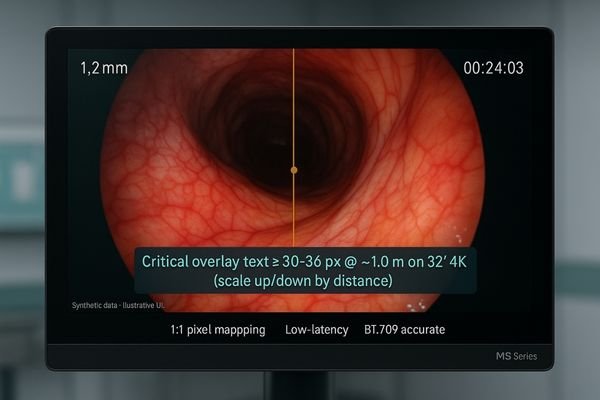
Pixel density on its own is an incomplete metric; true legibility hinges on the angular size of a character5 as perceived by the surgeon’s eye. Modern endoscopic video feeds are rich with data overlays: thin lines representing catheters, small fonts for measurements, and color-coded instrument statuses. If the smallest critical label on the screen cannot be read without leaning forward, the monitor is too small for that viewing distance. At a close working range of 0.8–0.95 meters, a 27″ display keeps fine anatomical details tack-sharp without making UI elements feel oversized or distracting. However, once the viewing distance extends to 1.1 meters or more, a 32″ screen is often necessary to maintain a safe and readable angular size for that same text. Practical spec: keep critical overlay text6 at ≥30–36 px when viewed at ~1.0 m on a 32″ 4K panel; scale accordingly for denser 27″ 4K at closer range.
Eye movement, posture, and team visibility (ergonomics)
An improperly sized screen can cause physical strain. Too much head and eye movement leads to fatigue, while squinting to see details results in poor posture and can degrade performance.
Ergonomics is about minimizing strain. A 27″ screen reduces eye travel at close range, while a 32″ screen improves visibility for the entire team and reduces forward leaning when viewed from farther away.
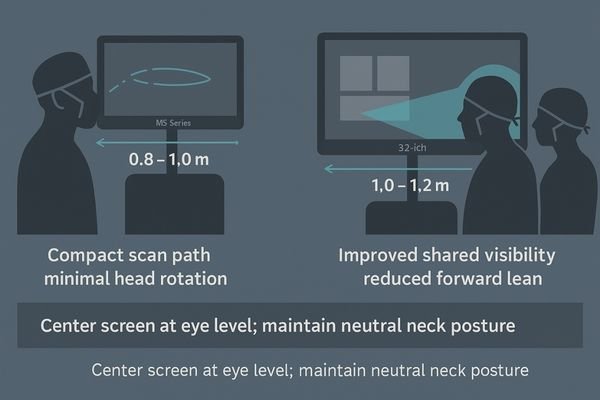
The ergonomic goal7 in the operating room is to promote a stable and comfortable posture for the entire surgical team. The size of the monitor plays a direct role in achieving this. At a close distance, a 27″ screen supports compact and rapid eye movements (saccades), allowing the surgeon to scan the entire image with minimal head rotation. This promotes stable fixation on the primary area of interest. When the equipment cart must be placed farther from the sterile field, however, a larger 32″ screen8 becomes ergonomically superior. It reduces the natural tendency for team members to squint or lean forward to see fine details. Furthermore, off-axis observers, such as assistants or nurses, benefit from the increased subtended size of critical symbols and text on a 32″ display. This improves shared situational awareness, leading to fewer verbal callouts and a reduced cognitive load for everyone in the room.
Multiview at 4K: when size materially changes the workflow
Running a single video feed is different from a multiview layout. When you split the screen, each window becomes much smaller, potentially rendering details and text too small to be useful.
Multiview workflows often demand a larger screen. A 32″ monitor restores the legibility and detail lost when a 4K image is quartered in a quad-split layout, making it superior for complex cases.

Using Picture-in-Picture (PIP) or quad-split layouts completely changes the display size calculation. A 4K quad split is effectively ~1920×1080 per pane. On a 27″ display, each of these panes becomes quite small, making it difficult to discern fine details or read text from a distance of a meter or more. This is where a 32″ monitor9 offers a material advantage. The larger screen size restores the effective canvas size of each pane, improving character height and edge definition. If your workflow relies heavily on pre-set multiview templates that combine the live endoscopic view with other sources like ultrasound, fluoroscopy, or vitals, stepping up to a 32″ monitor like the MS321PB at a viewing distance of 1.0 meter or more is highly recommended. It reduces visual search time and minimizes the need to toggle sources, creating a more fluid and efficient workflow.
Light, glare, and AR glass: size-specific hygiene and clarity
Operating room lights are notoriously bright and can cause severe glare. A monitor that reflects this light becomes a mirror, washing out the surgical image and compromising visibility.
To combat glare, an optically bonded flat front with an AR coating is non-negotiable for any size. This design maximizes clarity, simplifies cleaning, and prevents fluid ingress, ensuring reliable performance.
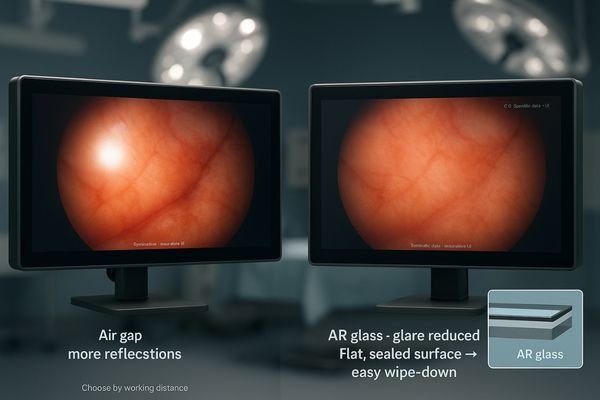
Regardless of whether you choose a 27″ or 32″ monitor, it must be engineered to perform under the harsh lighting conditions of the operating room. This is achieved through two key technologies: optical bonding10 + AR anti-reflection11 flat front. Optical bonding eliminates the air gap between the LCD panel and the protective front glass, which prevents internal reflections and fogging while increasing contrast. The AR coating on the front surface then suppresses reflections from external sources like surgical lamps. This combination is essential for maintaining image clarity and creating a single, flat, seamless surface that is easy to clean and impervious to fluids. In very crowded setups where the monitor is close to the team, a smaller 27″ pane can be wiped down slightly faster. However, the core principle remains: prioritize a fully bonded, AR-coated design to ensure both hygiene and optical performance.
Mounting on towers/arms: VESA 100, weight, tilt and clearance
An incompatible mount can derail an installation. Assuming a new monitor will fit an existing endoscopy cart without verifying its weight and VESA pattern is a common and costly mistake.
Most endoscopy arms use a VESA 100×100 mm pattern. Always verify the monitor’s weight and the arm’s torque integrity, especially with a heavier 32″ unit, to ensure a stable and secure installation.
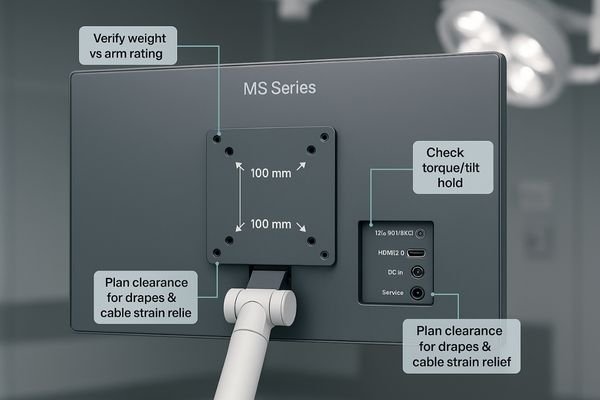
The feasibility of integrating a new monitor depends entirely on its physical compatibility with your existing endoscopy towers or ceiling-mounted arms. The vast majority of these mounting systems utilize the standard VESA 100×100 mm bolt pattern12. Before finalizing a purchase, you must verify this pattern along with the monitor’s weight13. While a high-quality 27″ monitor is typically light enough for most standard arms, a heavier 32″ model may require a check of the arm’s torque and locking mechanism integrity to prevent sagging or drooping over time. It is also crucial to consider clearance, especially when sterile drapes are applied, and to plan the cable routing paths to avoid collisions or strain when the monitor is tilted to its maximum angle. A well-designed monitor like the MS322PB will have its VESA mount and I/O ports positioned to facilitate clean and secure installation on standard surgical equipment.
Cabling & I/O for carts: 12G-SDI vs HDMI, redundancy planning
Signal loss during a procedure is unacceptable. Relying on consumer-grade cables in a high-EMI environment like an OR is a significant risk to patient safety and workflow stability.
Prioritize 12G-SDI for its stability and long-distance performance; use HDMI for redundancy or short-run auxiliary sources. This ensures a robust signal path, which is more critical than the monitor size decision.
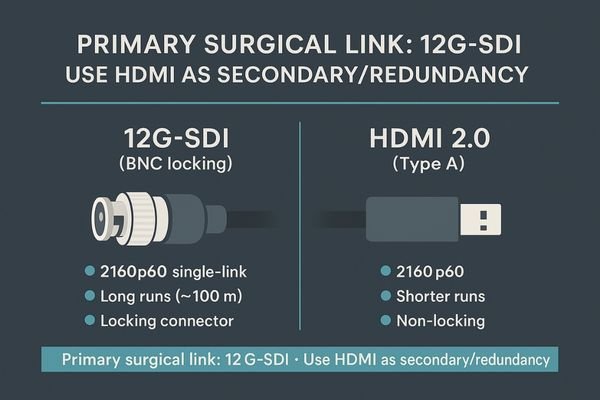
The frequent movement of endoscopy carts and the high-EMI nature of the operating room demand a robust cabling strategy. For the primary 4K 60 Hz video feed, 12G-SDI14 is the undisputed professional standard. Its locking BNC connector prevents accidental disconnection, and the coaxial cable itself is highly resilient to interference over long runs. With a dedicated SDI cable, 12G-SDI supports true 4K 2160p60 and lossless runs beyond 50 m. HDMI 2.015 is a valuable secondary input for connecting non-critical devices or for redundancy, but it should not be the primary connection for the endoscopic camera. This I/O strategy should be a prerequisite for any surgical monitor, regardless of its size. The choice between 27″ and 32″ should be driven by workflow and ergonomics, not by limitations in connectivity. Once the transport backbone is stable, let distance and multiview—not cables—decide size.
Decision map: solo surgeon vs teaching team within 0.8–1.2 m
Choosing feels complex. Without a clear framework, teams often default to what they used before, even if their workflow has changed, leading to a suboptimal setup.
Use a simple decision map. For a solo surgeon at 0.8–0.95 m (single-view), a 27″ 4K is often best. For team-based or quad/PIP-heavy procedures at 1.0–1.2 m, a 32″ 4K is superior.
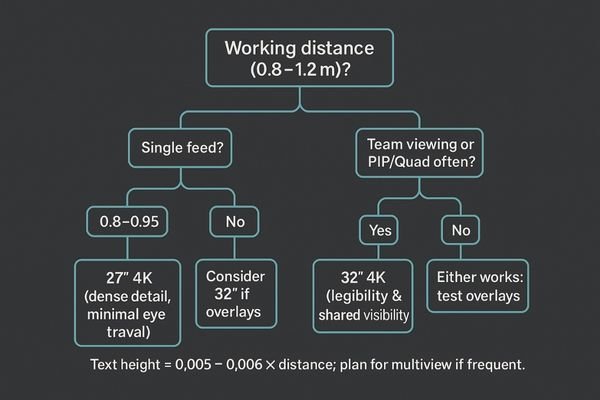
The choice between a 27″ and 32″ monitor can be simplified into a straightforward decision map based on your most common use cases within the 0.8–1.2 m viewing range. This framework helps align the hardware with the practical needs of the surgical team.
- Scenario 1: Solo Surgeon, Close Range (single-view). If the workflow primarily involves a single surgeon working at a close distance of 0.8–0.95 meters and using a single video feed, the 27″ 4K monitor is the ideal choice. It offers maximum detail with minimal eye fatigue.
- Scenario 2: Team-Based or Multiview (quad/PIP). If procedures frequently involve multiview layouts (PIP/PBP/Quad) or require clear visibility for an assistant or teaching audience at a distance of 1.0–1.2 meters, the 32″ 4K monitor is the clear winner. It ensures all information remains legible for everyone.
- Scenario 3: Mixed Use around ~1.0 m. Lean toward the 32″ if your on-screen overlays are dense and text-heavy; if overlays are minimal, the 27″ remains a nimble and efficient option.
- Scenario 4: Forced distance by room layout. If the OR layout consistently forces the cart to be positioned slightly farther away (closer to 1.2 m or beyond), default to the 32″ monitor to maintain readability.
Model picks for global endoscopy towers (Reshin lineup)
The final step is choosing a specific model. With many options on the market, it can be hard to know which monitor delivers on the features discussed, creating purchasing uncertainty.
Validate before you commit. Test your top choice with your actual camera chain to confirm latency, legibility, and glare resistance in your real-world OR environment to ensure a perfect fit.
Before finalizing your purchase order, it is crucial to perform a quick on-site validation. Connect the prospective monitor to your actual endoscopic camera and processor. First, perform a quick end-to-end latency check16 to ensure there is no perceptible lag. Second, display a typical image with overlays and confirm that all text and symbols are clearly legible from your standard working distance. Third, position the monitor under your OR lights and apply a sterile drape to test for glare and reflections. Finally, simulate the PIP, PBP, or quad-view layouts17 you will routinely use to ensure they are practical and easy to interpret. If a 27″ model fails any of these real-world tests at your intended viewing distance, sizing up to a 32″ model is the correct course of action. If the 27″ passes comfortably at close range, it remains an excellent and ergonomically efficient choice for your endoscopy tower. For team-based cases at ≥1.0 m with frequent quad/PIP, consider MS321PB for its balanced multiview experience and OR-friendly design.
Conclusion
Choose a 27″ monitor for close-range solo work and a 32″ monitor for team-based or multiview-heavy procedures to ensure optimal clarity, legibility, and ergonomics in the OR. ⚕️
👉 For expert guidance and Reshin surgical monitor solutions, contact martin@reshinmonitors.com.
-
Explore this link to understand how to optimize your endoscopy tower for better workflow and clinical outcomes. ↩
-
Discover insights on selecting monitors that enhance precision and ergonomics in surgical settings. ↩
-
Explore how a 27″ 4K monitor enhances surgical precision and team collaboration. ↩
-
Learn about the advantages of a 32″ screen for better visibility and teamwork during surgeries. ↩
-
Understanding angular size is crucial for optimizing display legibility, especially in medical settings where precision is vital. ↩
-
Exploring optimal text sizes for overlays can enhance readability and safety in various applications, particularly in surgery. ↩
-
Understanding the ergonomic goal can enhance surgical team performance and comfort, making it essential for optimal operating room design. ↩
-
Exploring the benefits of a 32″ screen can reveal how it improves visibility and reduces strain, crucial for effective surgical teamwork. ↩
-
Explore how a 32″ monitor enhances clarity and efficiency in medical workflows, especially for detailed imaging. ↩
-
Explore this link to understand how optical bonding enhances monitor performance, especially in critical environments like operating rooms. ↩
-
Learn about AR anti-reflection coatings and their importance in reducing glare and improving visibility in bright settings. ↩
-
Understanding the VESA 100×100 mm bolt pattern is essential for ensuring your monitor fits securely with existing equipment. ↩
-
Exploring how a monitor’s weight impacts installation can help you avoid issues like sagging and ensure safety. ↩
-
Explore this link to understand how 12G-SDI enhances video quality and reliability in professional settings. ↩
-
Discover the benefits of HDMI 2.0 and how it can serve as a reliable secondary input for your devices. ↩
-
Understanding end-to-end latency checks is essential for ensuring optimal performance in video systems, especially in medical settings. ↩
-
Exploring quad-view layouts can provide insights into their benefits for surgical monitoring, improving team collaboration and decision-making. ↩