Poorly positioned displays in the operating room cause physical strain, cognitive fatigue, and clinical errors. Staff are forced to crick their necks and squint, compromising focus and safety.
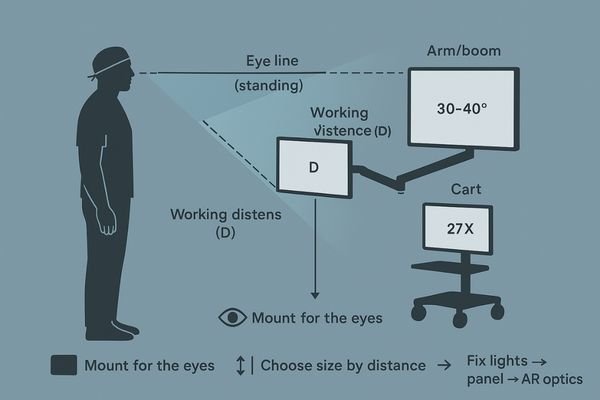
Mount for the eyes, not the wall: center the screen in a 30–40° viewing cone at true working height, then choose 55″ wall for team awareness, ≈32″ arm for reach and mixed views, and ≈27″ cart for tight solo work. Kill glare by fixing lights first, placing the panel second, and letting AR optics finish the job.
The most advanced surgical display is useless if it is not placed correctly. Proper ergonomics are not a final touch-up; they are the foundation of a safe and efficient clinical visual system. The placement of a monitor dictates the physical and mental workload of the entire surgical team. A setup that ignores human factors will inevitably create bottlenecks, increase fatigue, and introduce unnecessary risk. This guide provides a systematic approach to positioning displays—whether on a wall, arm, or cart—based on fundamental ergonomic principles1 to maximize visual performance and minimize strain.
Baseline positioning: eye line, working distance, and viewing cone
It is tempting to mount a screen wherever there is a free wall or a VESA plate. This convenience-first approach ignores the user, forcing them to adapt to a poorly placed display.
Every successful OR layout starts with three numbers: the user’s eye-line height, their primary viewing distance, and a 30–40° central viewing cone. The display’s center must sit within this cone.
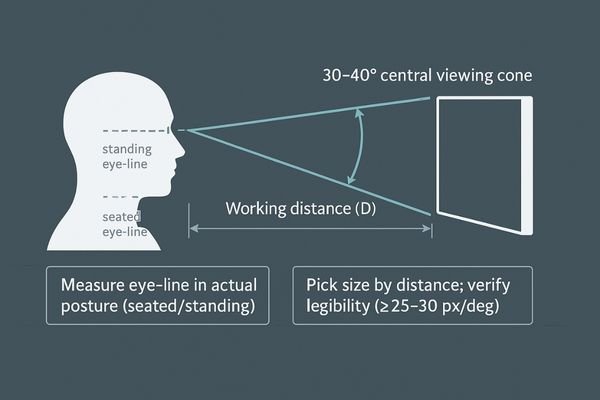
Before any hardware is chosen or installed, I evaluate every OR layout based on three core ergonomic parameters2. These non-negotiable numbers dictate the success of the entire system. The first is the user’s eye-line height at their actual working posture, whether they are standing or sitting. The second is the primary viewing distance, determined by the surgical task and the user’s position relative to the patient. The third, and most critical, is the central viewing cone3, an area extending approximately 30 to 40 degrees horizontally from the user’s eyes. The center of the primary display must be positioned within this cone. If it falls outside this zone, no amount of clever mounting can compensate for the constant neck rotation and wide, fatiguing eye movements that will result. The fundamental rule is to lock in the ergonomics first by defining this geometric relationship. Only then should a screen size and mounting solution be selected to fit that math. Reversing this process—picking a big screen and then trying to make it fit—is a direct path to ergonomic failure.
| Ergonomic Parameter | Definition | OR Application |
|---|---|---|
| Eye Line | The horizontal line from the user’s eyes at their working posture. | Varies significantly between seated (anesthesia) and standing (surgery) roles. |
| Working Distance | The distance from the user’s eyes to the screen surface. | Determines the required screen size and perceived pixel density. |
| Viewing Cone | The 30–40° field of view where the eye can comfortably scan with minimal head movement. | The screen’s central content must be placed within this cone to reduce fatigue. |
Wall-mount rules for team vision (55″): height, offset, tilt, and sightlines
A large wall display is often mounted too high, like a TV in a sports bar. This forces the entire surgical team to crane their necks, causing strain and poor sightlines.
A 55-inch wall mount excels at shared awareness when its center is near the team’s average eye level with a slight downward tilt. Off-axis staff must maintain clear sightlines without entering the sterile field.
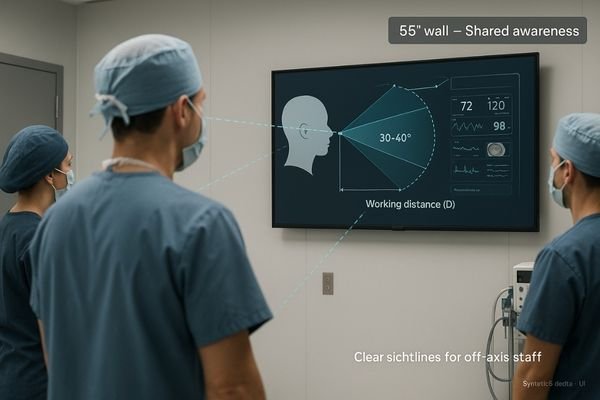
A large, wall-mounted display of around 55 inches is unmatched for providing shared situational awareness4 to an entire surgical team. However, its effectiveness is entirely dependent on its correct placement. The primary rule is to mount the screen so its center is near the average eye level of the standing team members. Mounting it too high is a common and critical error. A slight downward tilt of 5 to 15 degrees is then applied. This does two things: it aligns the screen more directly with the team’s natural line of sight and, crucially, it helps to mitigate specular reflections from overhead OR lights. The placement must also consider sightlines from all key positions in the room, including the anesthesiologist and circulating nurse. These team members must be able to read critical information5, like vitals displayed on a multiview layout, without having to step into the sterile field. A great wall setup, featuring a display like the MS550P with its wide viewing angles, feels effortlessly "visible from anywhere" in a single glance, keeping the whole team synchronized.
Arm-mount ergonomics (≈32″): reach envelope, collision map, and cable discipline
A monitor on an articulating arm provides great flexibility, but can quickly become a hazard. Without proper planning, it can collide with other equipment, present a cable snagging risk, and be difficult to position.
A 32-inch monitor is the sweet spot for arm mounts, balancing size with manageable torque. Map its reach envelope to avoid collisions and enforce strict cable discipline to prevent snags and premature wear.
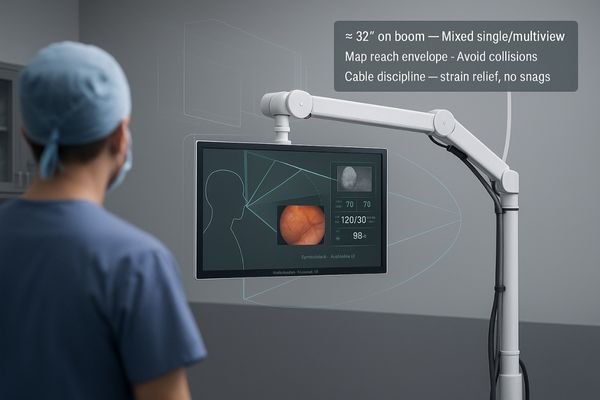
For articulating arms on surgical booms and towers, a screen size of approximately 32 inches offers the best ergonomic balance6. It is large enough to comfortably accommodate occasional PIP/PBP multiview layouts without forcing the user to squint, yet it is small enough to keep the torque on the arm manageable and minimize the risk of collisions. The first step in deploying an arm-mounted display is to meticulously map its full range of motion, or "reach envelope7." This map must be checked against the positions of all other critical equipment, including overhead lights, other booms, and anesthesia machines, to identify potential collision points. The next step is cable discipline. Video and power cables must be routed cleanly along the arm’s channels, leaving just enough slack for full articulation without creating hanging loops that can be snagged or pinched. If the monitor, like a MS322PB model, cannot be moved to its working position and returned to its "parked" position quickly, smoothly, and repeatably, the clinical team will end up fighting the hardware instead of using it.
Cart workflows (≈27″): mobility vs. stability and sterile handling
Mobile carts offer flexibility but introduce their own ergonomic challenges. An unstable, top-heavy cart is a safety hazard, and a poorly positioned screen can obstruct views or be difficult to manage.
A 27-inch screen is ideal for carts, balancing a compact footprint with sufficient viewing area. Prioritize a low center of gravity for stability and ensure handles allow for clean, sterile repositioning.
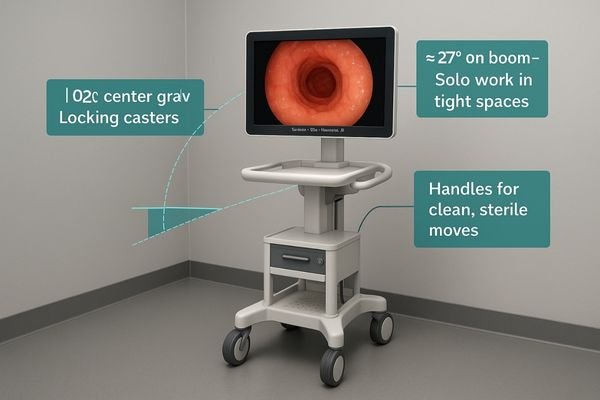
Mobile carts live and die by the balance between mobility and stability. For this application, a screen size of around 27 inches8 provides an optimal solution. It is large enough for clear viewing in a solo or small-group setting but compact enough to keep the cart’s center of gravity low, reducing the risk of tipping during transport through corridors. The smaller size also minimizes eye and neck travel for the operator, who is often working in a tight space right next to the cart. Ergonomic design must extend to the cart itself. It should have large, smooth-rolling casters and dedicated handles that allow for easy repositioning by a gloved, sterile, or non-sterile user without needing to touch the screen itself. The parking protocol for the cart is just as important as for a boom arm; it must be positioned so the panel sits squarely within the primary user’s viewing cone without shadowing the surgical field. If a display like the MS270P cannot be adjusted cleanly and safely with one hand, the cart risks becoming a piece of clutter rather than a capable clinical tool.
Glare control that actually works: AR optics × room lights × screen placement
Glare is a constant enemy of clarity in the OR, but simply buying an "anti-glare" screen is rarely a complete solution. Reflections from various sources can still wash out the image.
Effective glare control is a three-part system: first, optimize room lighting to eliminate hot spots. Second, position the screen to avoid specular paths. Third, let high-quality anti-reflection (AR) optics do the final work.
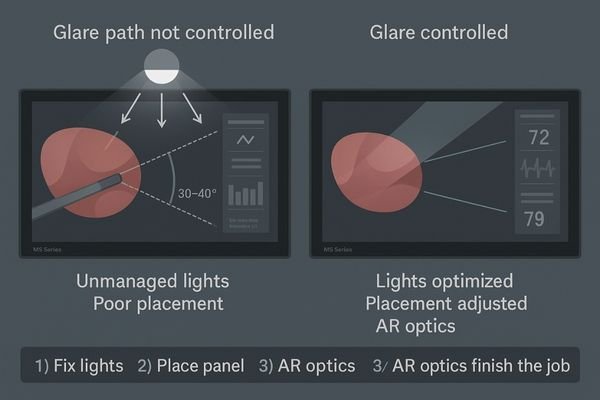
Controlling glare is a systematic process, not a single feature. It is a three-way handshake between lighting, placement, and optics. Simply relying on the display’s anti-reflection coating9 to solve all problems is a common mistake that treats the symptom, not the cause. The first and most important step is to control the ambient lighting10 in the room itself. Adjust or aim surgical and room lights to avoid creating bright "hot spots" on surfaces behind the viewers, as these will be reflected in the screen. The second step is screen placement. Position the monitor and its mount to physically dodge the most direct specular reflection paths from the primary light sources. Distance is an amplifier of glare; the farther a viewer is from the screen, the more of the surrounding room is reflected in its surface. Only after these two foundational steps are complete should you rely on the display’s optics to finish the job. A screen with a high-quality, anti-reflection, optically bonded front glass, found on models like the MS220SA, is essential for taming residual reflections and maximizing contrast.
Conclusion
Proper ergonomics are a non-negotiable foundation for safety and efficiency, achieved by fitting the technology to the user, not the other way around. 🧑⚕️
👉 For ergonomic medical display solutions and expert guidance, contact martin@reshinmonitors.com.
-
Exploring ergonomic principles helps optimize display placement, improving visual performance and reducing strain during surgical procedures. ↩
-
Understanding ergonomic parameters is crucial for optimizing OR layouts, ensuring comfort and efficiency for surgical teams. ↩
-
Exploring the concept of the central viewing cone can enhance your knowledge of optimal display positioning for better user experience. ↩
-
Understanding shared situational awareness can enhance team coordination and improve surgical outcomes. ↩
-
Exploring effective ways to display critical information can optimize communication and efficiency in surgical settings. ↩
-
Understanding ergonomic balance can enhance user comfort and efficiency in surgical settings. ↩
-
Mapping the reach envelope is crucial for preventing collisions and ensuring optimal equipment placement. ↩
-
Discover why a 27-inch screen is ideal for mobility and stability in clinical environments. ↩
-
Exploring the effectiveness of anti-reflection coatings can help you make informed decisions about display technology. ↩
-
Understanding ambient lighting’s role can significantly enhance your glare control strategies, improving viewing comfort. ↩