PACS vendors struggle with inconsistent image quality while KVM providers face latency complaints. Why do these integration challenges persist despite using certified components? Where are the technical boundaries breaking down in real-world implementations?
Simplifying PACS–KVM–diagnostic monitor integration means designing the whole chain around diagnostic monitors as managed endpoints, with clear technical boundaries, standardized configurations and shared workflows, so image quality, latency and control issues are solved system-wide instead of treated as isolated device problems.
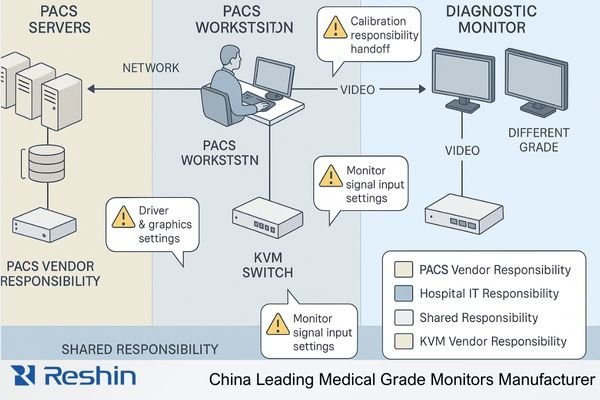
Medical imaging environments present unique integration challenges that extend beyond typical IT infrastructure projects. As healthcare facilities expand their diagnostic capabilities and consolidate reading operations, the complexity of integrating Picture Archiving and Communication Systems (PACS), Keyboard-Video-Mouse (KVM) solutions1, and diagnostic monitors increases exponentially. In my work as a Reshin engineer supporting PACS vendors and KVM switch providers, I see that most issues appear where responsibilities overlap on the monitor side—output settings, signal paths, and calibration behavior. This article examines practical approaches for simplifying PACS–KVM–diagnostic monitor integration, focusing on how clearly defined boundaries and well-configured diagnostic monitors can create stable, maintainable visualization environments across radiology and clinical workstations.
Understanding real-world workstation integration pain points for PACS and KVM vendors
Integration issues frequently emerge after installation when all components appear to meet specifications individually, yet the system performs inconsistently as a whole. Why do technically compliant solutions still create workflow friction in clinical environments?
In real PACS workstation projects with KVM switches and diagnostic monitors, I find that each team optimizes for different risks—image quality, latency, security or support—and the gaps between these priorities create most integration failures. Unless we define clear monitor-side boundaries, every issue becomes a blame game instead of a solvable engineering problem.

Conflicting Priorities in Diagnostic Visualization
The fundamental integration challenge stems from divergent priorities among stakeholders:
| Stakeholder | Primary Concerns | Technical Focus | Risk Perception |
|---|---|---|---|
| PACS Vendor | DICOM compliance2, Image consistency, Workflow efficiency | Software rendering, DICOM calibration, Study loading performance | Image quality inconsistencies across workstations |
| KVM Vendor | Switching performance, Signal integrity, Remote access | Extension distance, Matrix switching, User experience consistency | Latency, signal degradation, control responsiveness |
| Hospital IT | Standardization, Maintainability, Security compliance | Driver compatibility, Asset management, Update procedures | Support burden, system longevity, compatibility issues |
| Radiologists | Diagnostic accuracy, Reading efficiency, Consistency across workstations | Image quality, Tool accessibility, Session persistence | Workflow interruptions, reading inconsistencies |
These divergent priorities create a fragmented approach to integration, with each stakeholder optimizing for their specific concerns without addressing system-level interactions. The diagnostic monitor—positioned at the critical endpoint of this complex PACS–KVM–workstation chain—often becomes the focus of blame when issues arise, despite many problems originating elsewhere in the signal path. In my projects, we reduce this friction by turning these concerns into explicit, shared requirements before deployment, not after incidents.
Establishing Technical Boundaries and Responsibilities
Successful integration begins by explicitly defining boundaries and responsibilities across the visualization chain:
-
Signal Source Responsibilities (PACS workstation):
- Graphics driver configuration and stability
- Output resolution and refresh rate compliance
- Color management settings and consistency
-
Signal Distribution Responsibilities (KVM system):
- Signal integrity maintenance across distance
- Interface compatibility with source and destination
- Switching performance and control reliability
-
Endpoint Responsibilities (Diagnostic monitor):
- Interface support and signal acceptance
- DICOM calibration and consistency
- On-Screen Display (OSD) and control accessibility
By documenting these boundaries explicitly and creating a shared technical reference architecture, integration partners establish a framework for both implementation and troubleshooting that prevents the common "finger-pointing" scenario when issues arise. In practice, I usually capture this as a one-page “responsibility matrix” that all vendors sign off before go-live, so everyone knows what will be checked at the PACS workstation, KVM switch and diagnostic monitor endpoints.
Standardizing diagnostic monitor configurations across mixed workstation fleets
Healthcare facilities rarely enjoy homogeneous workstation environments, creating significant configuration challenges. How can PACS and KVM vendors ensure consistent visualization across diverse hardware generations and configurations?
In multi-site, multi-vendor diagnostic workstation environments, I often find that hardware is not the main problem—configuration chaos is. Without a unified diagnostic display policy for radiology and clinical roles, PACS and KVM vendors cannot guarantee consistent image quality or supportability across mixed diagnostic monitors and office screens.
Creating a Comprehensive Display Policy
The foundation for standardization is a formal display policy that addresses both hardware selection and configuration parameters:
-
Role-Based Monitor Assignment:
- Define specific monitor resolutions by clinical role
- Document minimum specifications for each diagnostic tier
- Establish standard monitor counts for each workstation type
-
Standard Configuration Parameters:
- Default resolution and scaling settings
- Color temperature and white point (typically 6500K)
- DICOM calibration targets and validation procedures
- Ambient light compensation settings
-
Calibration and Quality Assurance Protocol3:
- Initial calibration procedures and documentation
- Regular conformance testing schedule
- Acceptance criteria for ongoing quality assurance
- Remediation process for out-of-compliance monitors
This policy document serves as the technical foundation for standardization, providing clear guidelines that can be referenced in PACS configuration, KVM setup, and IT management procedures. In several deployments, we keep this as a controlled “Diagnostic Display Policy” document in the hospital IT knowledge base and require any new PACS workstation or KVM extension to comply before being accepted.
Implementing Configuration Templates
To operationalize the display policy, create standardized configuration templates that can be applied consistently across the diagnostic monitor fleet:
-
Template Components:
- Monitor preset definitions
- OSD menu configuration
- Input priority settings
- Calibration parameters
- Power management behavior
-
Documentation Requirements:
- Explicit version control for all templates
- Change management procedures
- Validation methodologies for each template
- Exception handling process
By establishing these templates as formal configuration artifacts within the project, all integration partners gain a common reference point for setup and validation, significantly reducing the variability that typically causes both implementation and support challenges. In my integration work, we often bundle these templates into a “golden workstation image” plus a monitor configuration sheet, so PACS, KVM and IT teams can reproduce the same settings across sites.
Distributors and integration partners who struggle with monitor configuration can work with manufacturer engineering teams, such as Reshin’s diagnostic display specialists, to co-develop display policies and templates that match their PACS workstations, KVM switches and radiology workflows.
Reducing signal and interface complexity at the monitor endpoint
Interface proliferation creates compatibility challenges that complicate both implementation and support. How can PACS and KVM vendors establish a manageable interface strategy that accommodates legacy systems while providing a path toward standardization?
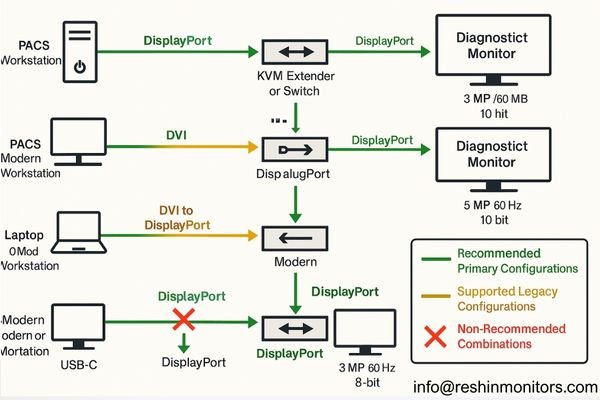
When I audit PACS–KVM–monitor installations, the most common pattern is interface chaos: VGA, DVI, DP, USB-C and multiple resolutions mixed in one radiology floor. To simplify diagnostic monitor integration, I push for a small set of preferred signal paths and validated profiles, so teams debug known patterns instead of endless combinations.
Establishing Interface Standards
The first step toward simplification is establishing clear interface standards that apply across the diagnostic environment:
-
Primary Interface Selection:
- Designate a primary interface technology (typically DisplayPort) for all new installations
- Document resolution, refresh rate, and color depth capabilities for this interface
- Establish cable quality and length standards for reliable operation
-
- Define supported legacy interfaces (DVI, VGA) with clear limitations
- Document standardized conversion approaches for each legacy format
- Establish validation procedures for converted signals
-
Conversion Discipline:
- Limit conversion to a single stage whenever possible
- Standardize on specific converter models/types
- Document signal characteristics before and after conversion
- Test and validate converted signals under actual operating conditions
Creating Validated Configuration Profiles
Rather than supporting unlimited combinations, establish specific configuration profiles that have been fully validated:
| Profile Name | Source Interface | Monitor Interface | Resolution | Refresh Rate | Validated Extension | Notes |
|---|---|---|---|---|---|---|
| Standard DP | DisplayPort 1.2+ | DisplayPort | Native | 60Hz | Up to 100m (fiber) | Preferred configuration for all new installations |
| Legacy DVI | Dual-Link DVI | DVI or DP | Up to 4MP | 60Hz | Up to 50m | Requires validated active DVI→DP converter at monitor |
| USB-C Workstation | USB-C/TB | DisplayPort | Native | 60Hz | Not recommended | Direct connection only, no KVM extension |
| Extended Reach | DisplayPort | DisplayPort | Native | 60Hz | Up to 300m | Requires specific extender models with validation |
By limiting supported configurations to these validated profiles, integration teams can focus on robust implementation of standard patterns rather than troubleshooting unlimited combinations. In real projects, I convert these profiles into a one-page “approved signal paths” chart that PACS, KVM and hospital IT teams keep at the rack, so any new diagnostic workstation connection must match one of the allowed patterns.
Technical integration alone doesn’t guarantee an effective clinical solution without addressing workflow alignment. How can vendors collaborate to create cohesive user experiences that transcend individual product boundaries?
On paper, PACS, KVM and diagnostic monitors can all be “integrated”, but radiologists only feel that integration when their daily reading workflow is smooth. I usually bring all vendors to the same whiteboard, map a full diagnostic day, and turn user actions into concrete button presses, hotkeys and monitor behavior that work consistently across systems.

Developing Unified Workflow Documentation
Effective workflow alignment begins with comprehensive documentation that spans all components:
-
- Document complete radiologist workflow sequences
- Identify transition points between systems
- Capture control expectations at each stage
- Highlight critical quality dependencies
-
Interface Control Documentation:
- Define consistent hotkey behaviors across systems
- Document display control sequences
- Specify expected system responses to user actions
- Create clear control boundaries between components
This unified documentation serves as both design guidance and validation criteria, ensuring that all components work together to support the radiologist’s actual workflow rather than forcing adaptation to disjointed systems. In practice, I treat this as a “radiologist workflow spec” that sits alongside PACS workstation and KVM configuration guides, so any future change must still respect the agreed control flows on diagnostic monitors.
Collaborative Configuration Planning
Beyond documentation, successful workflow integration requires collaborative configuration planning:
-
Joint Configuration Sessions:
- Conduct multi-vendor configuration workshops
- Test actual workflow sequences during setup
- Document configuration dependencies between systems
- Create shared validation checklists
-
User Experience Testing:
- Validate complete workflows, not isolated functions
- Test under realistic conditions with clinical users
- Measure transition performance between components
- Document any workflow compromises for user training
By approaching configuration as a collaborative process focused on end-to-end workflows rather than isolated component setup, integration partners create solutions that provide seamless user experiences across technical boundaries. When we run these joint sessions before go-live, most unexpected behaviors surface early, and the final PACS–KVM–monitor integration feels much more like a coherent diagnostic workstation system than three separate products.
Reshin diagnostic monitors for PACS and KVM workstation projects
Diagnostic monitor selection should align with both clinical requirements and the broader technical integration strategy. Which monitor capabilities facilitate integration while meeting diverse clinical needs across the diagnostic enterprise?
When we move into concrete product selection, I rarely ask PACS or KVM partners to start from a raw model list. Instead, we first define diagnostic display tiers by use case—primary reading rooms, general review seats, shared quick-read points and clinical evaluation endpoints—and then map each tier to a small set of Reshin diagnostic monitors that are easy to integrate with PACS workstations and KVM switches.
From my side as a Reshin engineer, I treat our diagnostic portfolio as an integration toolkit rather than a catalog. The MD-series monitors are designed with PACS workstations and KVM switches in mind: stable behavior under long reading sessions, DICOM-oriented calibration support, consistent interface options across generations, and lifecycles planned for multi-year enterprise deployments. This lets PACS and KVM vendors build standard workstation “patterns” around a few well-understood monitors instead of constantly adapting to random screens.
To make this practical for project teams, I usually group Reshin diagnostic monitors by clinical role and integration profile—primary diagnostic reading, clinical review, secondary review and technical testing. The table below summarizes how typical roles, usage patterns and display requirements map to specific models, together with the integration angle I emphasize when working with PACS and KVM partners.
| Clinical Role | Usage Pattern | Display Requirements | Recommended Models | Key Integration Considerations |
|---|---|---|---|---|
| Primary Diagnostic Reading | High-volume primary reading, complex radiology cases | 5MP diagnostic grade, accurate grayscale, DICOM-oriented setup | MD52G | 24/7 reading rooms, validated with PACS workstations and KVM signal paths |
| Primary Diagnostic Reading | Daily multi-modality radiology reading, dual-head use | High-resolution color, stable DICOM calibration, wide viewing | MD45C | Flexible choice for mixed PACS fleets, easy mapping into KVM matrices |
| Primary Diagnostic Reading | Mammography and cross-modality PACS reading | 5MP color, fine detail rendering, consistent luminance | MD50C | Suited for breast imaging workflows, clear primary endpoint in PACS–KVM designs |
| Clinical Review & Assessment | Routine clinical review and second-look reading | 3MP/4MP class, comfortable viewing, DICOM-aware presets | MD32C | Common review seat choice, simple integration with existing PACS clients |
| Clinical Review & Assessment | Shared review workstation across departments | Diagnostic-leaning resolution, good color/gray balance | MD33G | Fits mixed clinical roles, works well with KVM-shared review stations |
| Secondary Clinical Review | Occasional image look-up by clinicians | Clinical review grade, sufficient grayscale consistency | MD26GA | Easy drop-in for office PCs, low-overhead QA and configuration |
| Secondary Clinical Review | Referring physician and ward-side viewing | Clinical review grade, focus on readability and comfort | MD26C | Lightweight option for non-diagnostic areas, minimal PACS/KVM setup effort |
| Technical Testing & Training | Lab validation, classroom and demo workstations | Standard clinical/commercial panel, stable behavior | Varies by requirement | Used as reference screens for PACS workstation and KVM integration tests |
Specific resolutions, brightness levels and certifications for these models are subject to official Reshin datasheets; numerical parameters in this article are indicative of diagnostic tiers rather than exhaustive specifications.
MD50C, for example, is a 5MP color diagnostic medical display designed for mammography and PACS workstations, compliant with DICOM standards and equipped with DP/DVI/VGA interfaces, making it suitable as a primary diagnostic endpoint in integration projects where high-resolution breast imaging and radiology reading share the same workstation infrastructure.
Integration-Optimized Features
Beyond basic specifications, several monitor features significantly impact integration success:
-
Standardized Interface Support:
- Native DisplayPort connectivity for modern PACS workstations and KVM switches
- DVI compatibility for legacy systems where still required
- USB hub functionality for peripheral management when appropriate
-
Calibration Management:
- Support for DICOM-oriented calibration workflows
- Options for automated stability checks (such as front sensors where available)
- Calibration logging and reporting capabilities
- Integration with QA software platforms used by radiology departments
-
Multi-System Compatibility:
- Input detection and switching logic that cooperates with KVM behavior
- Profile management for multiple users/systems in shared reading rooms
- Control consistency across operating modes
- Power management that behaves predictably with PACS workstations and KVM extenders
By selecting diagnostic monitors with these integration-oriented characteristics, project teams can significantly reduce implementation complexity while ensuring consistent performance across diverse clinical environments. The Reshin diagnostic monitor portfolio is designed with these integration factors in mind, providing stable endpoints that simplify both PACS–KVM deployment and long-term workstation support.
Conclusion
From an integration engineering perspective, most problems between PACS workstations, KVM switches and diagnostic monitors come from unclear boundaries and inconsistent configurations rather than from any single device. In my work with PACS and KVM vendors, the most sustainable results come when we treat diagnostic monitors as managed endpoints with agreed policies, standardized signal paths, shared workflow documentation and clearly mapped product tiers that match real radiology and clinical use cases.
Reshin is a China-based manufacturer of medical-grade diagnostic displays, working closely with PACS and KVM partners to design, test and support integrated workstation solutions for hospitals and imaging centers. Our engineering team can join your projects early to help define responsibilities, create display policies and select suitable models such as MD52G, MD45C and MD50C for primary reading roles—if you are planning or optimizing PACS–KVM–monitor deployments, you are welcome to contact us for technical collaboration and solution support.
✉️ info@reshinmonitors.com
🌐 https://reshinmonitors.com
-
Discover how KVM solutions can optimize your medical imaging workflows, improving efficiency and user experience. ↩
-
Understanding DICOM compliance is crucial for ensuring interoperability and quality in medical imaging systems. ↩
-
Understanding these protocols is crucial for maintaining high standards in medical imaging, ensuring accurate diagnostics. ↩
-
Exploring effective Legacy Support Strategies ensures compatibility and smooth transitions in your technology upgrades. ↩
-
Explore this link to understand how User Journey Mapping enhances workflow efficiency and improves patient care. ↩